Need to submit a JPG as a PDF for an online application? This guide shows how to convert the image without cropping important details, check the page size and file size, and verify the final PDF before uploading it.
The conversion is the short part: one image becomes one page, and on a desktop it takes three clicks. What decides whether the file is accepted sits around it — the page the reviewer ends up looking at, the text that has to stay readable under a size cap, and the check you run before pressing submit.
This guide is for preparing one JPG as an application-ready PDF. If you need to combine several JPG files into one PDF, use the separate guide for merging multiple images into one PDF; that job is about page order and batch selection. This page leaves out filling in the form, adding a signature, and attaching files inside a PDF.
Read the Form Before You Convert
An application portal states conditions rather than "attach a file", and each condition changes what you build. Note five answers first:
- Format. "PDF only" rules the photo out as it stands; where JPG and PDF are both listed, converting is optional.
- Size cap. Applies to the file you upload, not to the photo on your phone.
- One file per document, or one in total. Separate slots — "photo ID", "proof of address" — mean one document per PDF. Two sides of one ID are two images, which makes it the combining job.
- Page count. Whether a single page is expected or a longer file is allowed.
- Quality wording. "Clear colour copy", "all four corners visible" describe the photograph; no converter adds them afterwards.
Step 1: Check the Format, Size Cap, and File Count
The sample page below shows how specific these rules get: PDF only, a 5 MB ceiling, one document for the section, A4 or Letter preferred, text that must be clearly readable. Two of those answers decide the rest of this page: whether the JPG has to become a PDF at all, and whether one photo is the whole job.
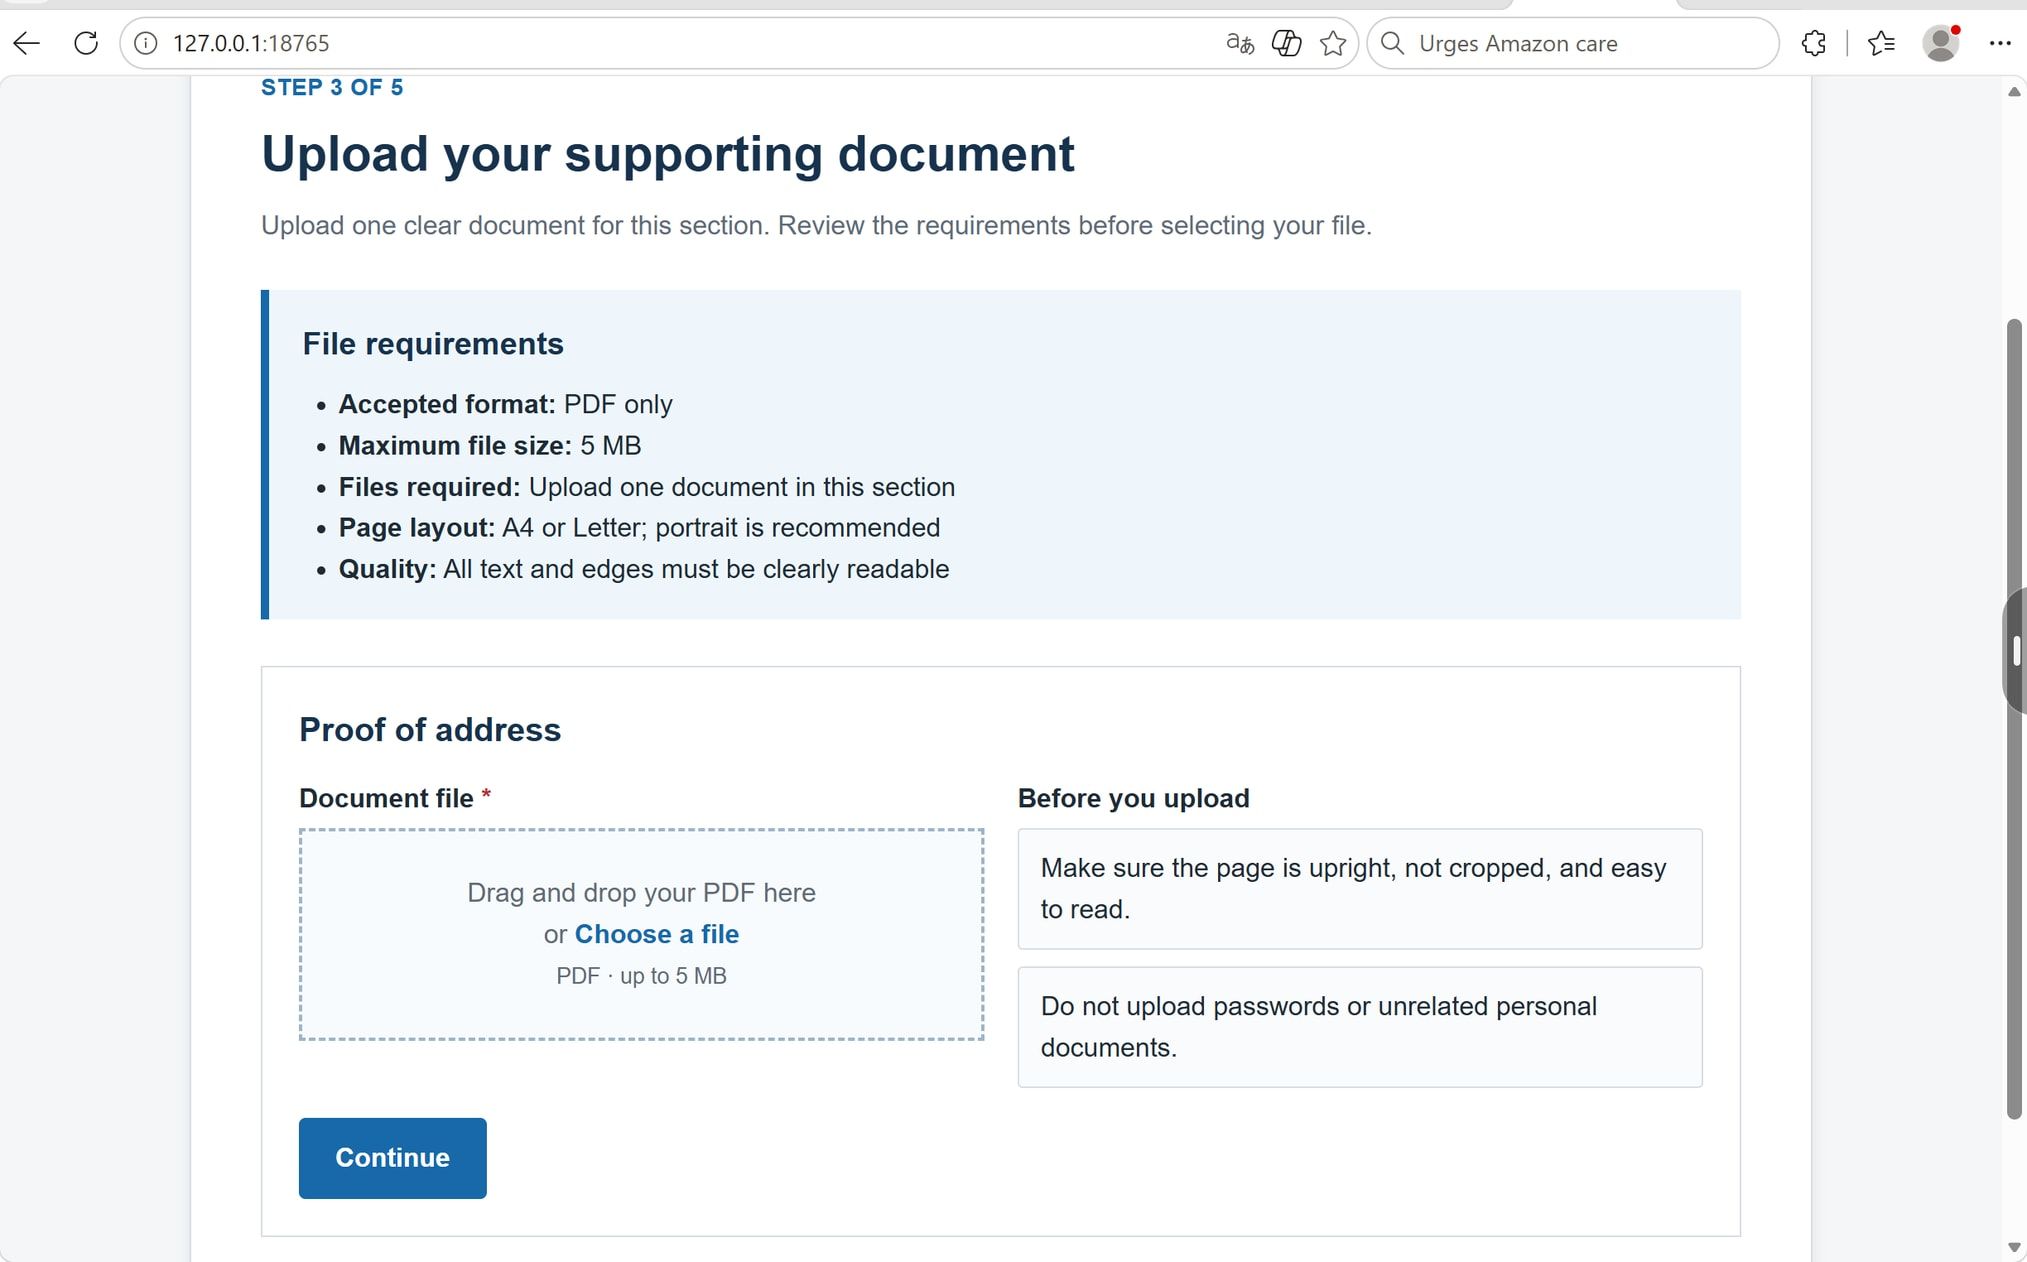
That page is a sample built for this walkthrough, not a real agency's portal. Read the same fields on the form you are actually submitting.
Choose the Page Size the Reviewer Sees
A converted JPG produces a page, and the page's size decides how the file gets read.
The image's own size. The browser JPG to PDF tool sizes the page from the image's pixel dimensions at 72 dpi, so a phone photo can come out several times larger than A4. Nothing is lost or cropped, but a portal scales that page into its preview pane, and a printer scales it onto paper.
A4 or Letter. Forms name a paper size when the file will be printed or filed. The desktop Image to PDF window keeps the page fields — size, orientation, margin — under Output settings, so the page can be set before the conversion. Where there is no paper-size field, convert first, then print the PDF to a PDF printer set to A4 with Fit scaling.
Letter instead of A4. Letter is 216 × 279 mm, A4 is 210 × 297 mm; on screen the difference is cosmetic, so send whichever the form names.
If the photo is landscape and the form asks for portrait, rotate it before converting. Once the image sits on a paper-size page it is smaller than in the file, so recheck the smallest text afterwards.
Keep It Legible Under the Size Cap
Conversion does not shrink the picture. The PDF is built from the same pixels, so its size tracks the JPG's, a little larger at most.
- Shrinking the image. Cuts the pixel count once, evenly; halving both sides leaves a quarter of the pixels. Do it from the original, then convert that copy.
- Re-saving at a lower JPEG quality. Also smaller, but the damage lands on thin strokes and edges first, and each pass re-encodes what the last one already damaged.
- Upscaling to "sharpen" it. Adds pixels without adding information, and grows the file. Never the fix for a soft photo.
Two things no setting repairs: a photo taken at an angle stays at an angle, and a page built from a JPG has no text layer, so its words are not searchable. Read the size from the file's properties, and check sharpness at 100 percent rather than fit-to-window: a page that looks soft when fitted is often fine at actual size.
Take Out What the Form Did Not Ask For
A proof of address often carries an account number and a full transaction list; an ID carries an ID number. The form needs the address, not the account.
- Cropping removes the pixels. Best when the needed part sits in one region; confirm at 100 percent that nothing required went with it.
- A white box in a PDF viewer is usually an annotation drawn on top of the page: the text underneath stays in the file, selectable and copyable. Whiteout versus redaction explains why that matters.
- Painting over it in an image editor on a JPG replaces pixels — real removal, provided the saved copy is flat and you convert that copy rather than the original beside it.
Do not attach the untouched JPG "just in case": the uploaded file is the one that counts. And a PDF is not a privacy filter — whatever the pixels show stays visible on the page.
Convert the Prepared JPG
The run below is the Windows desktop app, converting one JPG that had already been checked for page size, legibility, and content.
Step 2: Open the Image to PDF Tool
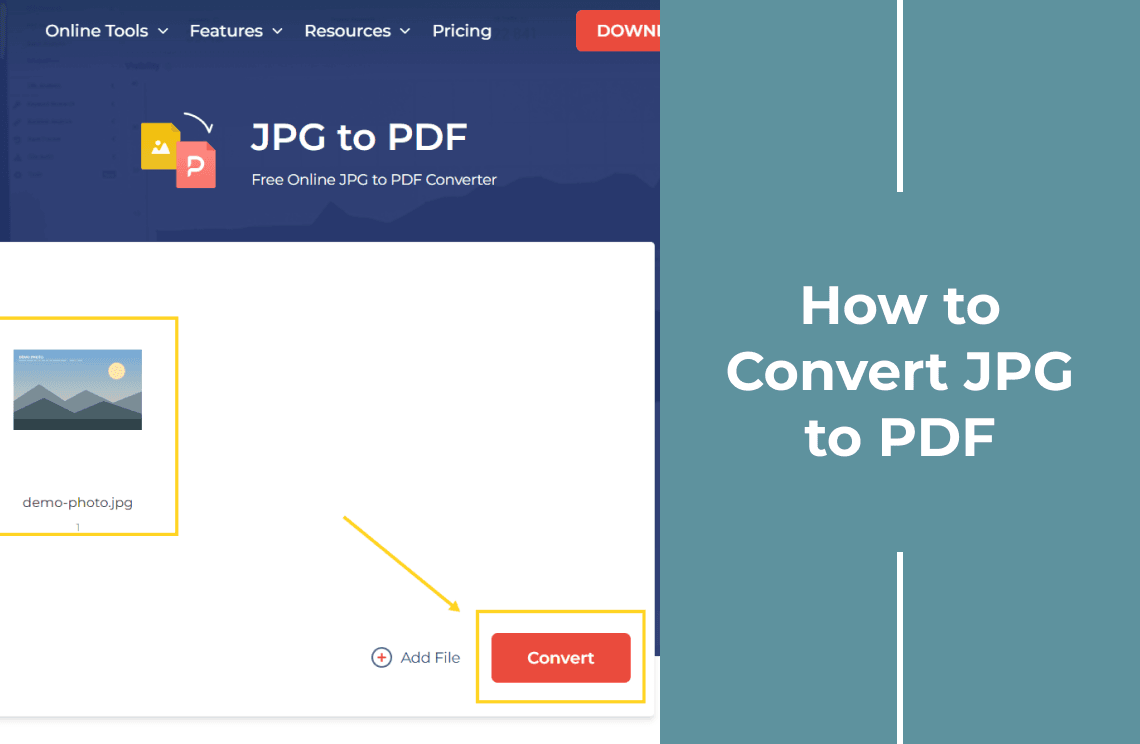
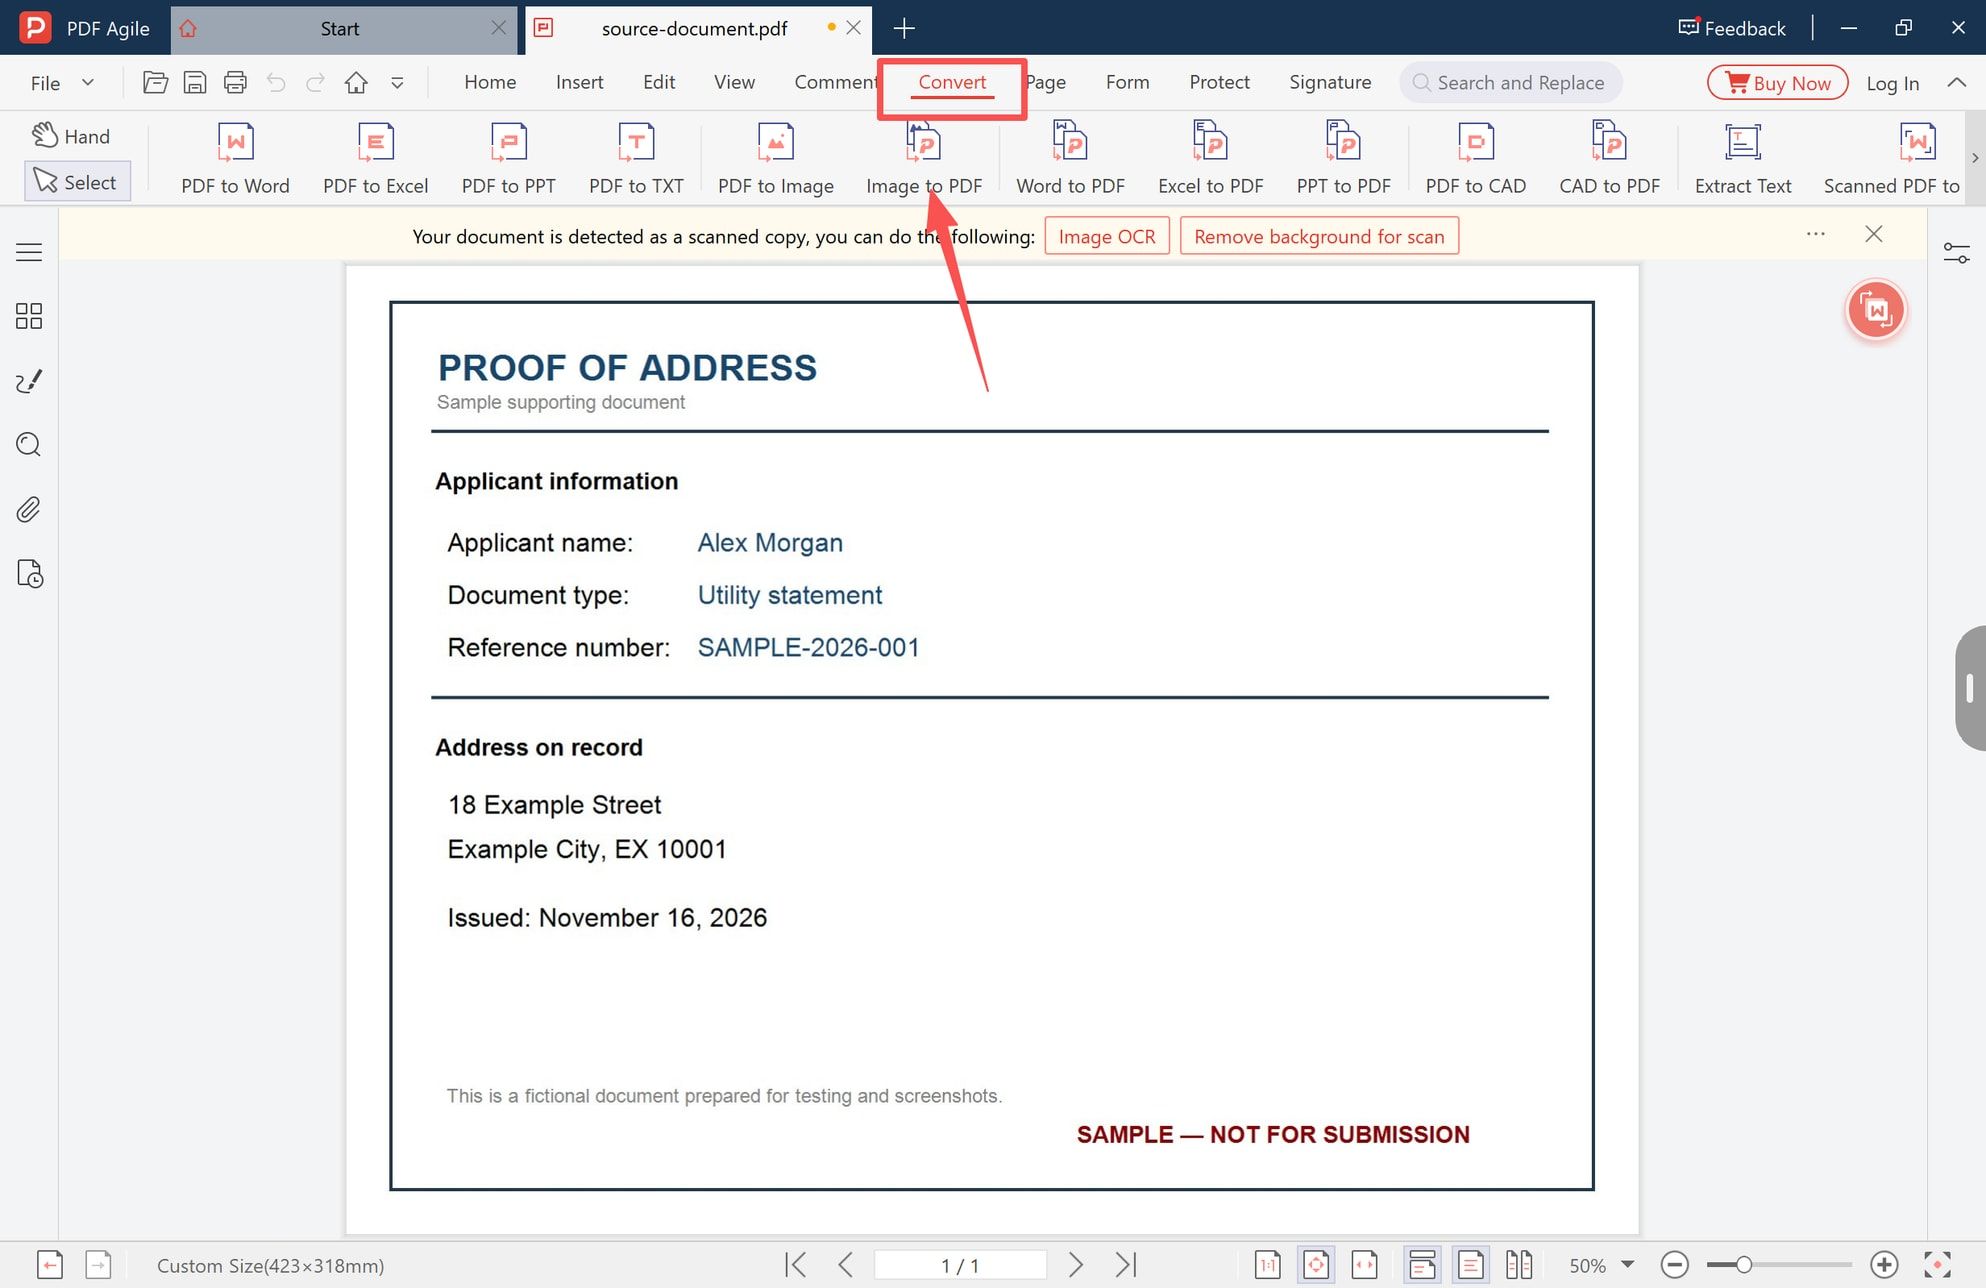
Open PDF Agile and switch to the Convert tab. The ribbon runs the conversions out of PDF first — PDF to Word, PDF to Excel, PDF to PPT, PDF to TXT, PDF to Image — then the ones that build a PDF: Image to PDF, Word to PDF, Excel to PDF, PPT to PDF, CAD to PDF. Image to PDF turns a picture into a page.
Step 3: Add the JPG File
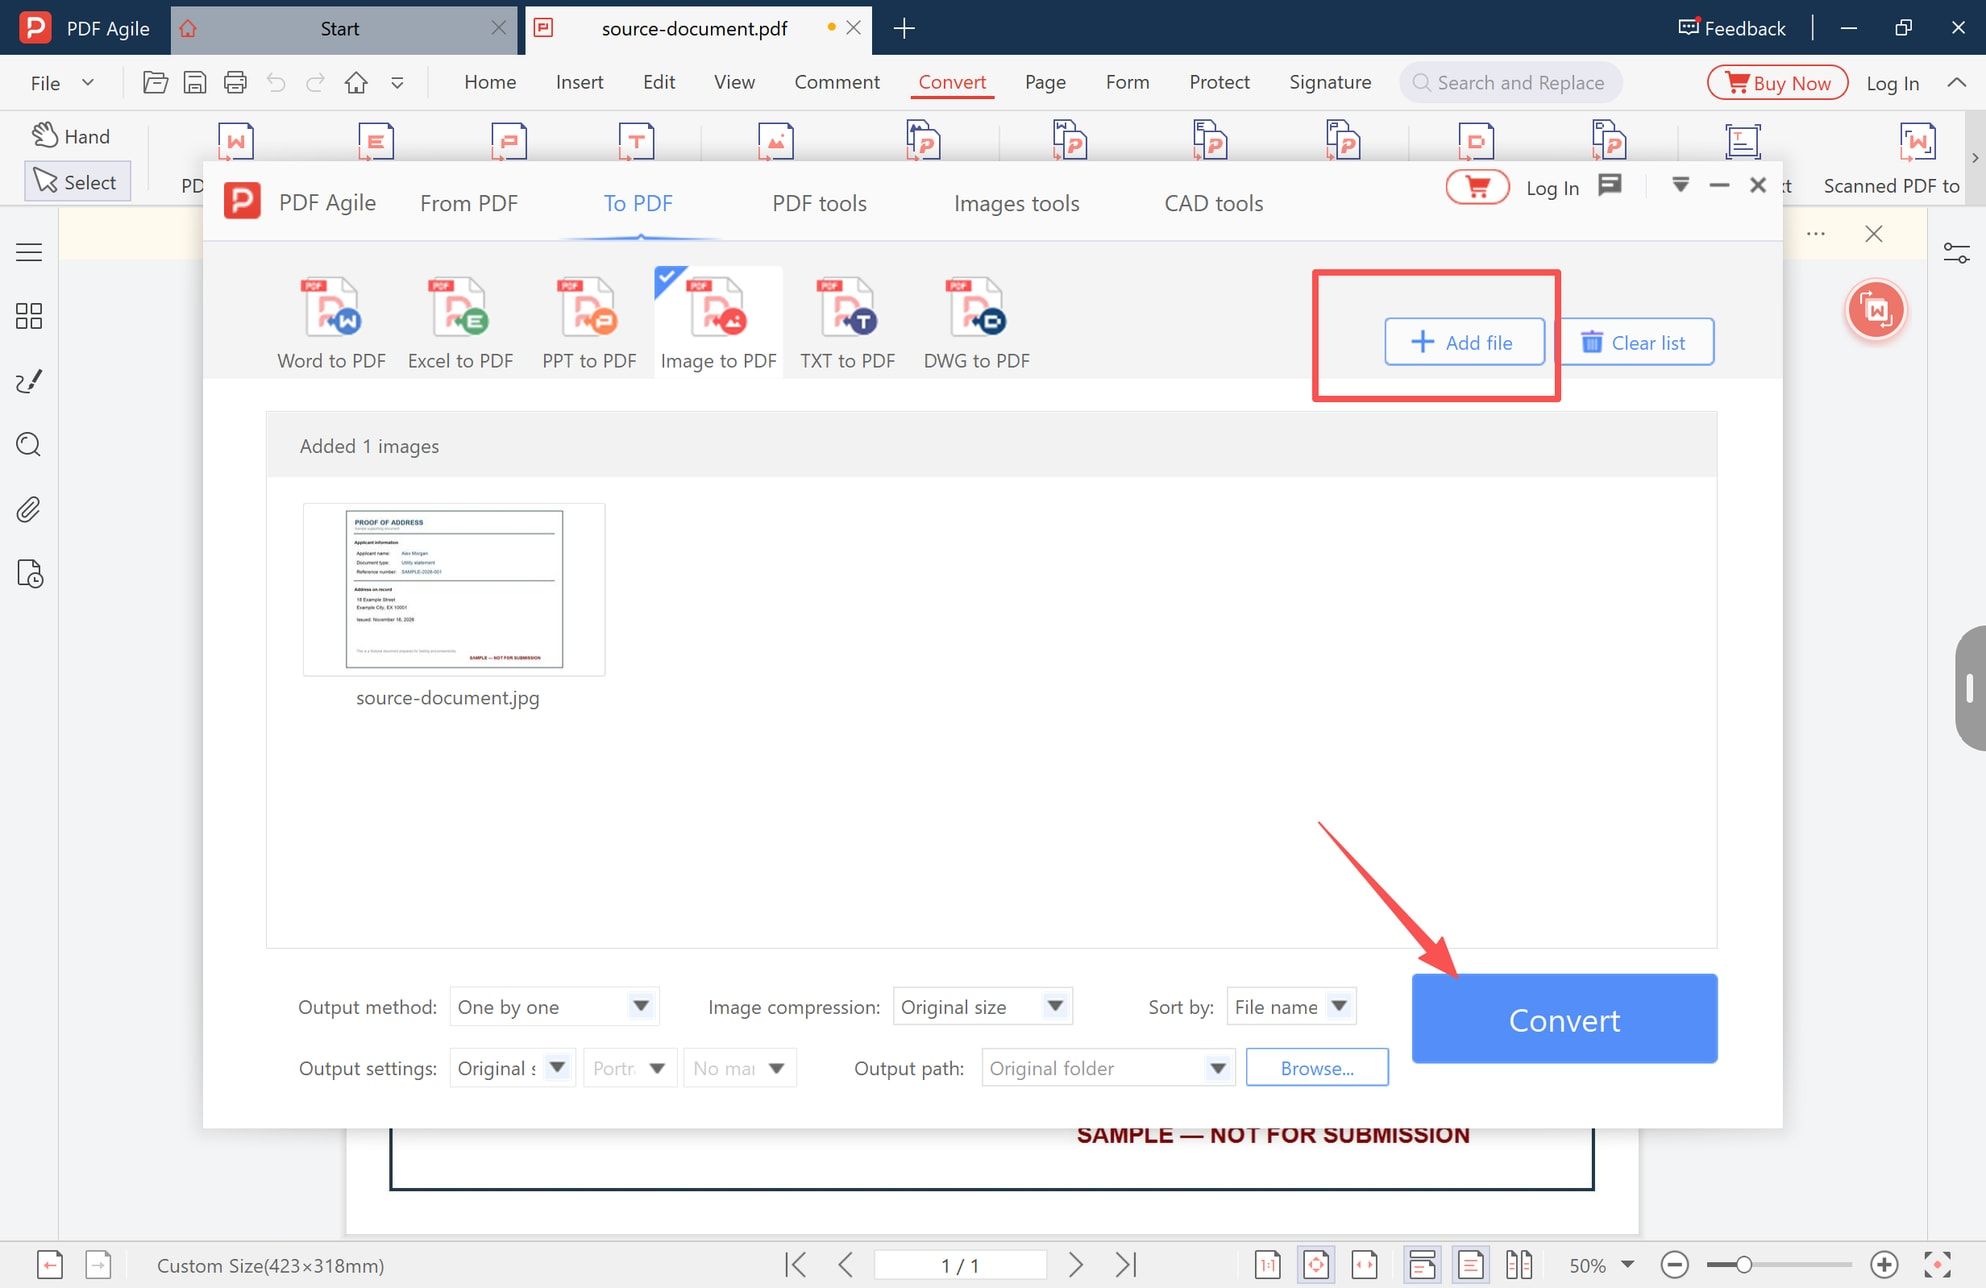
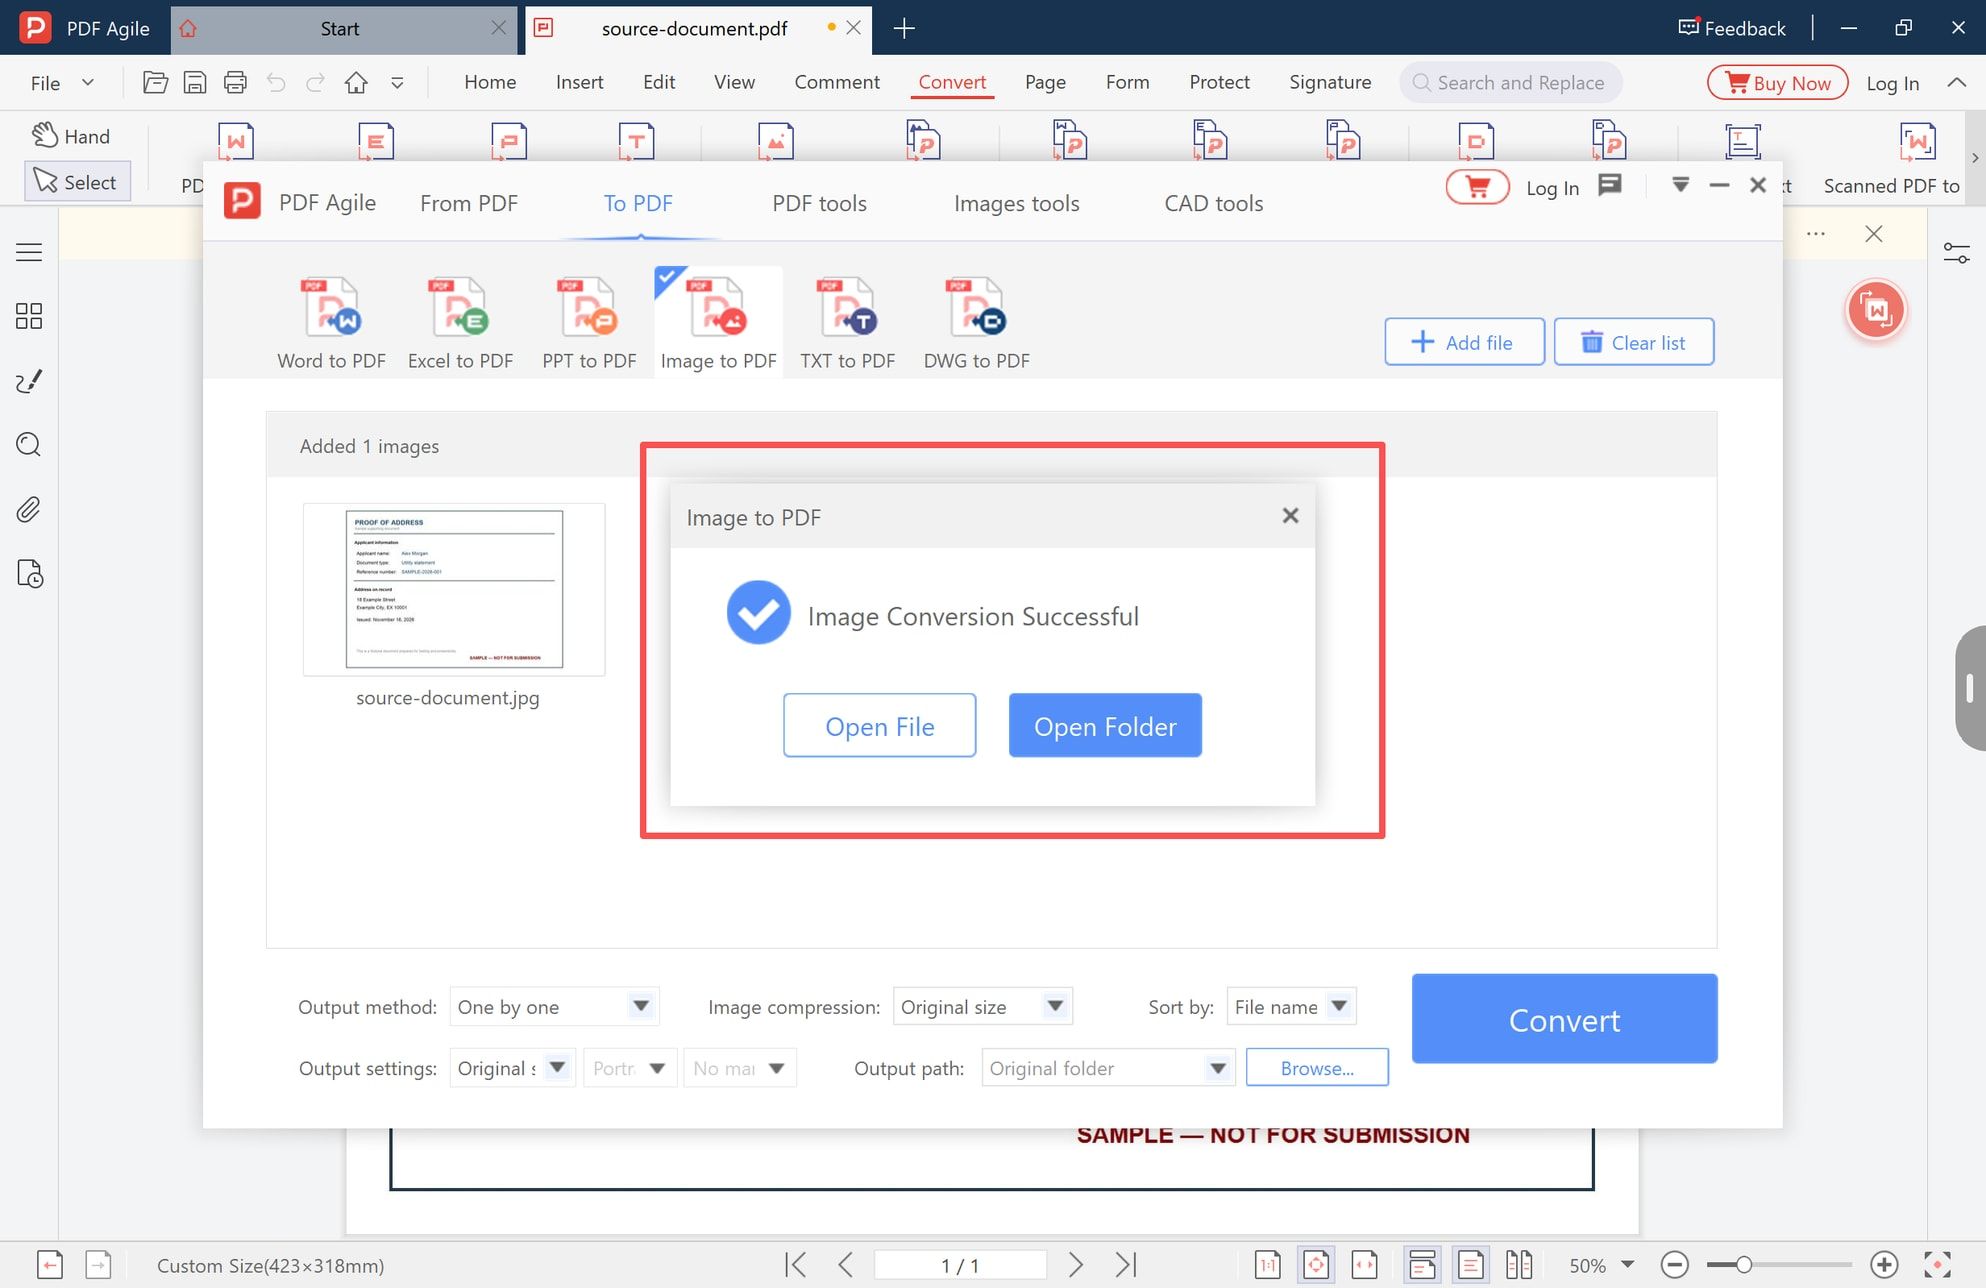
In the Image to PDF window, click + Add file and select the single JPG. The panel confirms the count — "Added 1 images" here — and shows the page you are about to create. If it reports two, clear the list and add the file again: a duplicate is the usual reason a submission carries a second, unexpected page.
The settings row under the list matters more than it looks: Output method (One by one), Image compression (Original size here), Sort by (File name), the Output settings fields (Original size, Portrait, No margin), and Output path (Original folder). With one file, method and sort change nothing; compression and the page fields do, and they are the ones to match against the form.
Step 4: Convert and Open the Output
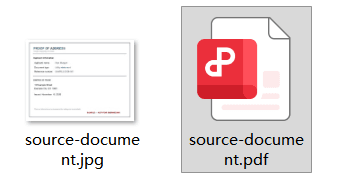
Click Convert; the dialog reports Image Conversion Successful with Open File and Open Folder. The output path was left at Original folder, so the PDF lands beside the JPG under the same name — `source-document.jpg` became `source-document.pdf`. Rename it before uploading: the file name is one of the few things a reviewer sees.
Verify the PDF the Way the Portal Will
Six checks, about a minute:
- Pages. One document, one page; a second page usually means the file went in twice.
- Orientation. Upright, as the form expects.
- Edges. Compare with the JPG; confirm nothing needed was cropped, stamps and signatures included.
- Smallest text at 100 percent. The check that catches a file shrunk too far.
- File size against the cap, read from the file's properties.
- File name that tells the reviewer what it is: `surname-proof-of-address.pdf`.
Then upload and look at the portal's own preview before you submit. Some previews crop or letterbox, and that preview is what the reviewer sees.
Step 5: Compare the PDF With the Original JPG
Keep both files until the submission is confirmed. If a portal rejects the PDF as invalid, open it in a second viewer: if it opens there, the file is intact and the objection is about size, encryption, or a field limit; if it opens nowhere, convert again from the original rather than from the previous PDF.
FAQ
Can I set A4 as the page size in the converter?
The browser JPG to PDF tool has no paper-size field — the page follows the image's pixel dimensions. In the desktop Image to PDF window the page fields sit under Output settings. Where neither gives you the size the form names, convert first and print the finished PDF to A4 with Fit scaling; how to convert JPG to PDF covers the mechanics.
Does converting the JPG reduce its quality?
No. The image is placed on the page as it is, so the conversion changes the container rather than the pixels. If the PDF looks softer than the JPG, it is being displayed smaller than its native size, or the image was shrunk before conversion.
Will the text in my document be selectable in the PDF?
No. A page built from a JPG is a picture of a page, so there is no text layer to select or search. For a human reviewer that normally does not matter; portals with automatic checks may still expect recognizable text, which is a separate recognition step.
My phone saved the photo as HEIC. Can I just rename it to JPG?
No. Renaming changes the extension, not the format, and the portal may reject the file when it tries to read it. Export or convert the photo to JPG first, then convert that copy to PDF. JPEG and JPG are the same format, so either label means the same file.
Can I convert one JPG without installing anything?
Yes. The JPG to PDF tool runs in the browser: select the image, convert, download. It is the quicker route for a single page. The trade-offs are that the page size follows the image, and that the file leaves your machine — worth a second thought when the document is an ID or a bank statement.
The portal rejected the PDF. What do I check first?
The wording usually names the problem. "File too large" is the size cap: shrink the source image once and convert again. "Please upload a JPG" means the format list was read too quickly. "Invalid file" is worth testing in a second viewer before you rebuild anything.
One JPG, one page, and five answers taken from the form: that is the task. If you would rather keep the document on your own machine than hand it to a converter, the desktop Image to PDF tool used above writes the PDF locally and keeps the page fields in the window. PDF Agile is our own product, so weigh the page-size and quality advice here with that in mind.
Steps and interface reflect the desktop app as of November 2026; menus and labels may change in later versions. Adobe Acrobat, Microsoft Print to PDF, macOS, Windows, and iPhone are trademarks of their respective owners. More conversion walkthroughs sit in How-to & Tips.