A non-fillable PDF form has no interactive fields, so clicking a blank line does nothing. You can still complete it: open the form in a PDF editor, add text inside each printed field, mark the option boxes, and save a new copy. The printed layout never changes, and no fields are created along the way.
That last point separates this job from nearby ones. If the form already has fields, type in them and skip this page. If the file is locked rather than flat, the problem is permissions, not typing. And if you only need to tell which kind of form you are holding, how to write on a PDF form settles that in a few lines. This page covers the flat form end to end, including the step most people skip: whether the saved file is acceptable to whoever processes it.
What "Non-Fillable" Actually Means
A PDF holds two kinds of text, and only one of them is a field.
Interactive fields are named objects with a value and a type. The page draws them, but your answer lives in the field rather than on the page. Labels, rules, and printed lines are ordinary page content, and a form is non-fillable when those lines are page content and there is nothing to click into.
Two very different files end up looking the same on screen:
- A flat digital form. Built in Word or a design tool and exported to PDF. The labels are still real text, so they can be selected and searched.
- A scanned form. Someone printed the form and scanned it back. The page is one image, and nothing on it can be selected until OCR runs.
The difference changes how you work: on a flat digital page a text tool may recognize the existing text blocks, so a careless click can land inside a printed label; on a scan there is nothing to recognize, and placement is judged by eye.
How to Tell Whether the Form Is Non-Fillable
- Click a blank line. A real field paints a border and shows a cursor. A flat form does not react.
- Press Tab. In a fillable form, Tab moves from field to field. On a flat page, focus leaves the document.
- Zoom to 400%. Vector text stays sharp; a scan turns into visible blocks of pixels.
- Try to select a label. If "Email Address" highlights the way text highlights in a browser, the file has a text layer.
- Open it in a desktop reader. A form that refuses typing in a browser tab may just be opened by a viewer that does not enable fields.
- Look for a password prompt or greyed-out tools. That is protection, not a flat page, and it needs a different fix — why a PDF refuses to accept typing covers the locked cases.
Decide Which Method You Need
- The form has clickable fields. Type in them. Do not overlay text on a field that already works, or the receiver's software will read the empty one.
- The form is flat and digital. Place text over each printed line — the procedure below.
- The form is a scan. Overlaying still works. OCR is optional and only worth it when you need searchable text or a text layer to align against; adding text to a scanned PDF covers when that step pays.
- The form needs a signature that counts legally. Use a signature workflow. A typed name is not a digital signature, whatever it looks like.
- Something must be hidden, not just covered. Redaction removes content; a white rectangle only hides it, and the text underneath stays copyable.
- The form is read by software. Overlaying is the wrong method — see the limits below.
How to Fill Out a Non-Fillable Form
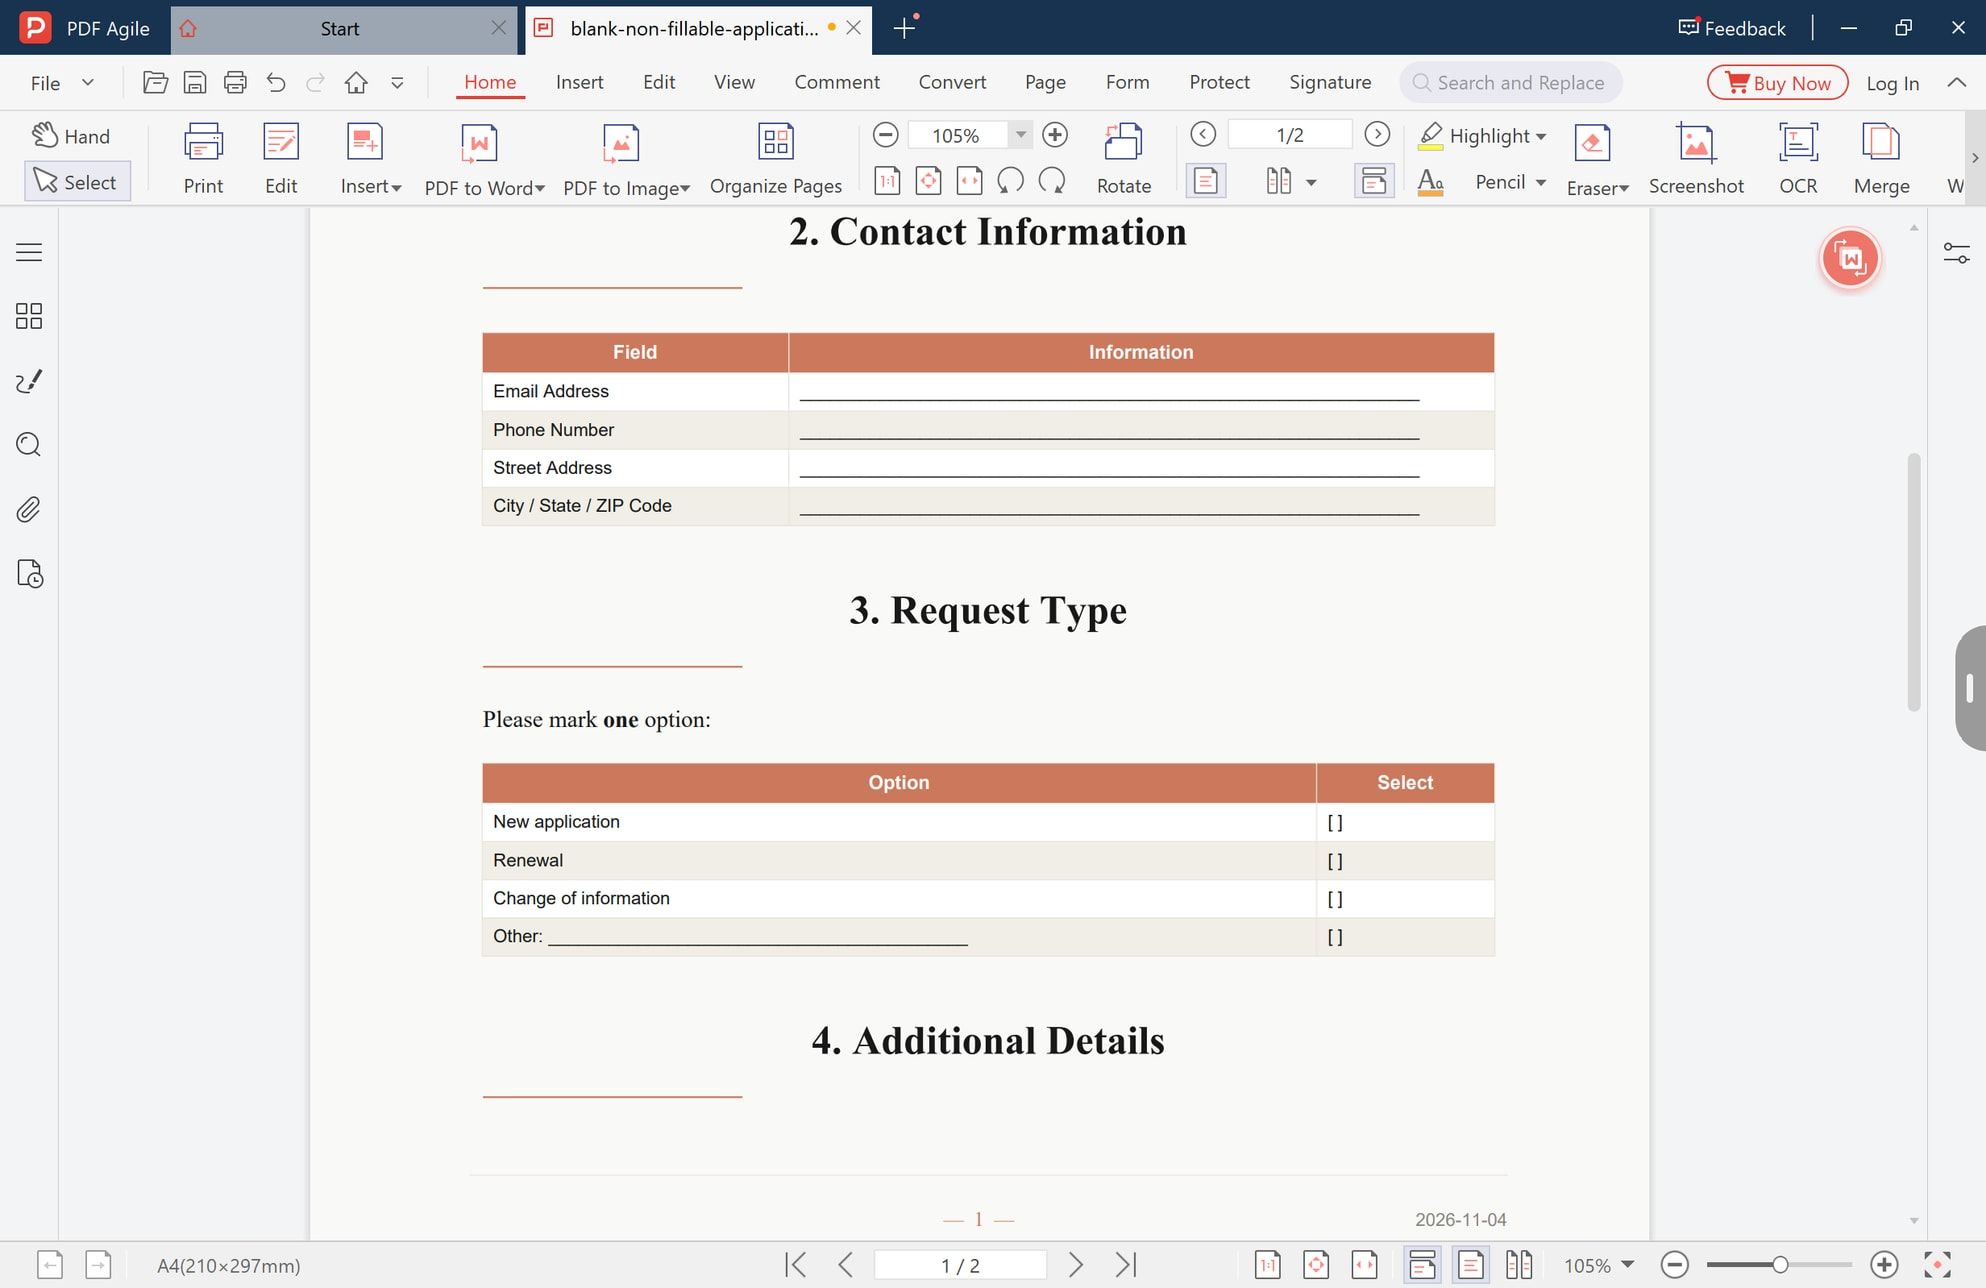
The screenshots show a blank general application form being completed in a desktop PDF editor. It has no fields of any kind, which is the case this article covers.
Step 1: Keep the Blank Form Blank
Save a copy under a new name and work on that copy. Keep the untouched original: if an answer lands in the wrong place you can start over, and most forms come back a second time. Name the copy so the receiver can identify it, for example application-form-completed.pdf.
The form below is the starting state for every step that follows: the lines are printed rules, the option boxes are typed characters, and no amount of clicking produces a cursor.
Step 2: Turn On the Text Tool
In the desktop app, the text tool is not on the Home tab. Open the Edit tab and choose Add Text. The screenshot shows that tab open, with the existing labels outlined in red because the editor has detected them as page text rather than fields.
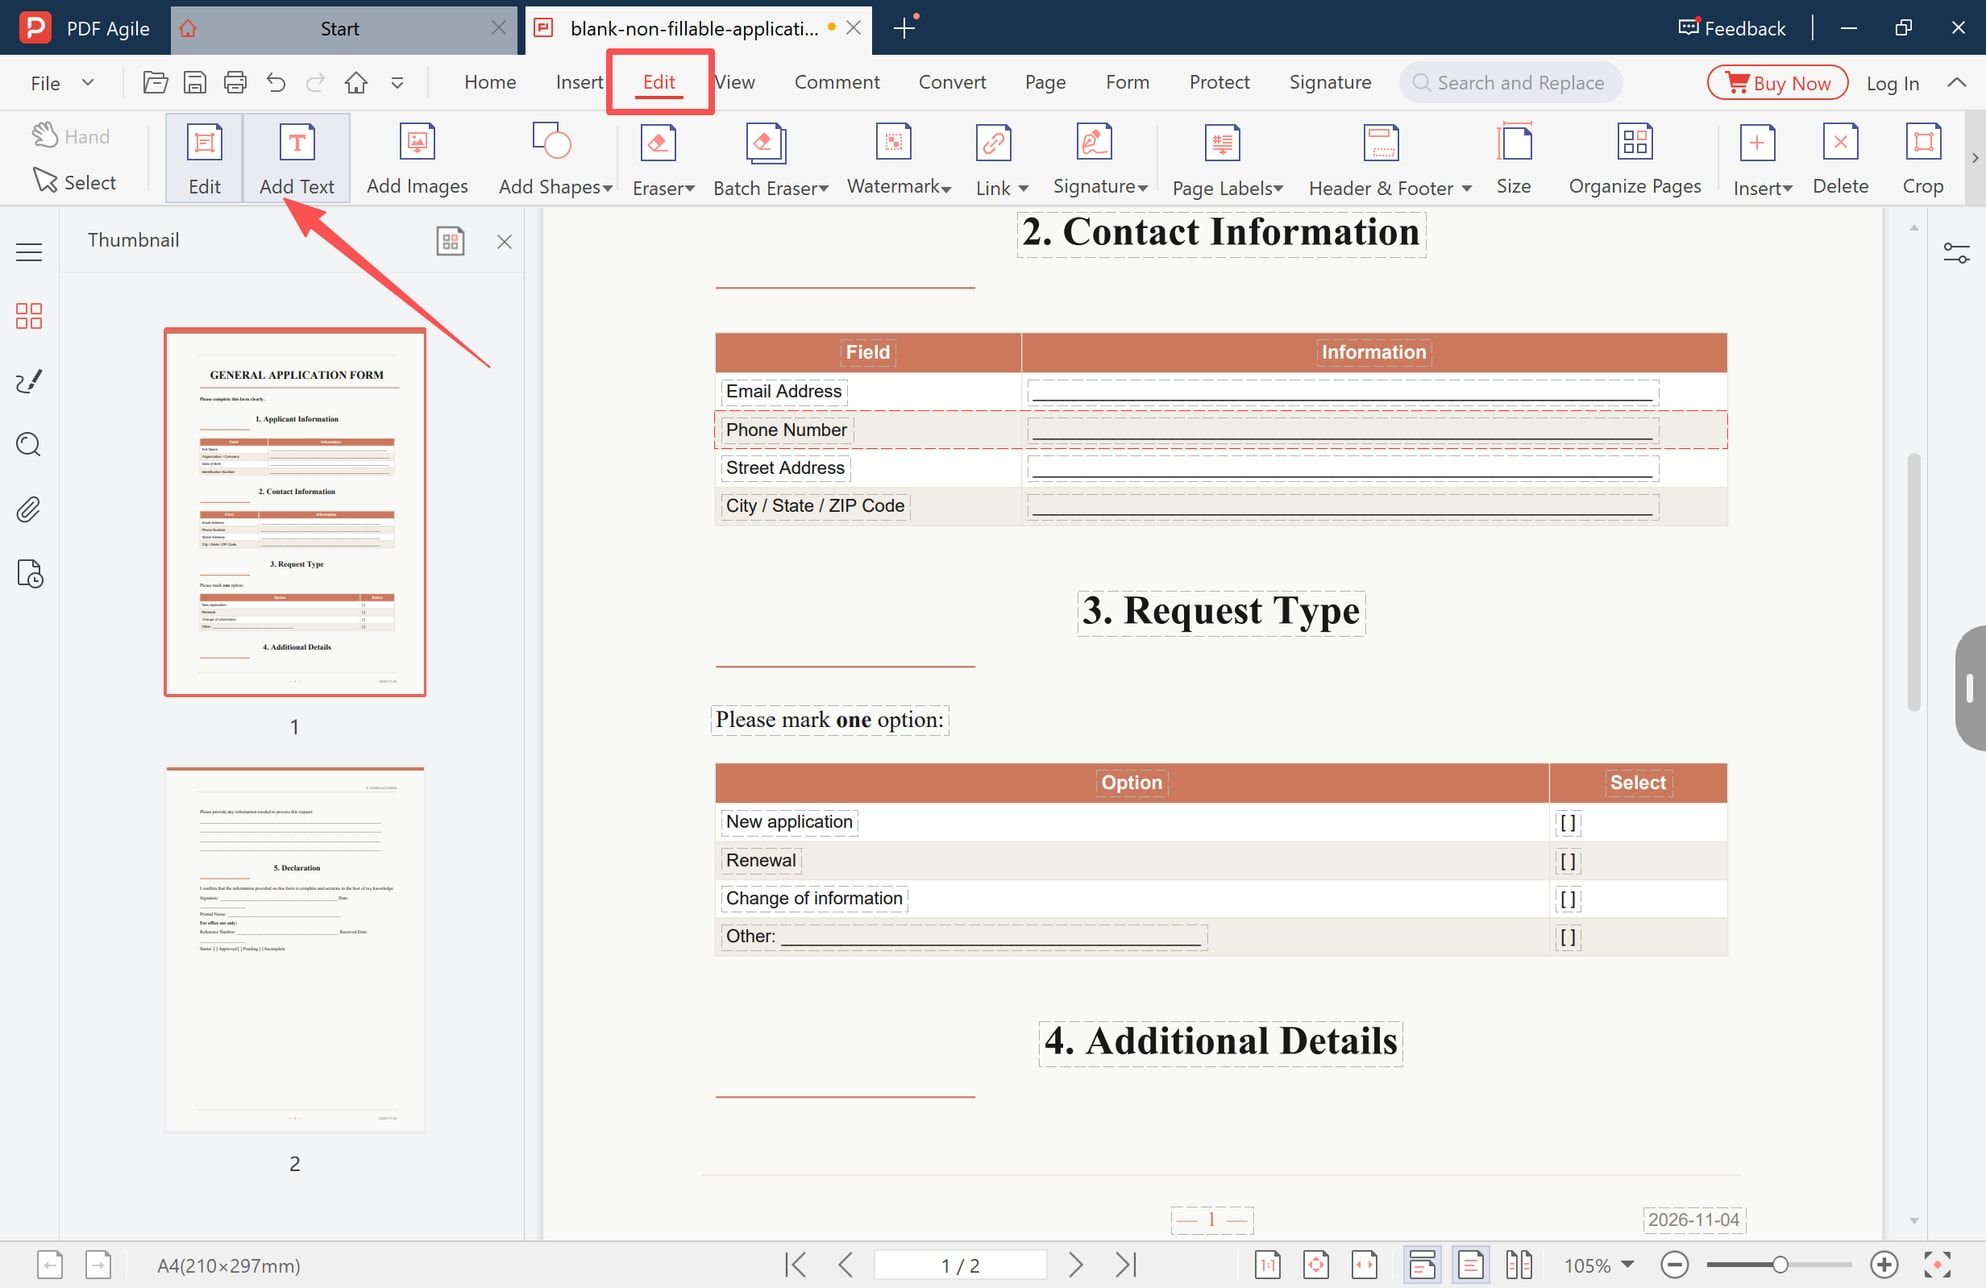
The same toolbar holds tools for replacing existing text. Use Add Text for a blank form; use the replacement tool only to change a printed label.
Step 3: Put Each Answer Inside the Field, Not On the Line
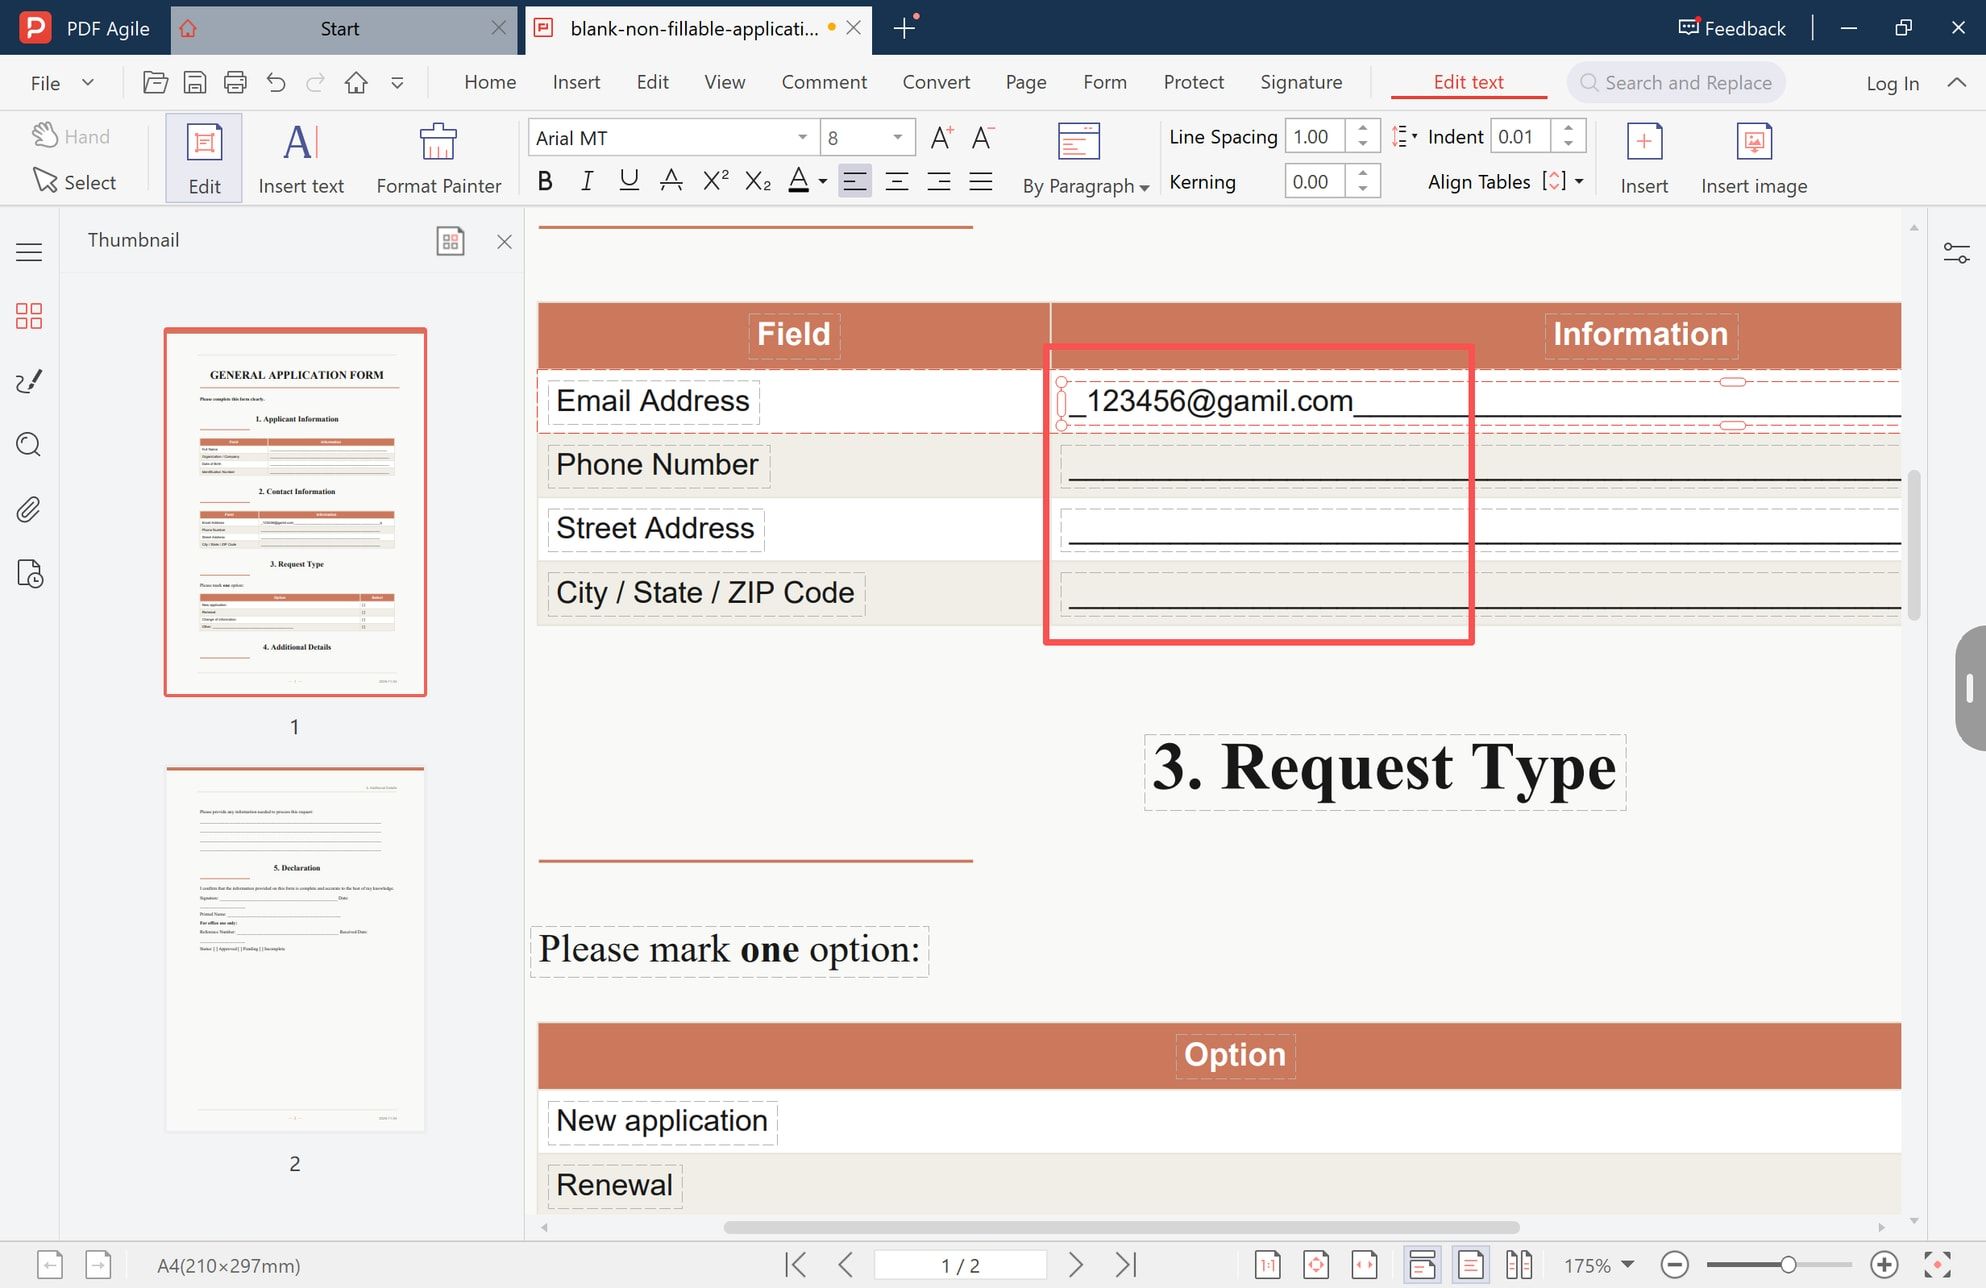
Click once inside the printed area and type. The insertion point appears where you click and the text grows rightward, so the click point is the whole decision.
- Sit on the rule, not through it. The baseline of your text should rest on the printed underline.
- Start just right of the label column, so the answer reads as a value and not as more label.
- Stay inside the box. Text that runs past the border looks like damage, even when the words are right.
- Never cover the field name. The reader needs the question and the answer together.
Step 4: Match the Font Size to the Row
Most editors start a text block at a size meant for body text, which is too large for a form row. Here the size was reduced to 8 pt so the value fits between column borders. Set the size before you type if you will repeat it; consistency matters more than the exact number. If a value cannot fit at a readable size, shorten it or write "see attached page 2" rather than shrinking the text to something a clerk cannot read.
Step 5: Mark Checkboxes and Option Boxes
Printed option boxes are characters, not controls. Typing an X or a check mark between the brackets works, and it is what most paper forms were designed for.
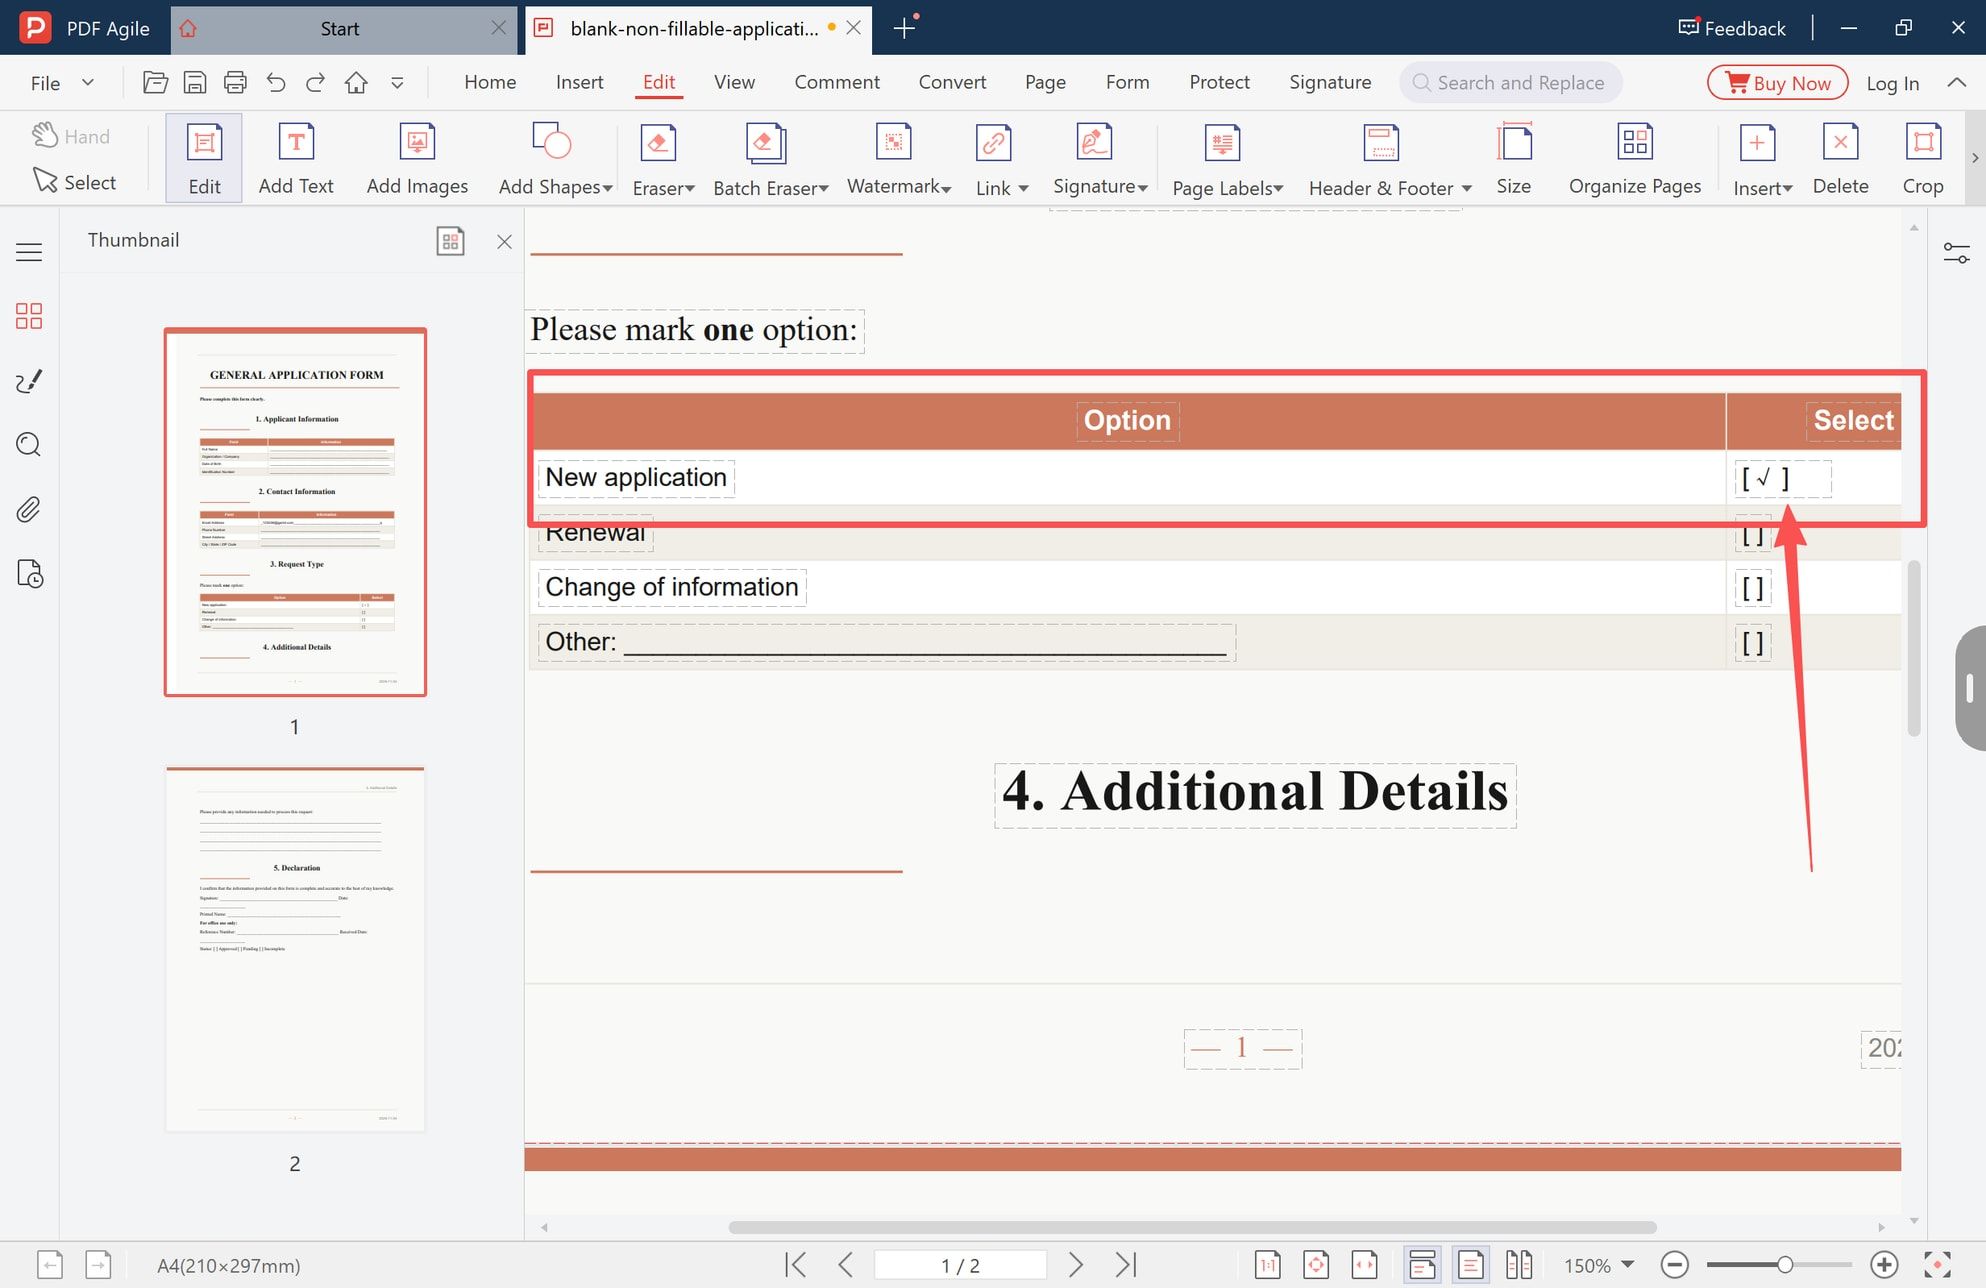
Three details matter more than the symbol. Align the mark inside the brackets, so nobody has to guess which option it belongs to. Leave exactly one mark in a single-choice group — a second mark left behind from a copied value is a common reason a form is sent back. And use the same mark everywhere, because an X in one place and a check mark in another reads as two people filling it in.
Step 6: Follow the Form's Own Formats
Copy the date format the form prints, not the one your region uses. The same string, 03/04/2026, is March 4 in one convention and 3 April in another, and a mismatched format is a legitimate reason for rejection. Delete any placeholder you typed while testing; a stray sample number on a submitted form is worse than an empty field.
Step 7: Save a New Copy
Use File > Save as and save as PDF. In the screenshot the command sits under File with the shortcut Ctrl+Shift+S.
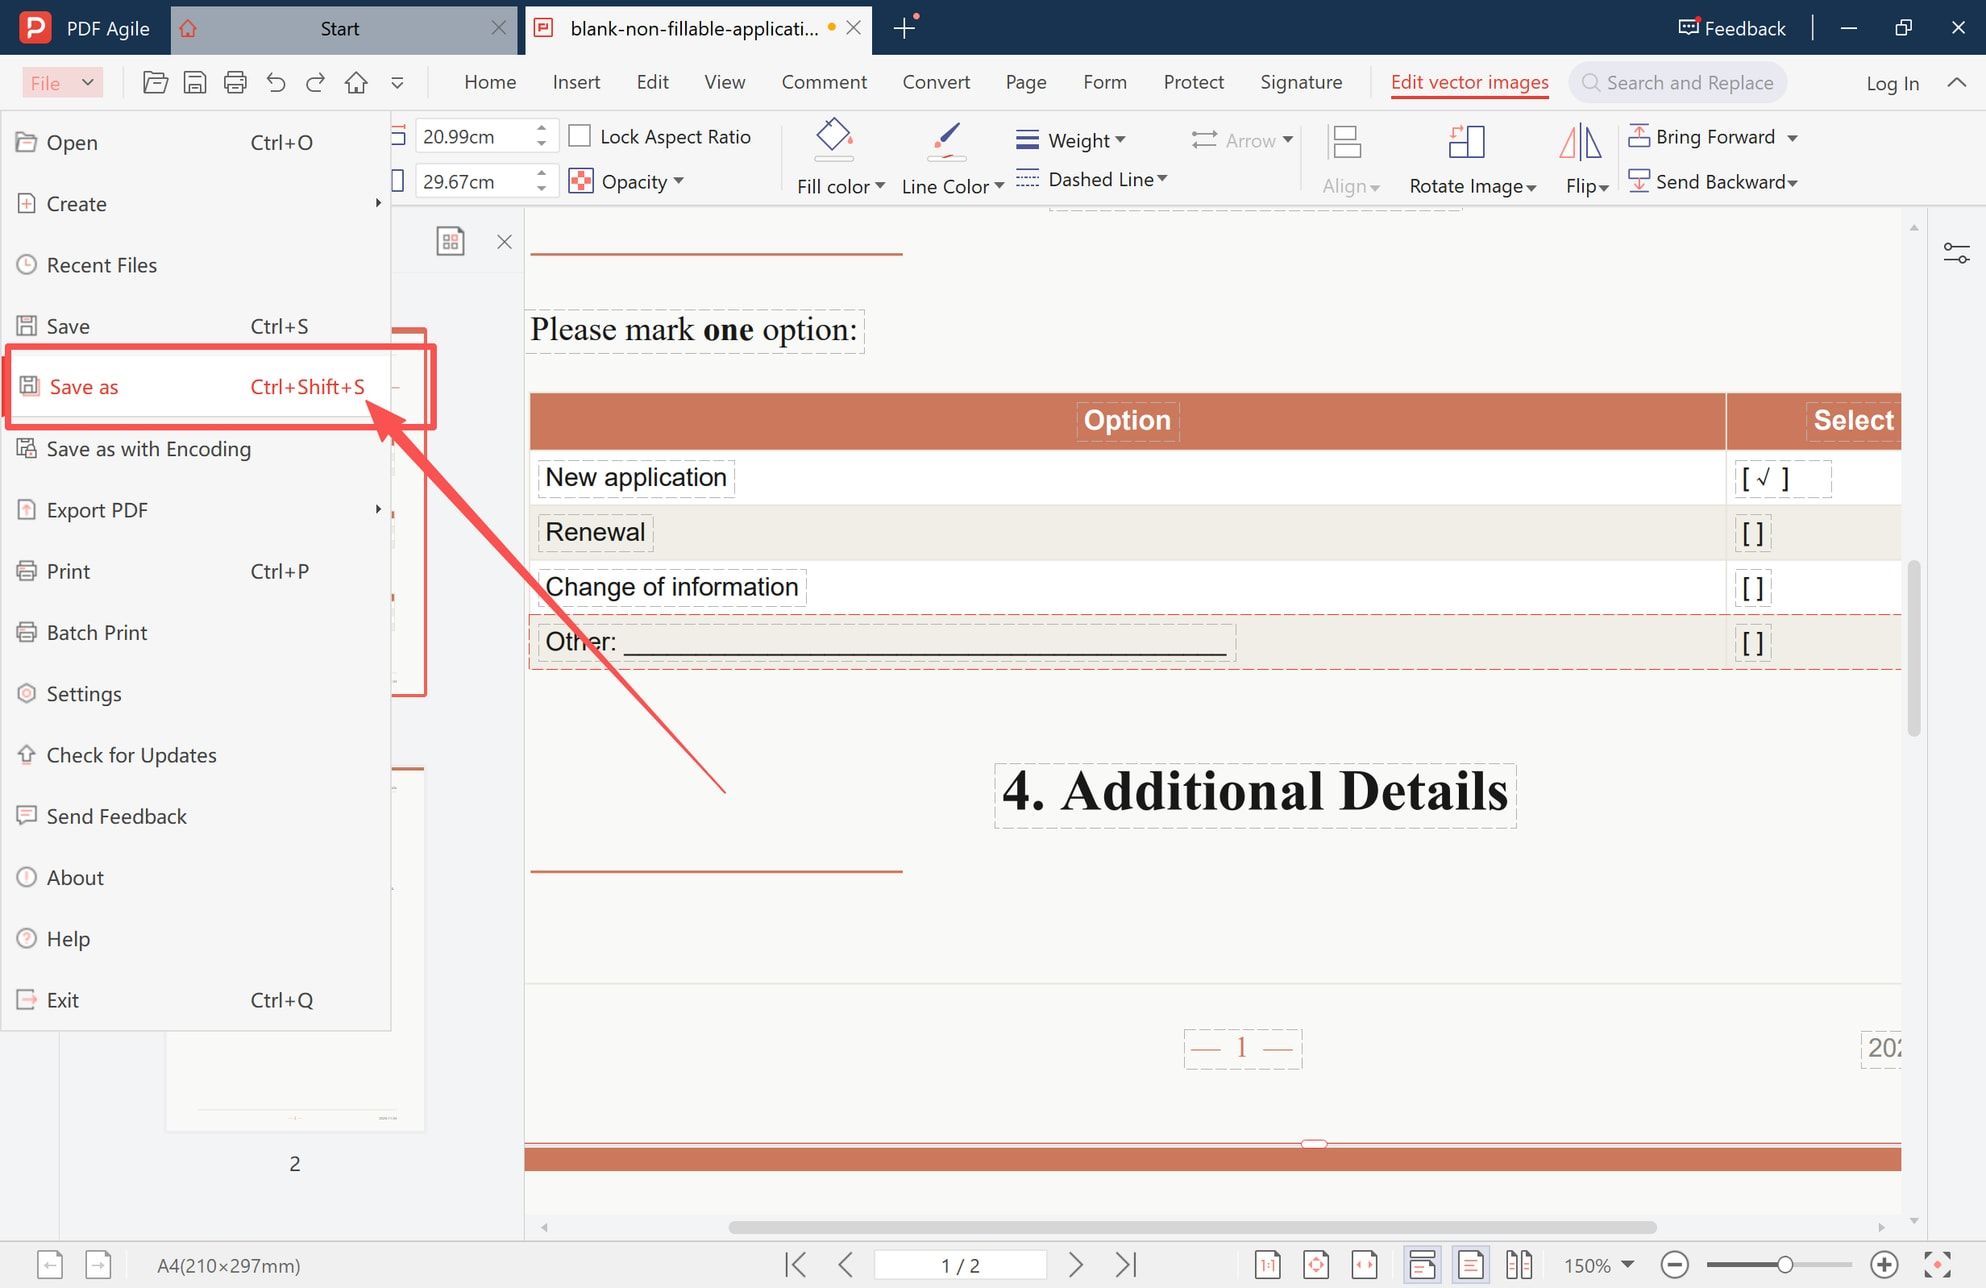
Do not use plain Save. Save writes back into the file you opened, which is the blank form, and the next person who needs that form inherits your answers.
What If the Form Is a Scan?
A scan has no text layer, but that does not block you: the text tool places text above the page image, so answers sit on the scan exactly as they would on a digital page.
Turn on OCR only when you need searchable text, the ability to delete printed words, or a text layer to align against. OCR does not fill the form for you and does not repair a crooked scan. If you run it, check every number against the paper original — OCR reads clean machine print well and struggles with small type, dense tables, and handwriting. Some tools rebuild the page and shift the layout slightly, so compare before placing answers, and straighten a tilted page first.
Check the File Before You Submit It
It is normal for the page to look right at 100% and wrong at the receiver's end. Work through this list on the saved file, after closing the editing session.
- Reopen the saved copy, to confirm the answers were written into the file rather than held in the open window.
- Check every page you touched at the zoom a reader will use, not the zoom you typed at.
- Confirm each answer sits on its line and inside its box, with nothing overlapping a label or the field below.
- Look at the longest value, which is the one that runs past its border.
- Recheck option groups: exactly one mark for a single-choice question, every required mark for a multiple-choice one.
- Compare dates and numbers with the printed format one more time.
- Open print preview. If the form goes on paper, print one page and confirm the marks appear — text placed on the page prints, while some annotation marks only print when "print annotations" is enabled.
- Open the file in a second reader. What you see there is closer to what a stranger sees.
- Confirm file name, page count, and file size against what the portal accepts.
If the answers survive all nine, the hard part is done.
Non-Fillable vs Fillable: What Actually Changes
Overlaying text produces a PDF that looks complete. It is not the same file as a filled-in form, and the difference shows in six places:
- Where the answers live. Field values sit in named objects; overlaid answers are page text.
- Keyboard navigation. A fillable form tabs field to field. On a flat form you position every answer yourself.
- Machine reading. Software reads field values. It cannot read overlaid text as data.
- Validation. Fillable forms check required fields and formats. A flat form checks nothing for you.
- Editing later. A field can be clicked and retyped; text you added is edited like any page text.
- Printing. Field values print. Text on the page prints. Some annotation marks need a setting enabled.
The third item decides whether this method works for you. If the receiver is a person who opens, prints, or reads the page, overlaying is fine. If the receiver is a system that extracts fields — a tax portal, an HR platform, a bank's upload checker — an overlaid answer is invisible to it, and the file can be rejected as blank even though every line is filled.
Everything above is about answers, not the form itself. If what you need is to change the document — its text, images, or page order — that is editing a PDF rather than filling one.
When Overlaying Is the Wrong Method
- The instructions ask for the fillable version or an online form. Request the fillable file or use the organization's portal.
- The document needs a verified signature. Use the signature path the organization accepts.
- The form is protected. Fix the permissions first instead of writing over a locked file.
- Content has to be removed, not covered. A white box over a tax number leaves the number in the file.
- The answers are long. Use a continuation page and say so instead of squeezing a paragraph into one line.
Privacy and Compatibility
Where the file goes matters as much as how it looks. A browser-based form filler normally uploads the document to a server to do the work, which is fine for a school slip and a poor idea for a tax return, a medical record, or an ID document. A desktop editor does the work locally, so the file does not leave the machine unless you send it. PDF is a standard, but how text is stored inside it is not uniform, and readers differ in what they display and print — which is why the list above asks you to reopen the file, check print preview, and view it in a second reader.
FAQ
Why can I type on some PDFs but not others?
Some files contain real form fields and some do not. A third case looks like the second: a protected file may have fields that the permissions forbid you from changing.
Does adding text create form fields?
No. The answers become page content. They look right and print right, but nothing tab-navigates and no software reads them as values.
Will the recipient see my answers?
Yes, they see the same page you saved. If someone reports a blank form, the usual causes are a reader that failed to render the text or a print setting that skipped it — which is what the second-reader and print-preview checks catch.
Where a Desktop Editor Fits
The steps above use the Edit tab and the Add Text tool in PDF Agile, the desktop app the screenshots were taken in. Its editing tools put font, size, and color controls in the same toolbar as the text tool, and File > Save as keeps the blank master intact.
Placing text on a flat form is not unique to one product — Acrobat, Preview, and most desktop editors can do it, and the honest difference is the number of steps and how the text controls are arranged.
If your forms arrive blank and unclickable and you would rather place the answers than print and rescan, PDF Agile for desktop is built for that workflow. More of these step-by-step guides are filed under How-to & Tips.
Steps and interface reflect the desktop PDF editor shown in the screenshots, captured in November 2026 on Windows; menus may change in later versions. Adobe Acrobat, Microsoft Word, and macOS Preview are trademarks of their respective owners. Disclosure: this article was written by the team that builds the editor described above.