Finding a simple way to print your PowerPoint slides along with your speaker notes? Knowing how to print PowerPoint with notes can be incredibly useful for preparing for a presentation, creating handouts or keeping a reference for yourself. This step-by-step guide will teach you the entire process. So, keep reading to learn the best methods for printing PowerPoint with notes!
How to Print PowerPoint with Notes (Basics)
Quick Steps to Print PowerPoint with Notes
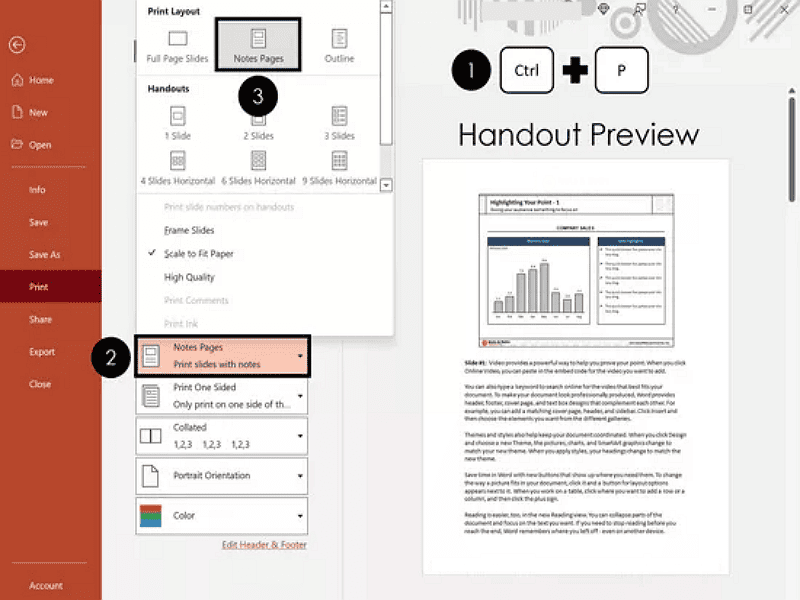
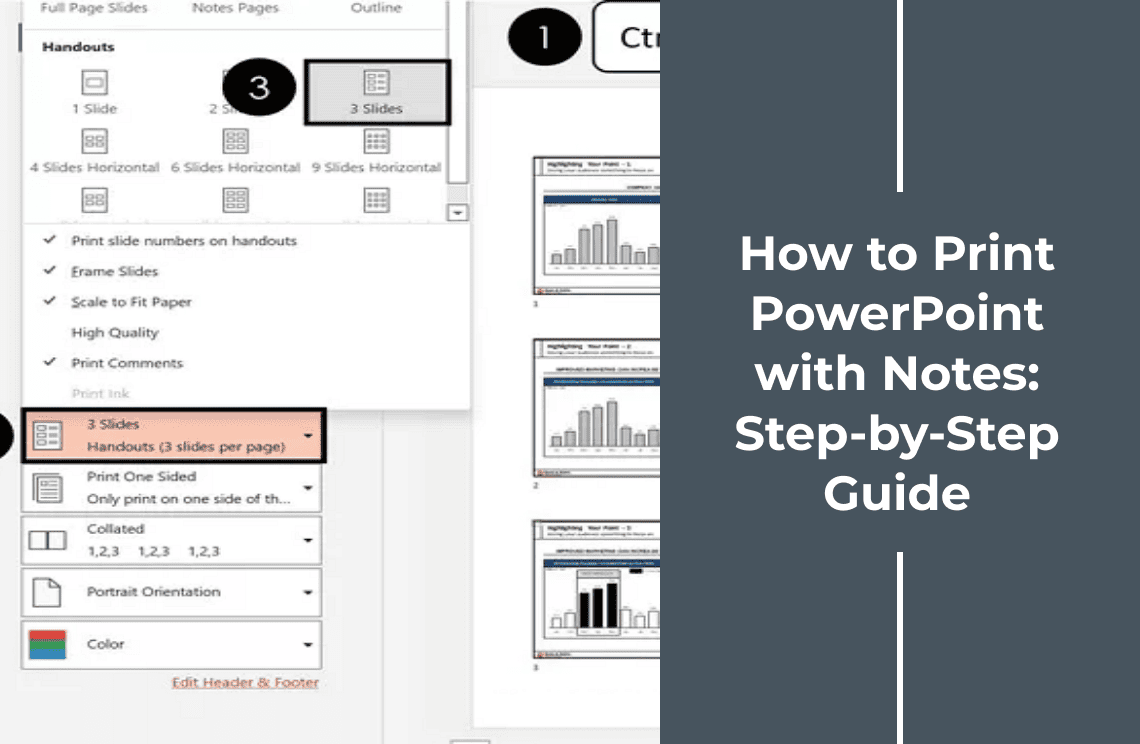
1. Open the Print Menu – Press Ctrl+P (or go to File > Print).
2. Choose Notes Page Layout – Under Settings, click the Print Layout dropdown and select Notes Pages.
3. Print! – Click Print to get your slides with notes.
If your notes are long, they may span multiple pages, but only the first page will show the slide thumbnail. Also, the page number reflects the slide number, not the note page count (e.g., multiple note pages for Slide 2 will all be labeled "2").
Formatting the Notes Master for Professional Handouts
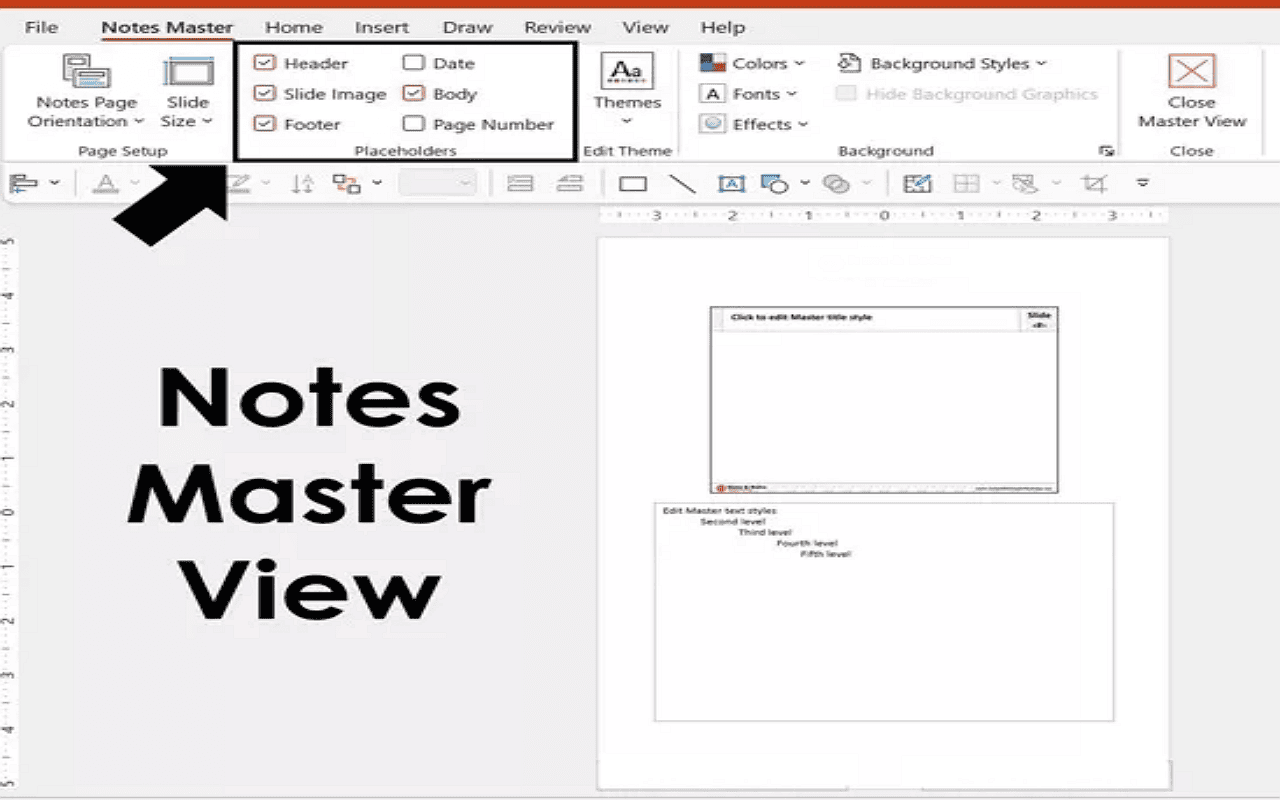
1. Go to the View tab in PowerPoint
2. Select Notes Master
The View tab also contains other important master views like Handout Master and Slide Master, which control the default formatting for different aspects of your presentation.
The Notes Master allows you to format your notes pages as professional handouts. You can add your company branding and contact details to create a polished look.
Once in Notes Master view, you can:
- Choose which placeholders to include
- Add design elements like images and shapes
- Insert important information such as: Your company logo, Your email or contact details, Your website URL
When formatting your handouts, remember that simplicity works best. Include just enough to make your materials look professional and ensure people can easily reach you if needed.
The changes you make in Notes Master view will automatically apply to all your notes pages, giving your printed materials a consistent, branded appearance.
Printing PowerPoint Notes with Multiple Slides Per Page
Exporting to Word for Multi-Slide Handouts
1. Open your PowerPoint presentation
2. Click the File tab
3. Select Export from the menu
4. Choose Create Handouts
5. Click the Create Handouts button
6. In the dialog box, select Notes next to slides
7.Click OK to confirm
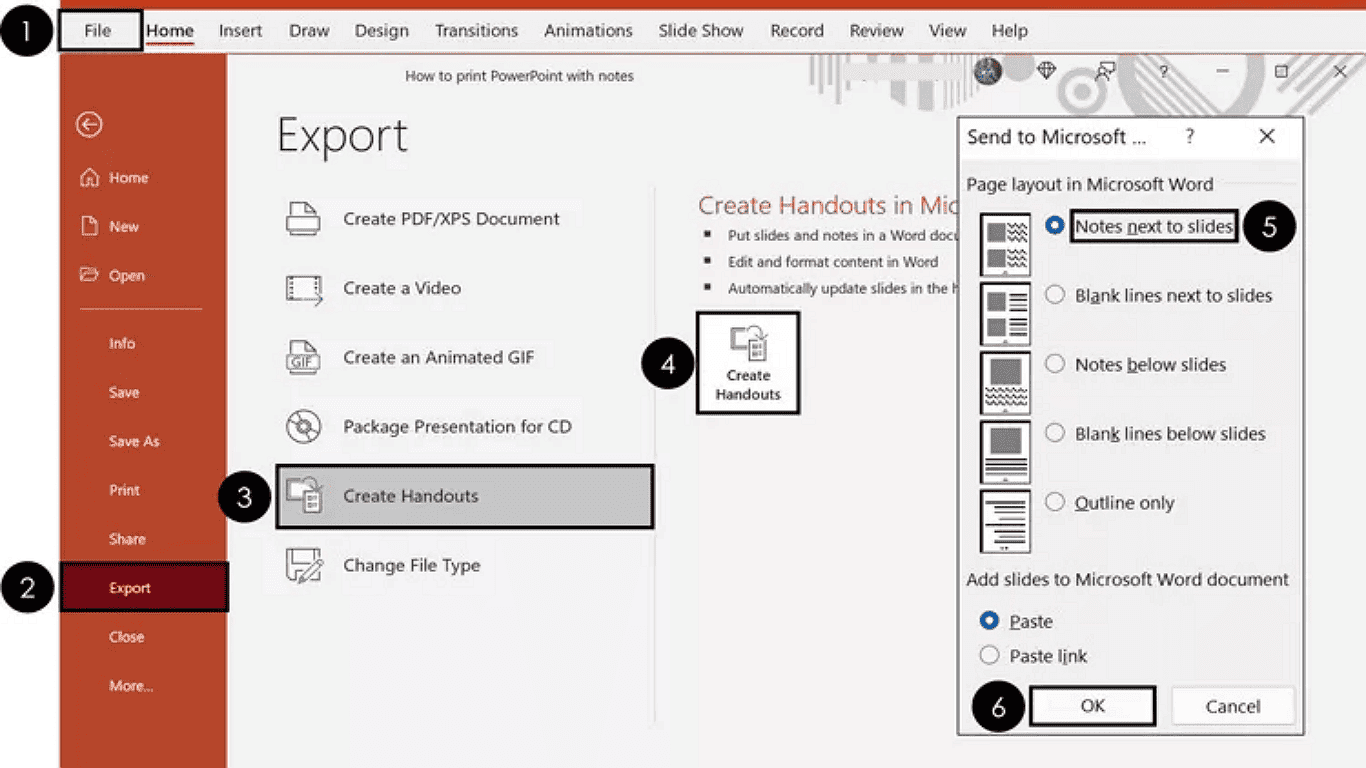
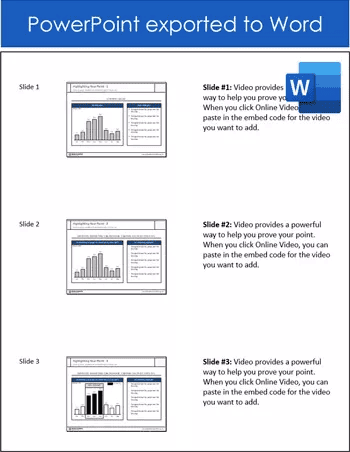
This process converts your PowerPoint file into a Word document, where slides and notes appear in a table format. The Word document gives you greater flexibility to:
- Adjust the number of slides per page
- Edit note formatting
- Rearrange content as needed
Once in Word, you can further customize your handout layout before printing to create professional, information packed reference materials.
Printing PowerPoint Notes Without Slide Thumbnails
You can print just your PowerPoint speaker notes without including the slide images, and without altering your original presentation. Avoid modifying your Notes Master; instead, follow these straightforward steps.
For a visual demonstration of this process using both the Create Handouts feature and Outline View, watch our brief video tutorial below.
1. Export Your Presentation to Word
To print notes without slides, first transfer your content to Microsoft Word:
- Open PowerPoint and go to File
- Select Export from the left panel
- Choose Create Handouts in the center section
- Click the Create Handouts button on the right
- Pick Notes next to the slides in the dialog box
- Click OK
This converts your presentation into a Word document with slides and notes arranged in a table format. Adding borders will help visualize the structure.
2. Display Table Borders for Clarity
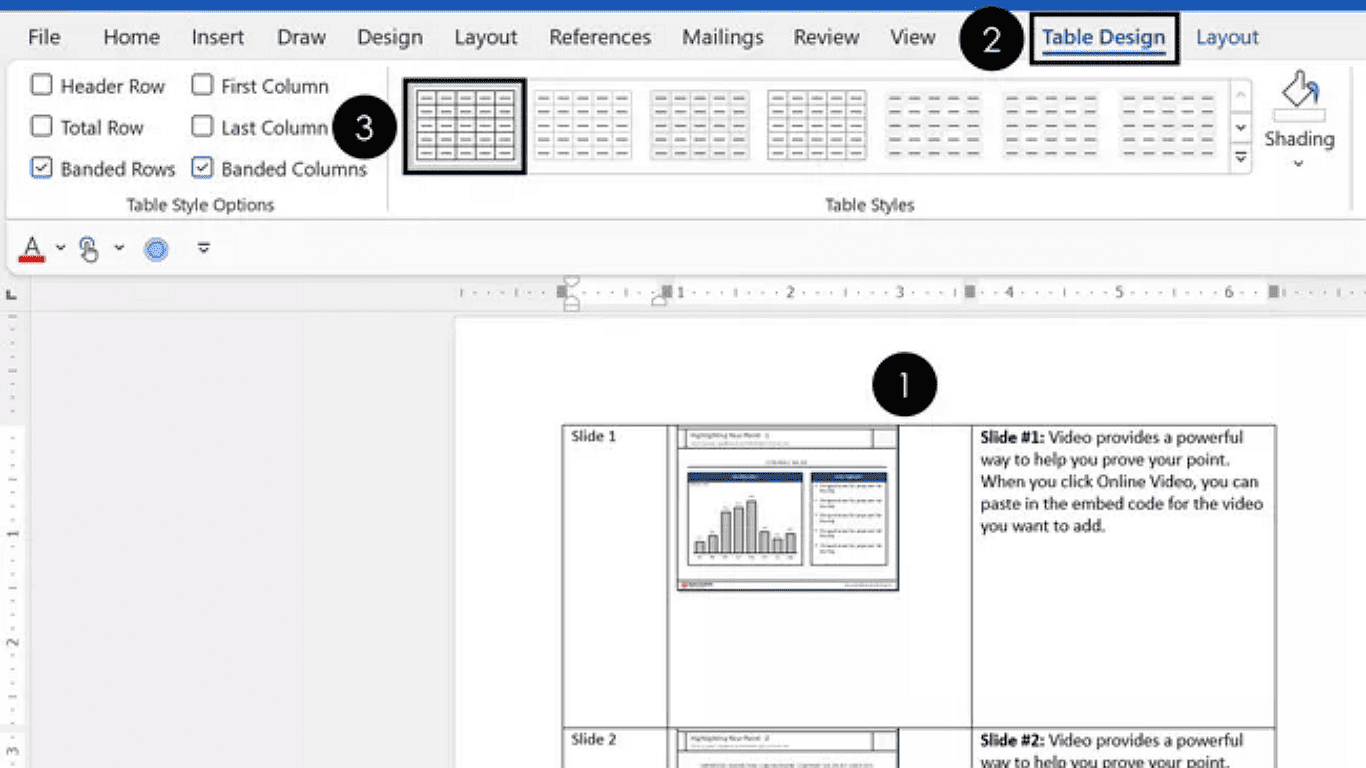
Making the table structure visible simplifies editing:
- Highlight the entire table in Word
- Navigate to the Table Design tab
- Select your preferred border style
Though optional, this step significantly eases the formatting process.
3. Customize Your Notes Layout
Finalize your notes-only document by making these adjustments:
- Remove the slide thumbnail column
- Adjust column widths as needed
- Insert slide titles from PowerPoint's Outline View
- Add your personal or company contact details
- Continue refining until you achieve the perfect layout
This method preserves your original PowerPoint file while giving you clean, professional notes for printing.
How to Print PowerPoint with Comments
To print comments in PowerPoint, select a handout style and enable Print Comments.
Assuming your presentation contains comments, you can print them in Handout or Outline view.
To print slides with comments:
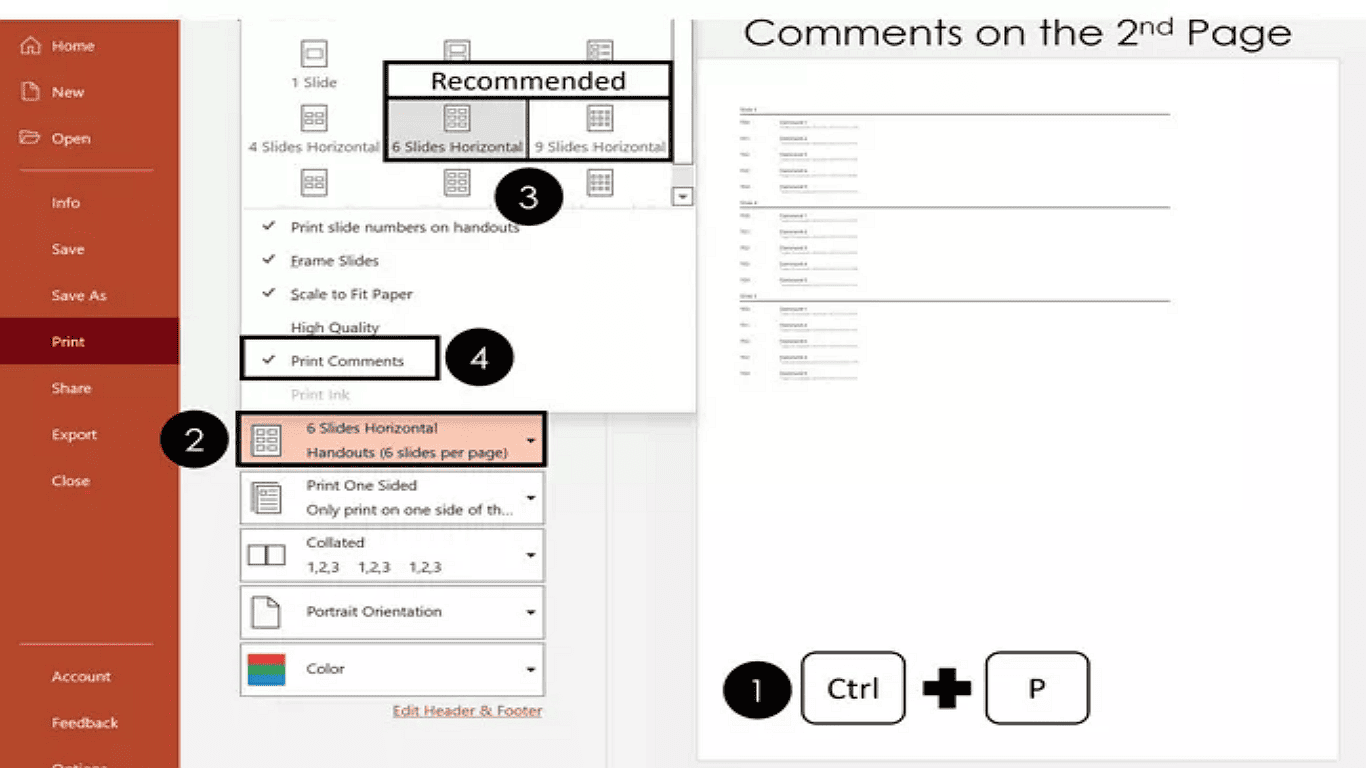
1. Press Ctrl+P
2. Open Slide Layout options
3. Choose slides per page (6 or 9 recommended)
4. Select Print Comments
5. Click Print
Comments always print on page two. Page one shows handouts with comment markers; page two displays the comment text. Since this uses extra paper/ink, the 9-slide layout is most efficient unless you need larger slides.
Creating Note-Taking Handouts from PowerPoint
Need to print your slides with space for written notes? You have two straightforward options:
Option 1: Quick Print with Preformatted Lines
For immediate results:
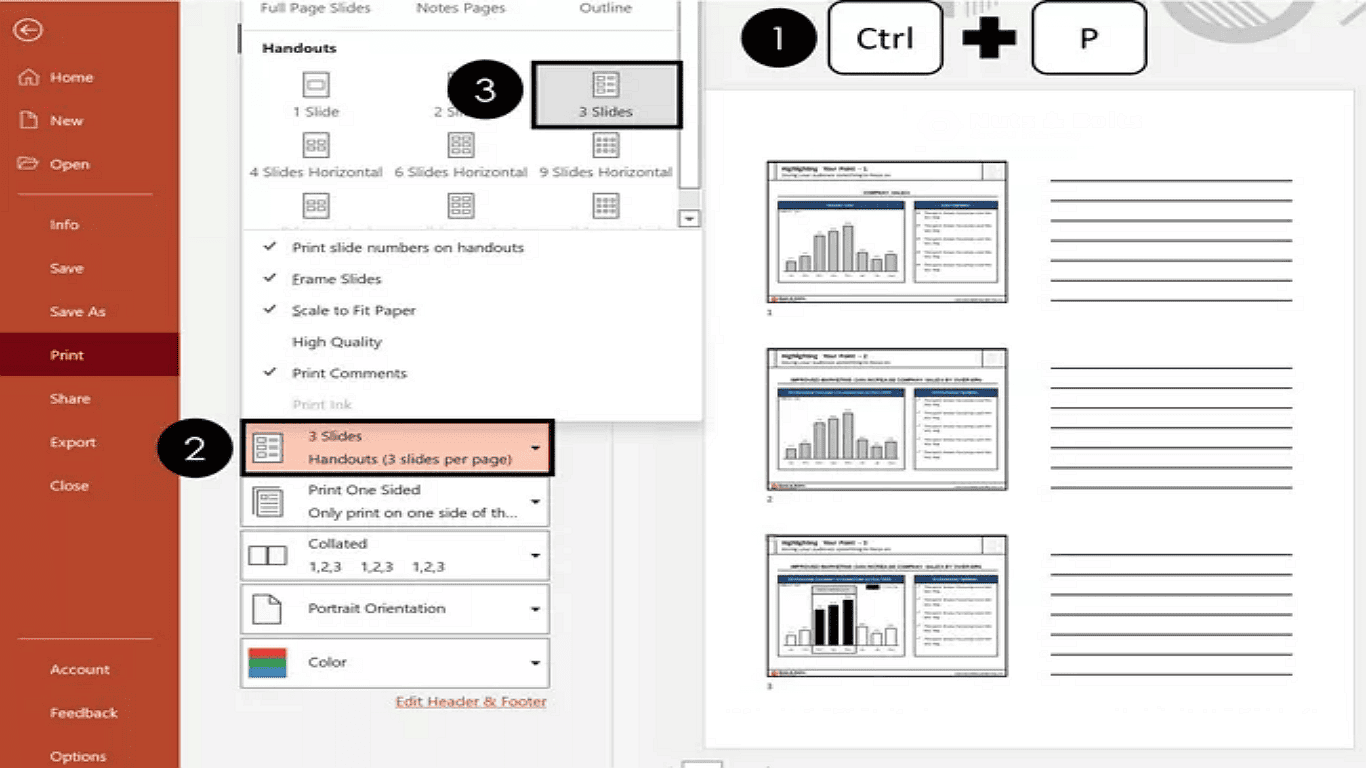
1. Press Ctrl+P in PowerPoint
2. Under Layout, choose "3 Slides" with lines
3. Print directly from PowerPoint
This provides standard note lines beside each slide. For basic adjustments, use the Handout Master view.
Option 2: Fully Customizable Word Export
For flexible formatting:
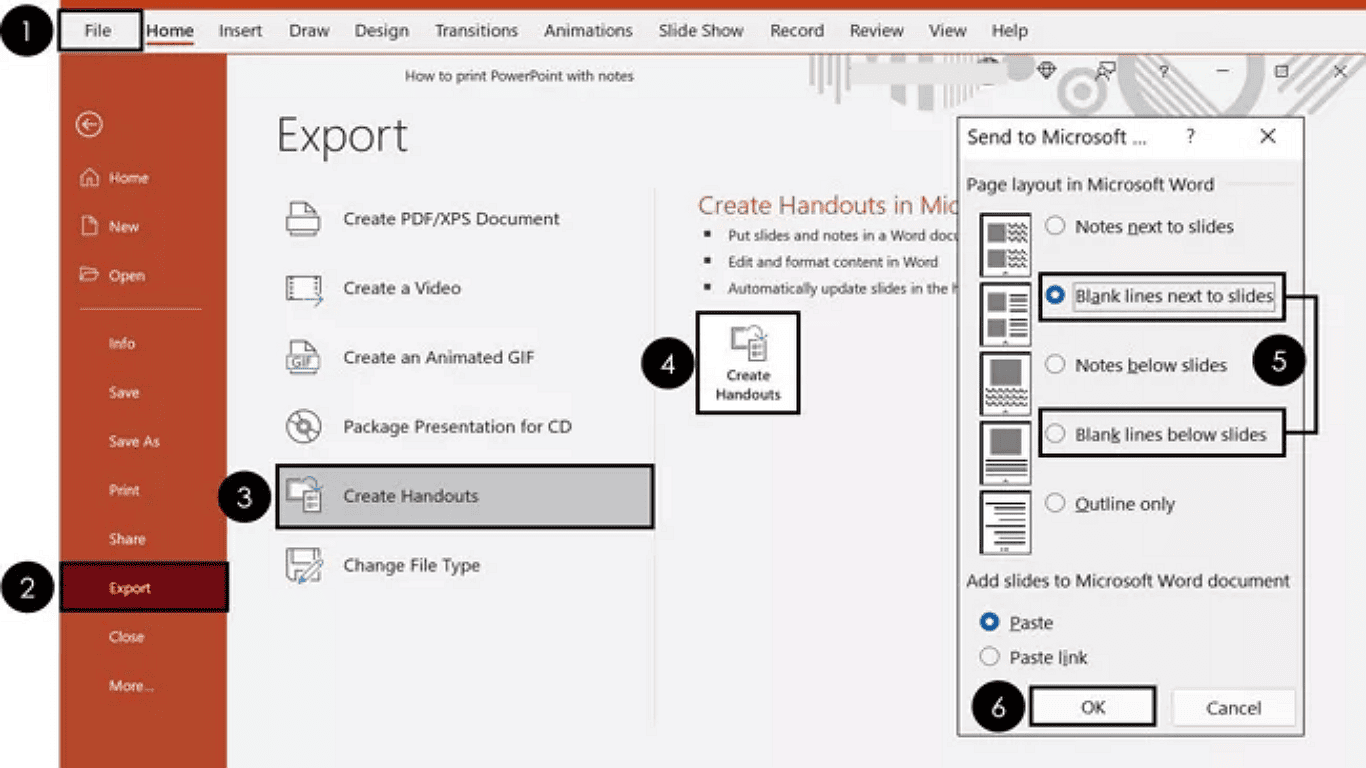
1. Select File > Export > Create Handouts
2. Pick either:
- Lines beside slides
- Lines below slides
3. Open in Word to modify line spacing, thickness, or add headers
The Word method allows complete control over your handout layout. Adjust line count by changing paragraph spacing, or enhance readability with bold formatting.
For advanced handout customization techniques, explore our detailed export guide.
Printing a PowerPoint Outline
When printing your PowerPoint outline, remember two important limitations: First, only text in proper content placeholders will print (text in regular shapes or boxes won't appear). Second, your outline will contain text only - no graphics, charts, or pictures will be included.
You have two options for printing:
Option 1: Print Directly from PowerPoint
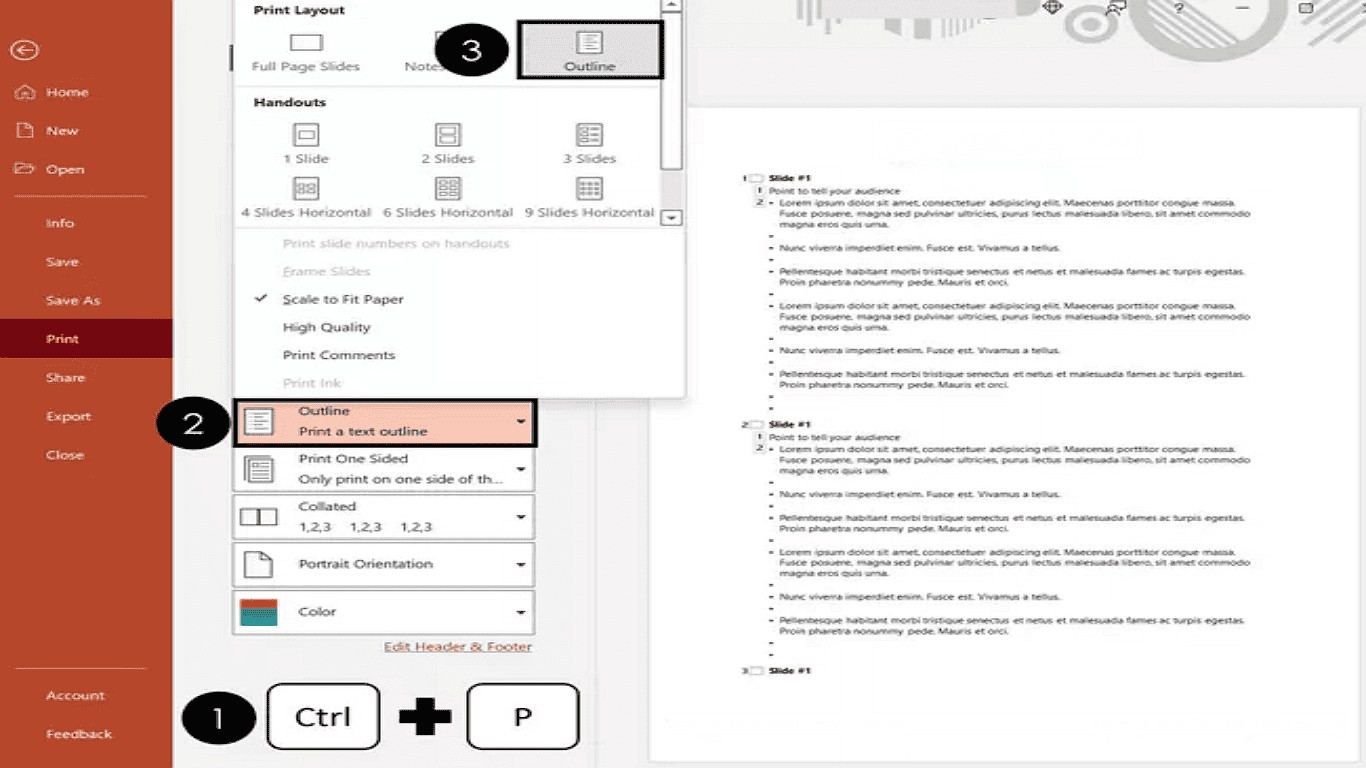
To quickly print your outline:
- Press Ctrl+P to open print options
- Select Outline from the Layout choices
- Click Print
If your outline shows only slide titles (missing other text), you'll need to expand it first:
- Go to the View tab and select Outline View
- Press Alt+Shift+9 to expand all content
Option 2: Export to Word First
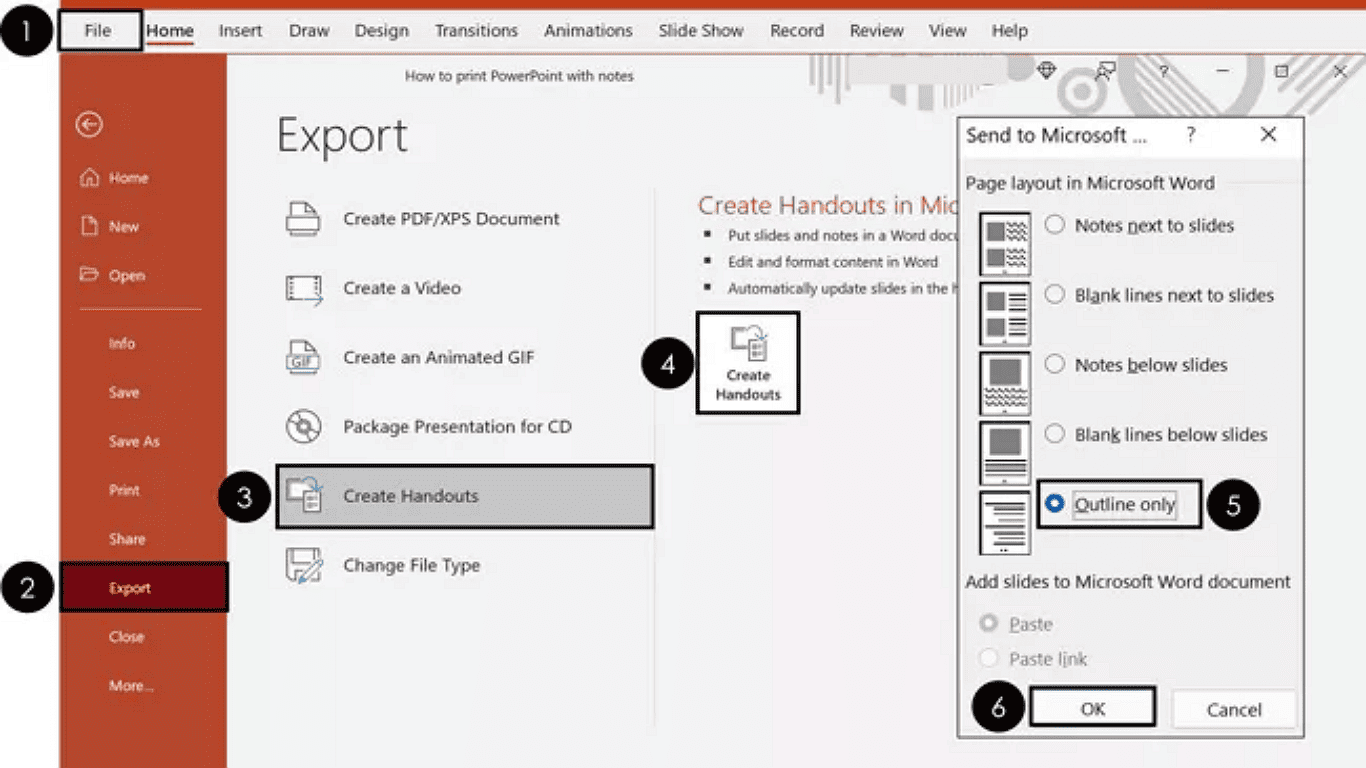
For more control over formatting:
- Choose File > Export > Create Handouts
- Select your preferred outline format
The Word method lets you edit and reformat the text before final printing. For more detailed outline view tips, check our complete guide.
Convert Your PowerPoint to PDF for Easy Sharing
Sharing presentations is simple and hassle-free with PDFs. This universal format ensures your slides look perfect on any device while keeping the original layout intact.
To get started, save your PowerPoint as a PDF. Then, use PDF Agile to share, present, or edit your file effortlessly.
- Free Download
- Compatible with: Windows • macOS • iOS
- Secure and user friendly
Need to make quick edits or enhancements? PDF Agile is a powerful yet free PDF editor packed with smart tools to help you work efficiently. Key features include:
- Cool Annotations: Highlight, add comments, sticky notes and stamps for better collaboration.
- Simple Editing: Modify text, images and layouts smoothly. Merge, split or rearrange pages in flashes.
- Supple Conversion: Export PDFs to Word, Excel, PowerPoint or image files for seamless repurposing.
- Robust Security: Password protect sensitive documents and manage pages with simplicity.
With PDF Agile, you get a fast, reliable way to edit, convert, and secure PDFs—perfect for professionals and students alike.
Final Words
Now you're equipped with all the essential techniques - from printing notes and comments to creating outlines and handouts. These skills will help you produce professional-looking materials for meetings, lectures, or personal reference.
Want to boost your productivity even further? Check out our Tips section for more office productivity hacks that work seamlessly with your PowerPoint workflow. Try these methods today and experience the difference in your presentation materials. For more time-saving tech tips, bookmark our blog and never miss an update!
Print smart, present better!