In the world of document creation and editing, clarity and precision are paramount. Whether you're drafting a legal contract, editing a manuscript, or collaborating on a project, the ability to visually indicate changes or deletions can significantly enhance the readability and professionalism of your work. One of the most effective tools for this purpose is the strikethrough feature in Microsoft Word.
Strikethrough allows you to draw a line through text, signaling that the content is intended to be removed or has been edited out. This simple yet powerful formatting option is invaluable for a variety of tasks, from proofreading and editing to legal documentation and collaborative writing. By mastering the strikethrough feature, you can ensure that your documents are not only well-organized but also clearly communicate any revisions or deletions.
In this tutorial, we will guide you through the process of applying strikethrough in Microsoft Word. You will learn how to use the ribbon, keyboard shortcuts, and the font dialog box to add and customize strikethrough text. Additionally, we will cover advanced tips and tricks, troubleshooting common issues, and practical examples to help you make the most of this feature.
Understanding Strikethrough
A. Definition and Purpose
Strikethrough is a text formatting feature that draws a horizontal line through the middle of the selected text. This line indicates that the text has been deleted, edited, or is no longer relevant. It is a visual cue that helps readers quickly identify changes or corrections in a document.
Example: This is an example of strikethrough text.
B. Common Uses
- Editing and Proofreading:
- Strikethrough is commonly used during the editing process to mark text that needs to be removed or replaced. It allows editors to see the original text while clearly indicating the proposed changes.
- Legal Documents:
- In legal documents, strikethrough is used to show amendments or deletions. This is crucial for maintaining a clear record of changes, ensuring transparency and accountability.
- Drafts and Collaborative Work:
- When collaborating on a document, strikethrough helps team members track changes made by others. It facilitates better communication and ensures that everyone is on the same page regarding edits and updates.
- Academic Papers:
- In academic writing, strikethrough can be used to indicate revisions or corrections in drafts. It helps professors and peers understand the evolution of the document and the reasoning behind the changes.
C. Benefits of Using Strikethrough
- Clarity:
- Strikethrough provides a clear visual indication of deleted or edited text, making it easier for readers to understand the changes made to a document.
- Transparency:
- It maintains a record of what was originally written, which is particularly important in legal and academic contexts where transparency is crucial.
- Efficiency:
- Using strikethrough can save time during the editing process by allowing editors to see both the original and revised text simultaneously.
- Collaboration:
- In collaborative projects, strikethrough helps team members track changes and understand the rationale behind edits, fostering better communication and teamwork.
Section I. Applying Strikethrough to Text
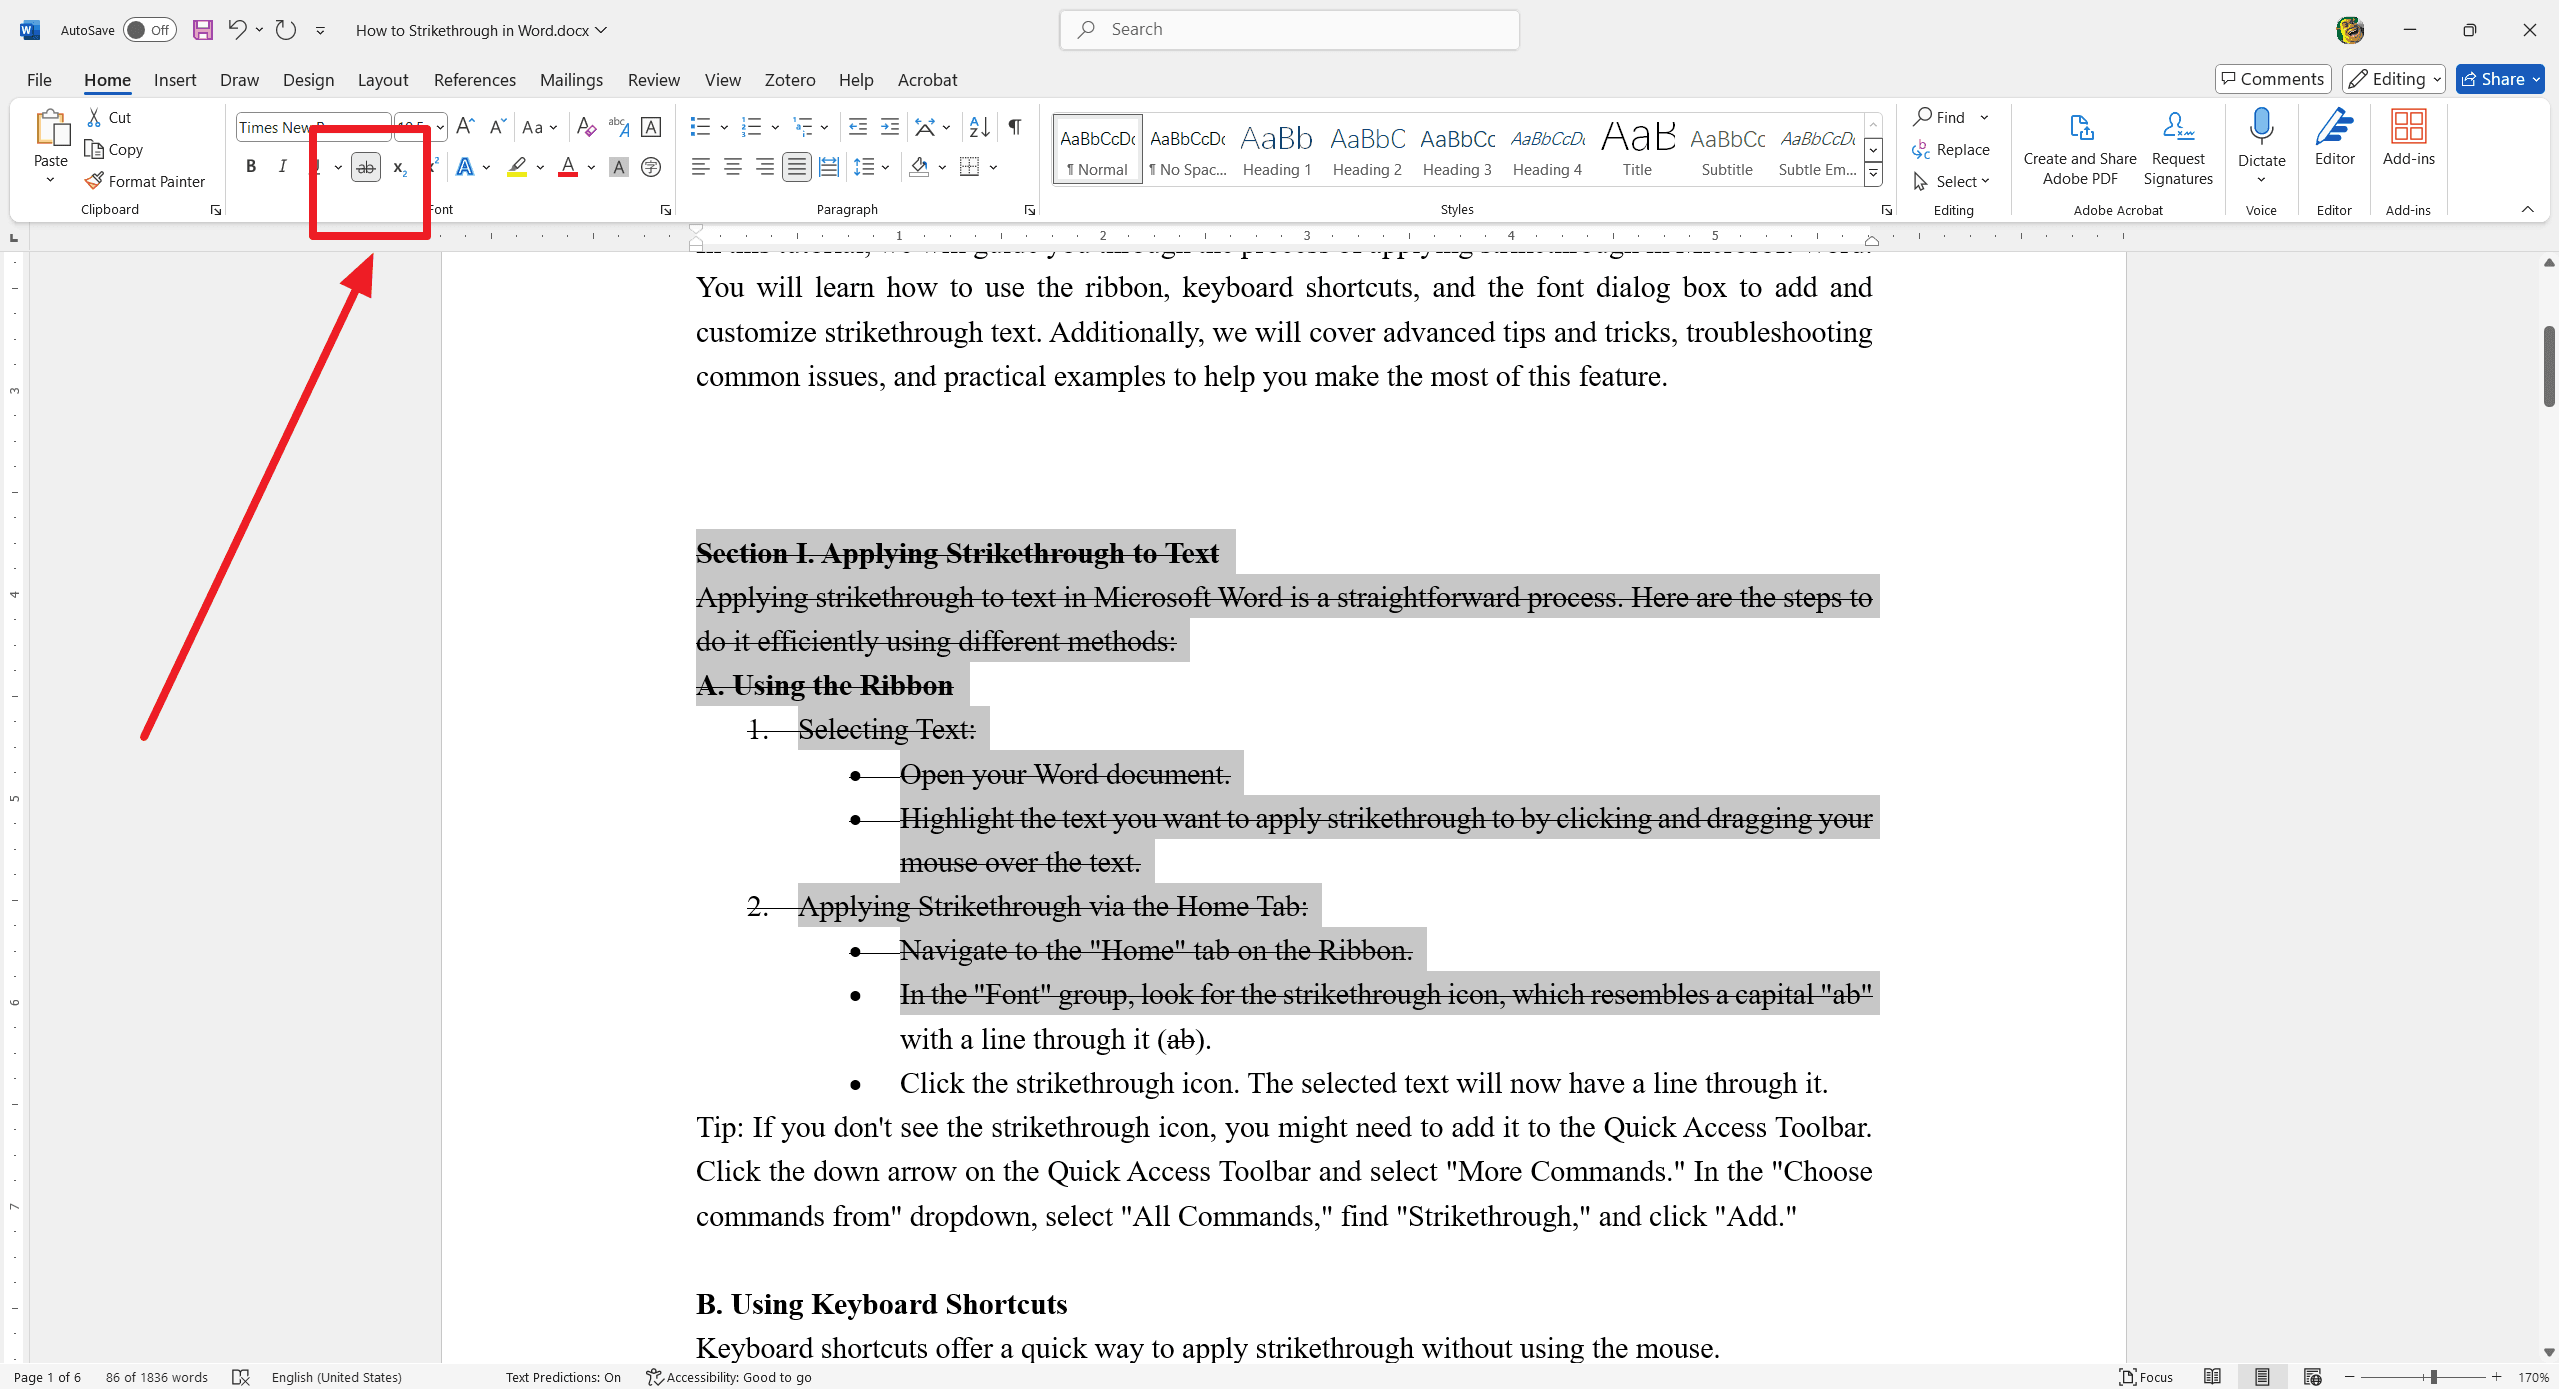
Applying strikethrough to text in Microsoft Word is a straightforward process. Here are the steps to do it efficiently using different methods:
A. Using the Ribbon
- Selecting Text:
- Open your Word document.
- Highlight the text you want to apply strikethrough to by clicking and dragging your mouse over the text.
- Applying Strikethrough via the Home Tab:
- Navigate to the "Home" tab on the Ribbon.
- In the "Font" group, look for the strikethrough icon, which resembles a capital "ab" with a line through it (
ab). - Click the strikethrough icon. The selected text will now have a line through it.
Tip: If you don't see the strikethrough icon, you might need to add it to the Quick Access Toolbar. Click the down arrow on the Quick Access Toolbar and select "More Commands." In the "Choose commands from" dropdown, select "All Commands," find "Strikethrough," and click "Add."
B. Using Keyboard Shortcuts
Keyboard shortcuts offer a quick way to apply strikethrough without using the mouse.
- Windows Shortcut:
- Select the text you want to strikethrough.
- Press Ctrl + D on your keyboard. The selected text will now have a line through it.
- Mac Shortcut:
- Select the text you want to strikethrough.
- Press Command + Shift + X on your keyboard. The selected text will now have a line through it.
Tip: Keyboard shortcuts can significantly speed up your workflow, especially if you frequently apply strikethrough to text.
C. Using the Font Dialog Box
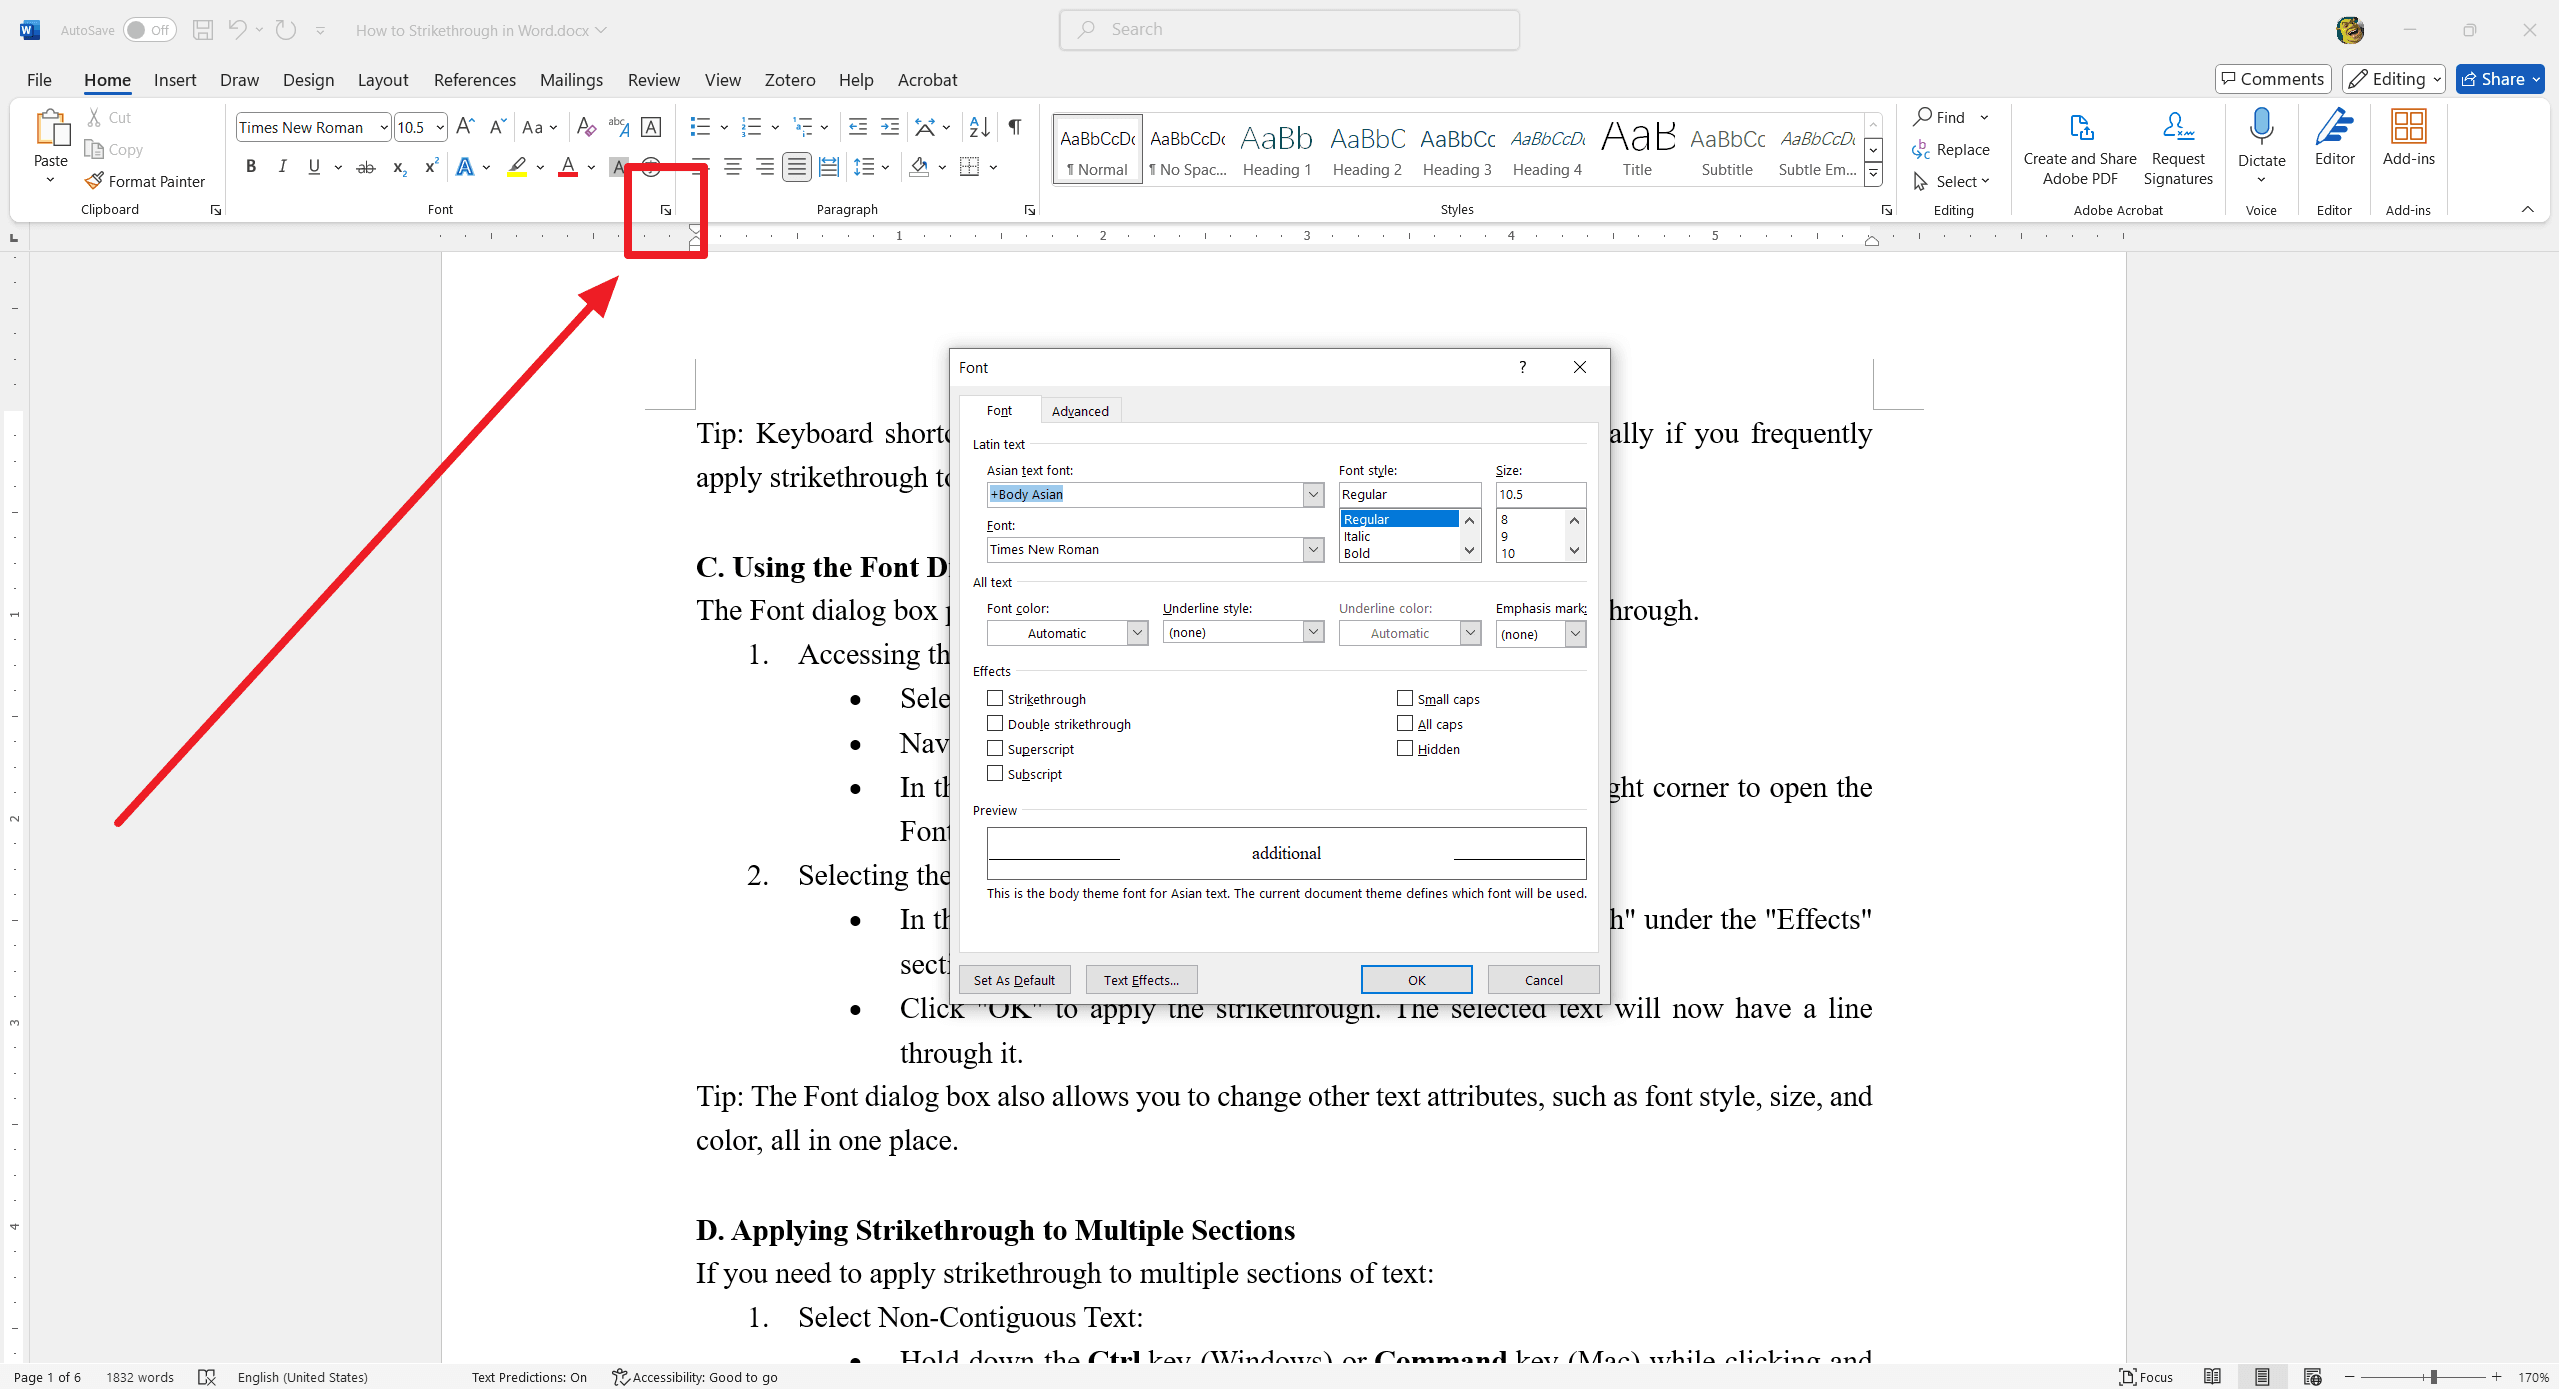
The Font dialog box provides additional options for customizing your strikethrough.
- Accessing the Font Dialog Box:
- Select the text you want to strikethrough.
- Navigate to the "Home" tab on the Ribbon.
- In the "Font" group, click the small arrow in the bottom-right corner to open the Font dialog box.
- Selecting the Strikethrough Option:
- In the Font dialog box, check the box next to "Strikethrough" under the "Effects" section.
- Click "OK" to apply the strikethrough. The selected text will now have a line through it.
Tip: The Font dialog box also allows you to change other text attributes, such as font style, size, and color, all in one place.
D. Applying Strikethrough to Multiple Sections
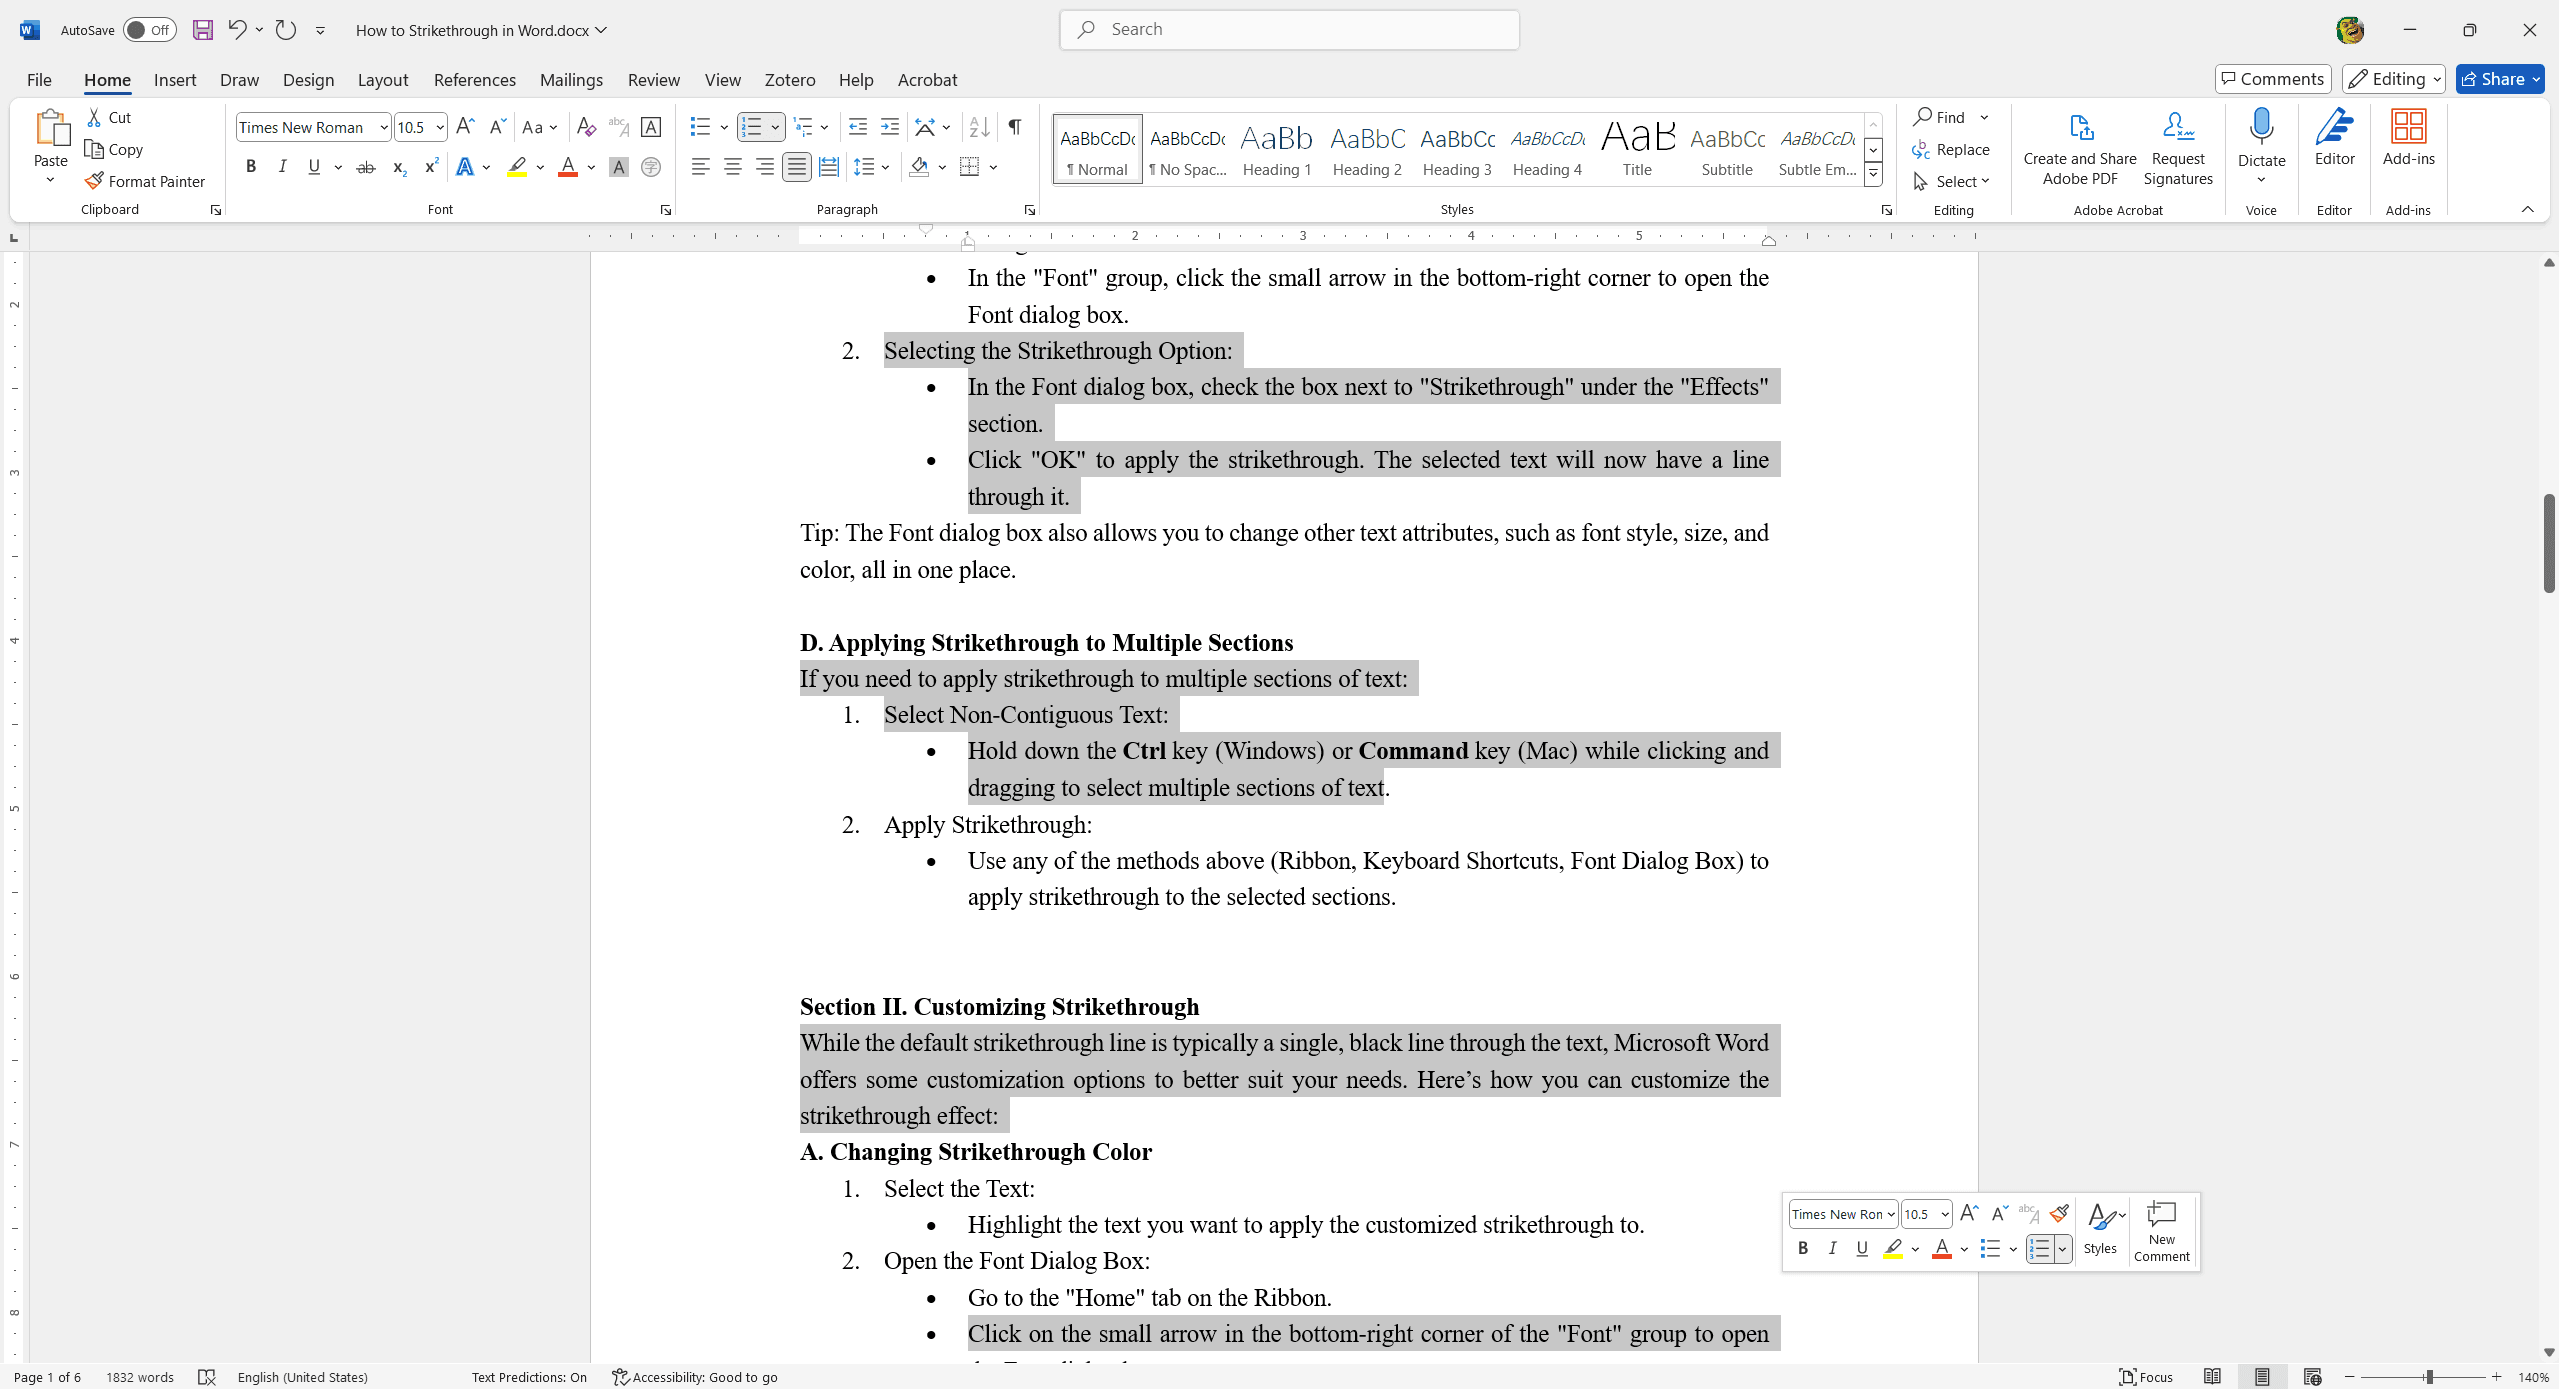
If you need to apply strikethrough to multiple sections of text:
- Select Non-Contiguous Text:
- Hold down the Ctrl key (Windows) or Command key (Mac) while clicking and dragging to select multiple sections of text.
- Apply Strikethrough:
- Use any of the methods above (Ribbon, Keyboard Shortcuts, Font Dialog Box) to apply strikethrough to the selected sections.
Section II. Customizing Strikethrough
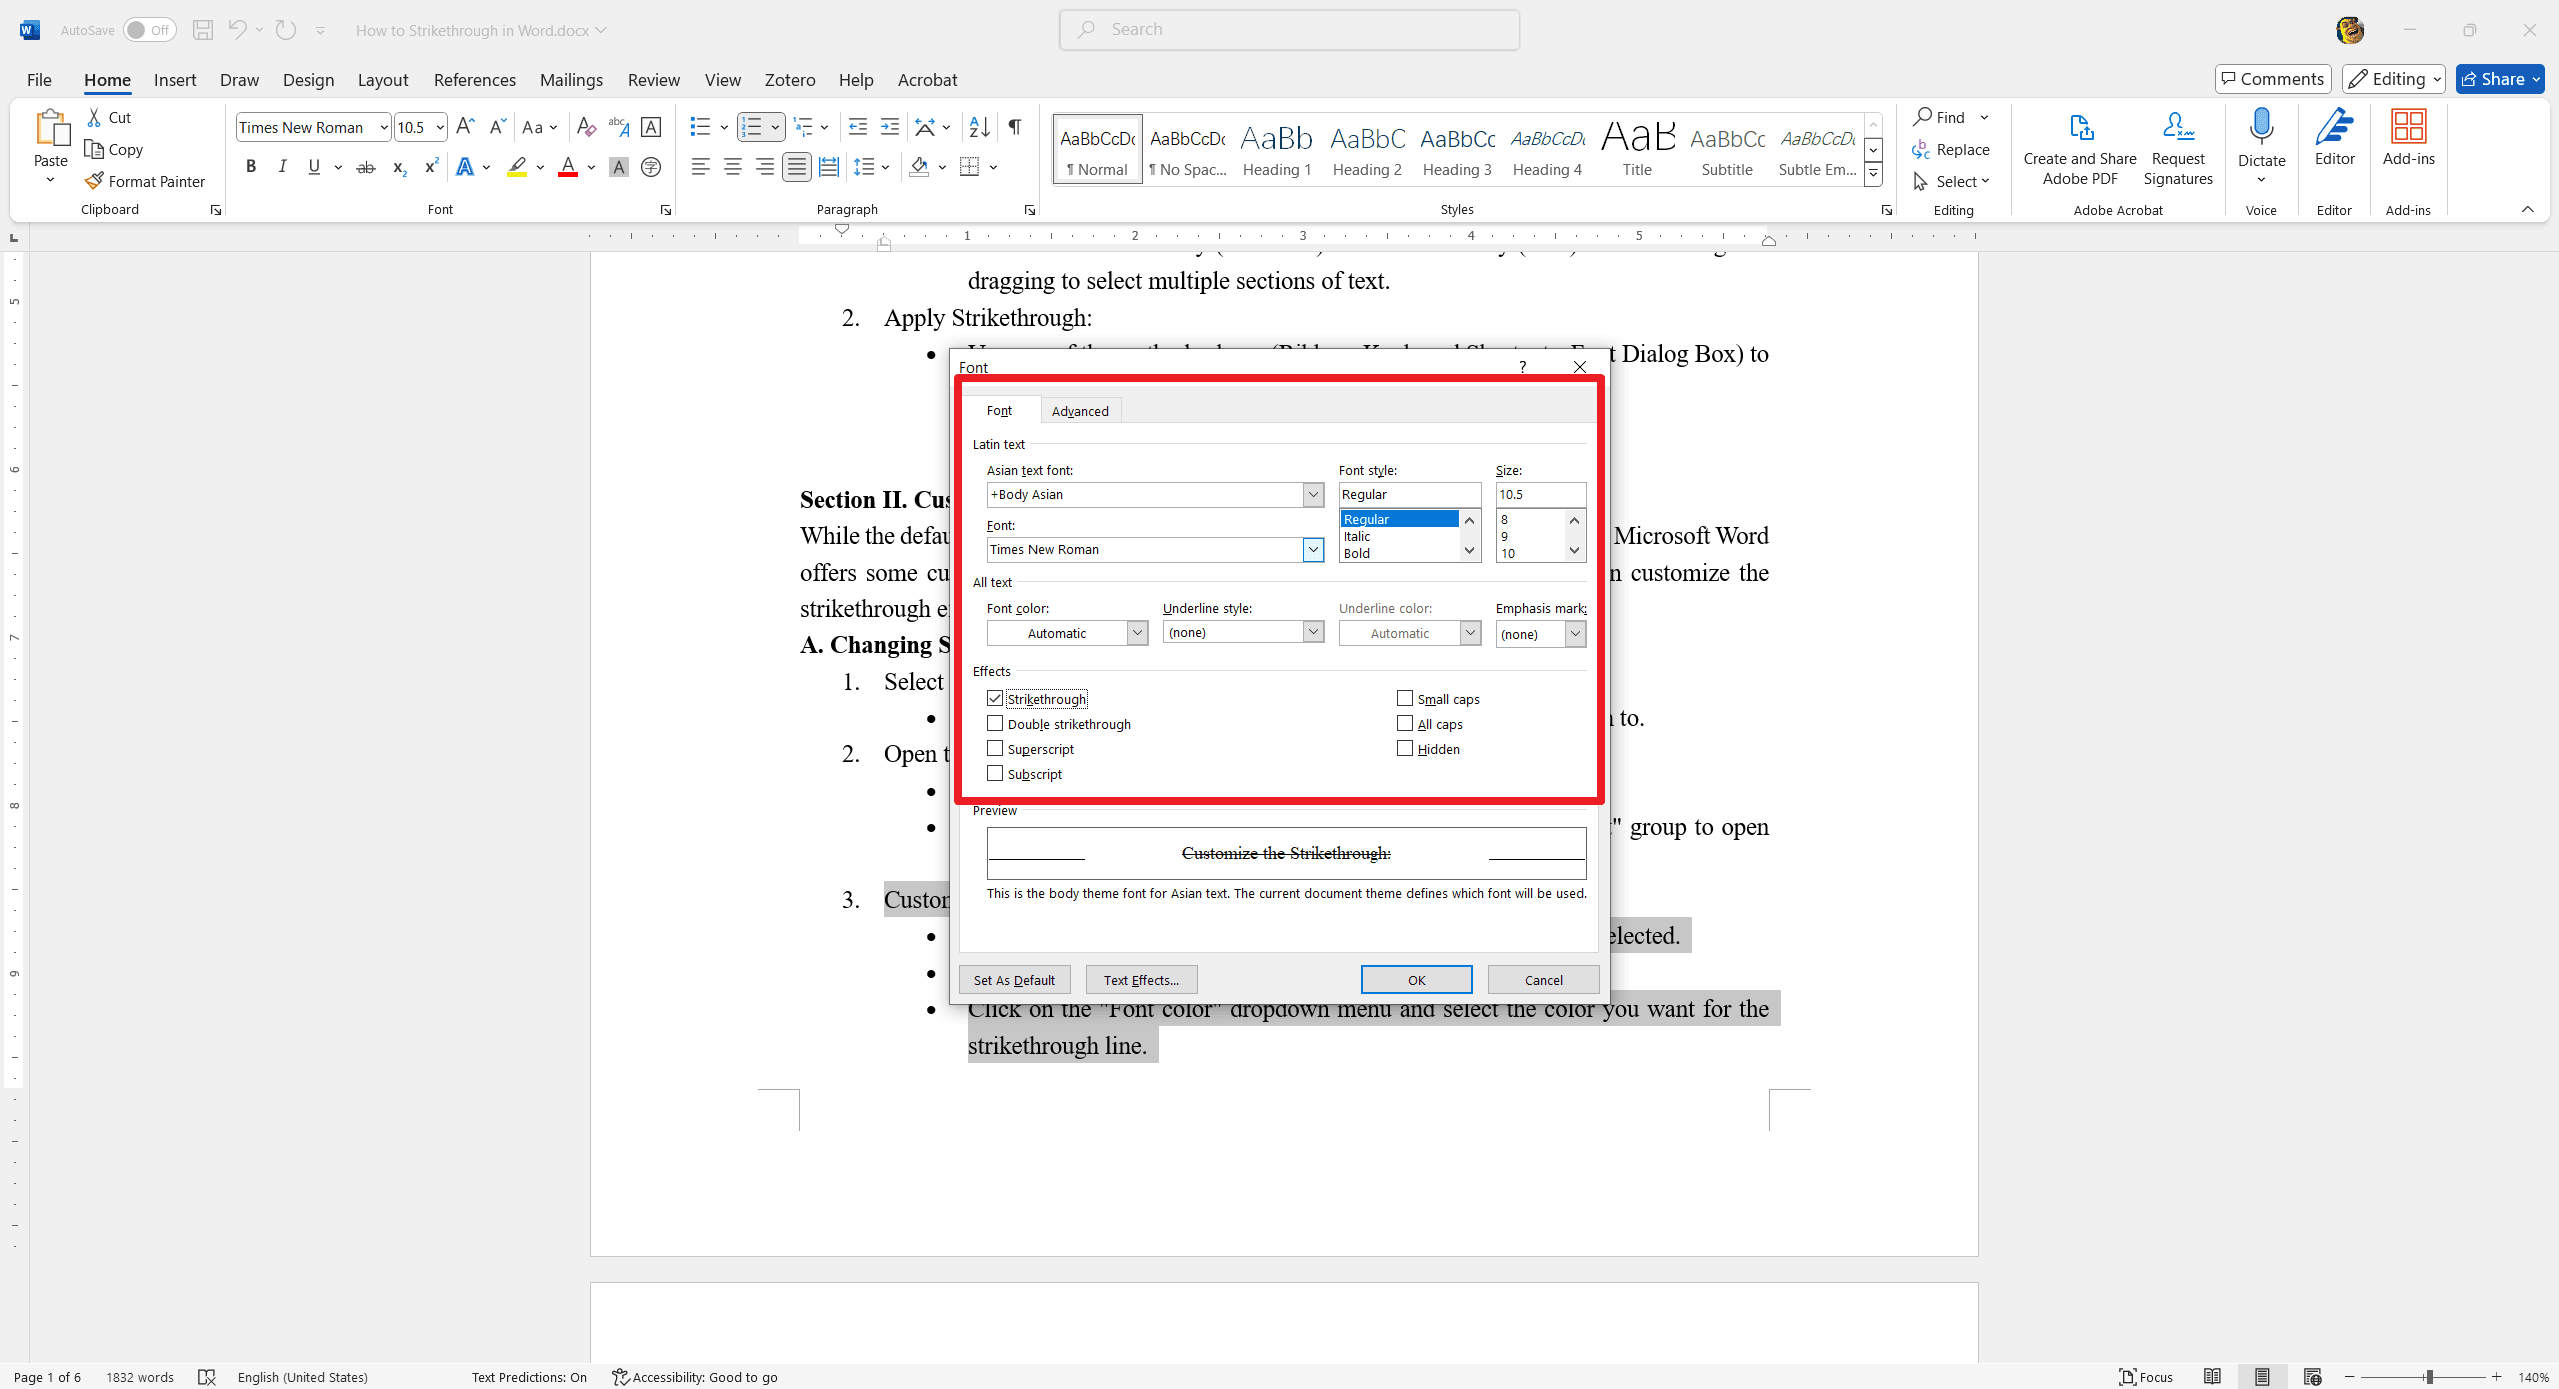
While the default strikethrough line is typically a single, black line through the text, Microsoft Word offers some customization options to better suit your needs. Here’s how you can customize the strikethrough effect:
A. Changing Strikethrough Color
- Select the Text:
- Highlight the text you want to apply the customized strikethrough to.
- Open the Font Dialog Box:
- Go to the "Home" tab on the Ribbon.
- Click on the small arrow in the bottom-right corner of the "Font" group to open the Font dialog box.
- Customize the Strikethrough:
- In the Font dialog box, click on the "Font" tab if it's not already selected.
- Check the "Strikethrough" box to apply the strikethrough.
- Click on the "Font color" dropdown menu and select the color you want for the strikethrough line.
- Click "OK" to apply the changes.
Note: The color of the strikethrough line will match the font color you select. Unfortunately, Word does not support changing the strikethrough color independently of the font color.
B. Adjusting Strikethrough Style
- Double Strikethrough:
- Microsoft Word does not natively support double strikethrough. However, you can achieve a similar effect by using the "Highlight" feature or by manually drawing lines.
- To use the "Highlight" feature, select the text, go to the "Home" tab, and choose a highlight color. This will not create a double strikethrough but will emphasize the text differently.
- Using Shapes for Custom Strikethrough:
- For more advanced customization, you can use shapes to create a custom strikethrough effect.
- Go to the "Insert" tab and select "Shapes."
- Choose a line shape and draw it over the text to create a custom strikethrough line.
- You can adjust the color, thickness, and style of the line to match your preferences.
Tip: While these methods provide some level of customization, they may not be as seamless as the built-in strikethrough feature. Use them judiciously to maintain the professional appearance of your document.
Section III. Removing Strikethrough
If you need to remove the strikethrough formatting from your text, follow these straightforward steps:
A. Using the Ribbon
- Select the Text:
- Highlight the text from which you want to remove the strikethrough.
- Remove Strikethrough:
- Go to the "Home" tab on the Ribbon.
- In the "Font" group, click the "Strikethrough" button (it looks like
abc) to toggle it off.
B. Using Keyboard Shortcuts
- Select the Text:
- Highlight the text from which you want to remove the strikethrough.
- Remove Strikethrough:
- Press the keyboard shortcut to toggle off the strikethrough:
- Windows: Alt + H + 4
- Mac: Command + Shift + X
- Press the keyboard shortcut to toggle off the strikethrough:
C. Using the Font Dialog Box
- Select the Text:
- Highlight the text from which you want to remove the strikethrough.
- Open the Font Dialog Box:
- Go to the "Home" tab on the Ribbon.
- Click on the small arrow in the bottom-right corner of the "Font" group to open the Font dialog box.
- Remove Strikethrough:
- In the Font dialog box, click on the "Font" tab if it's not already selected.
- Uncheck the "Strikethrough" box.
- Click "OK" to apply the changes.
Tip: If you accidentally apply strikethrough to a large section of text, using the "Undo" feature (Ctrl + Z on Windows or Command + Z on Mac) can quickly revert the change.
FAQs
Q1: Can I apply strikethrough to an entire paragraph?
A1: Yes, you can apply strikethrough to an entire paragraph. Simply select the paragraph by clicking and dragging your mouse over the text, or by triple-clicking within the paragraph. Then, apply the strikethrough formatting using the ribbon, keyboard shortcut, or font dialog box.
Q2: How do I remove strikethrough from text?
A2: To remove strikethrough, select the text with the strikethrough formatting. Then, go to the Home tab and click the strikethrough button again to toggle it off. Alternatively, you can use the same keyboard shortcuts (Alt + H + 4 on Windows or Command + Shift + X on Mac) to remove the formatting.
Q3: Can I customize the appearance of the strikethrough line?
A3: While Word does not offer extensive customization options for the strikethrough line itself, you can change the color of the text to make the strikethrough more visible. To do this, select the text, go to the Home tab, and choose a different text color from the Font Color dropdown.

