Presentations in PowerPoint are a must have for professionals and students to deliver impactful reports with dynamic images. Did you know you can automate your slideshow for smooth playback PROCESS?
Are you presenting at meetings, trade shows or events? Then, learning how to loop a PowerPoint slideshow ensures your presentation runs smoothly from the first slide to the last without manual involvement. Understanding how to advance a slide in PowerPoint automatically can enhance your provision.
We have put together a step by step guide to simplify the process on how to loop a PowerPoint presentation using Microsoft PowerPoint controlling transition of slides.
What is PowerPoint Looping?
You typically advance slides manually in a standard PowerPoint presentation by pressing keys on your keyboard or clicking with your mouse or a remote of presentation. The slides advance automatically without manual control when activating PowerPoint looping. It means the presenter doesn't have to interact with the computer during the slideshow of your project.
This way you can specify exactly how long each slide should remain obvious. The presentation smoothly moves to the next slide after passing set time and automatically returns to the first slide and begins again when reaches the end. It creates a continuous series.
Exploring Slide Advancement Methods
PowerPoint advancing slides involves the various techniques during a presentation to progress from one to another slide. Manual advancement is the most basic method. Here the presenter controls transitions using mouse clicks, keyboard arrows or presentation remotes anything. Users can implement timed advancement that moves slides forward after predetermined intervals or utilize rehearsed timings that record natural pacing during practice rounds. Advancement controls offer presenters flexibility to match their delivery style with different presentation scenarios like formal speeches and self running shows.
How to Set Up a Looping PowerPoint Presentation
Follow these simple instructions to configure your PowerPoint slideshow to play on repeat:
1. Install Microsoft PowerPoint on your desktop or laptop and open your presentation document.
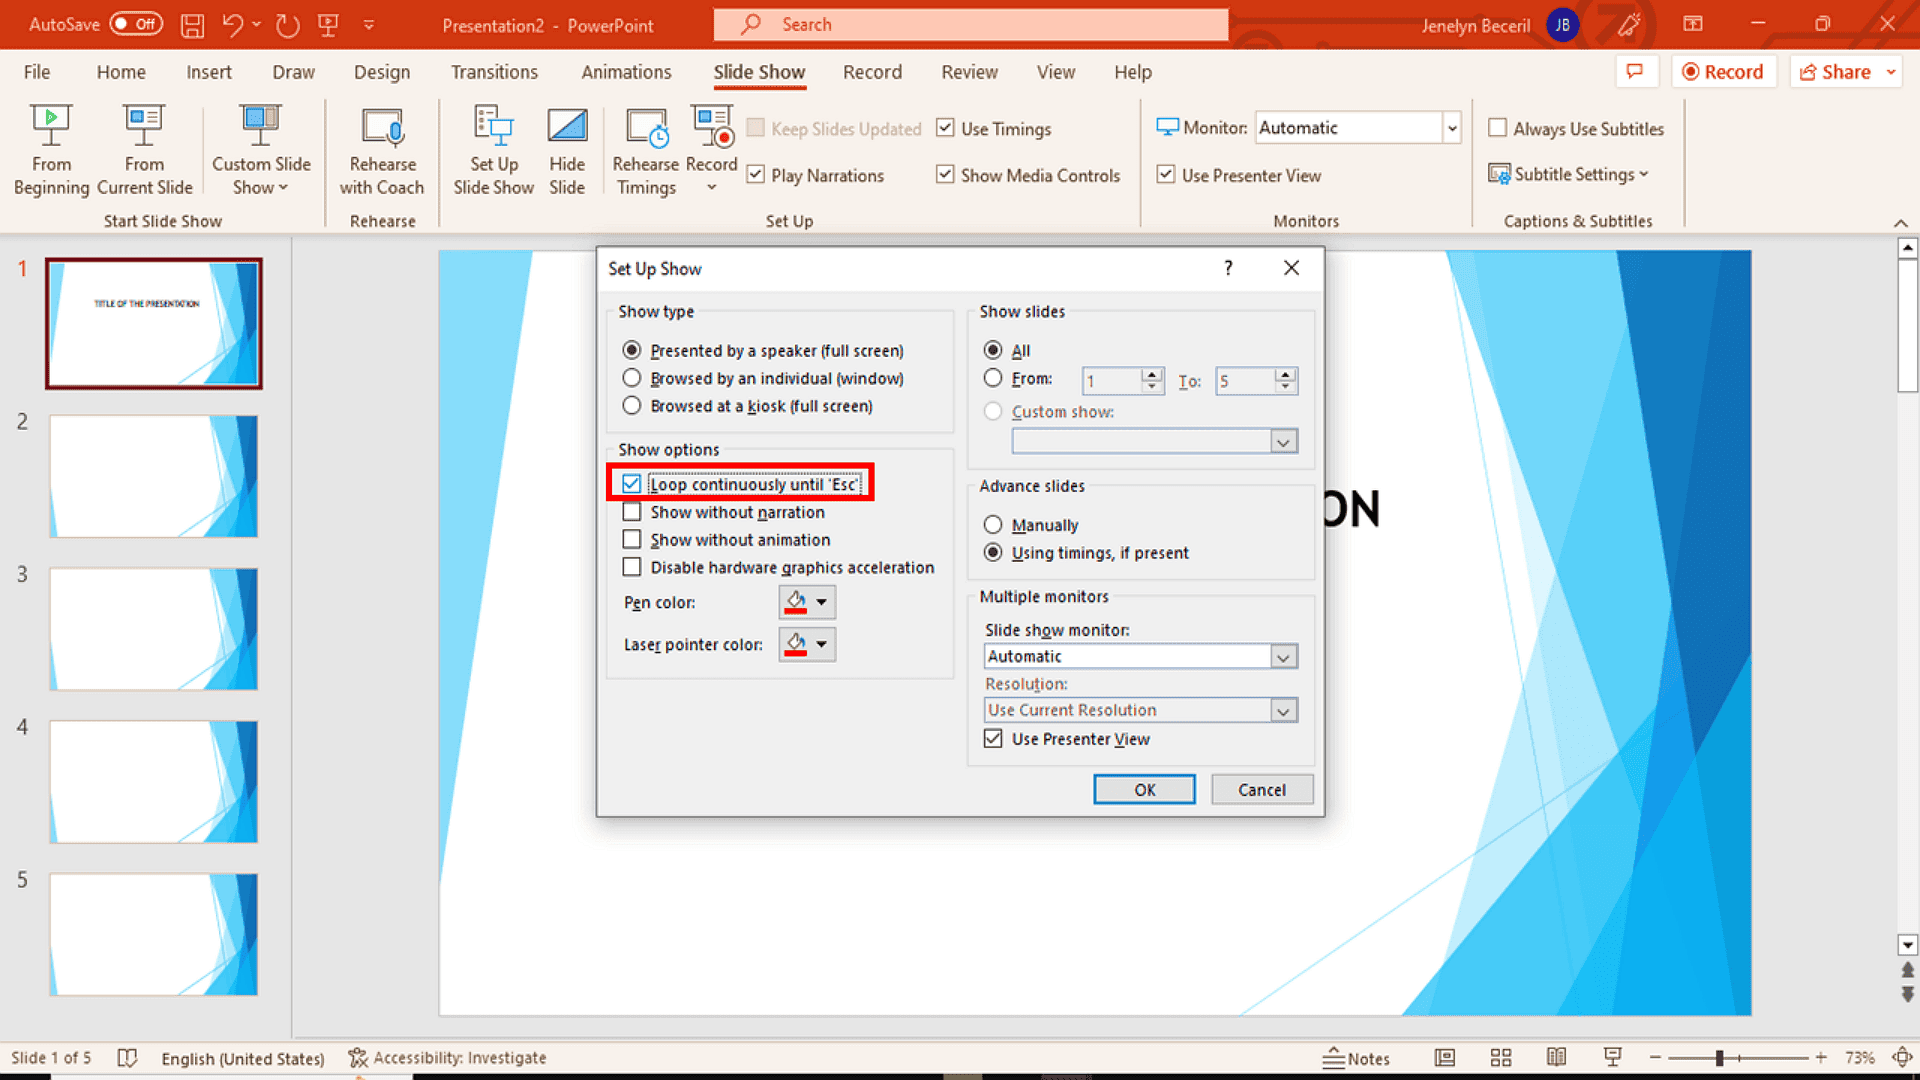
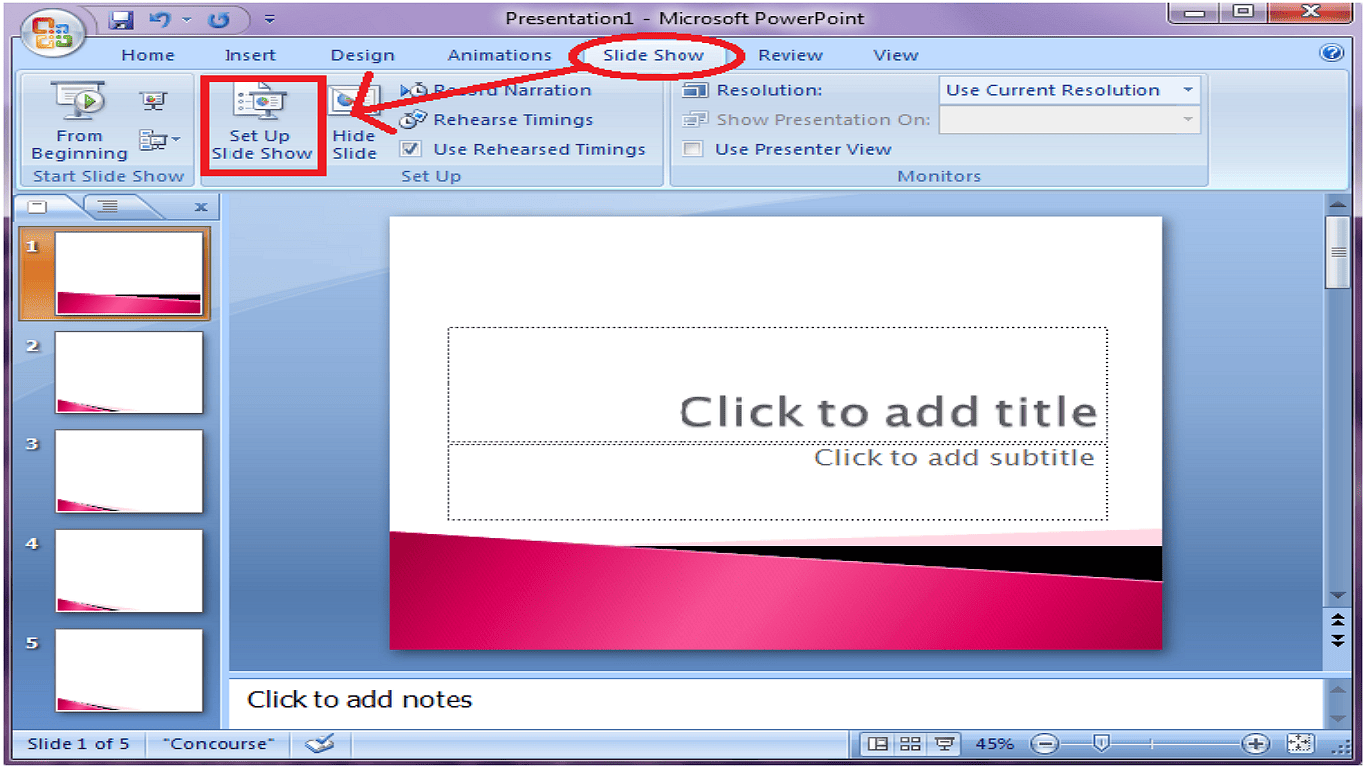
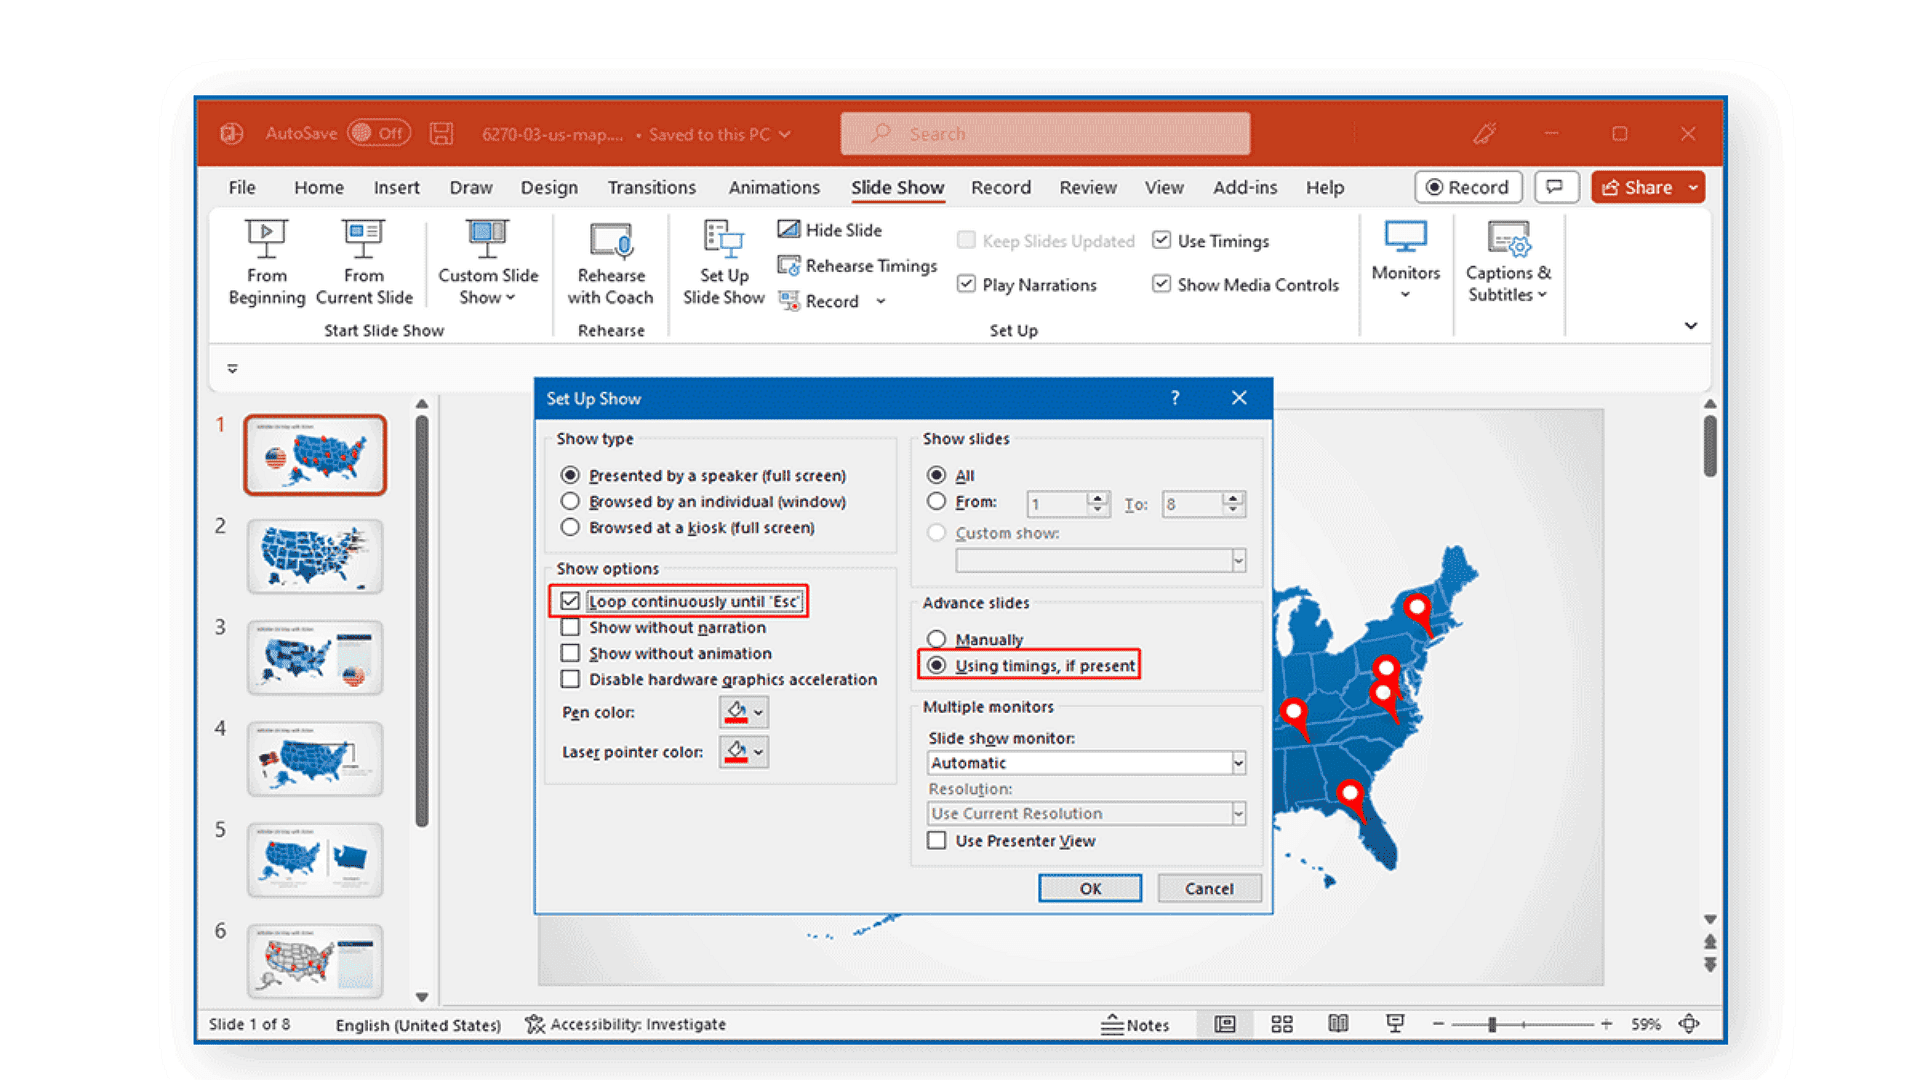
2. Click on the Slide Show tab in the top menu and choose Set Up Slide Show option.
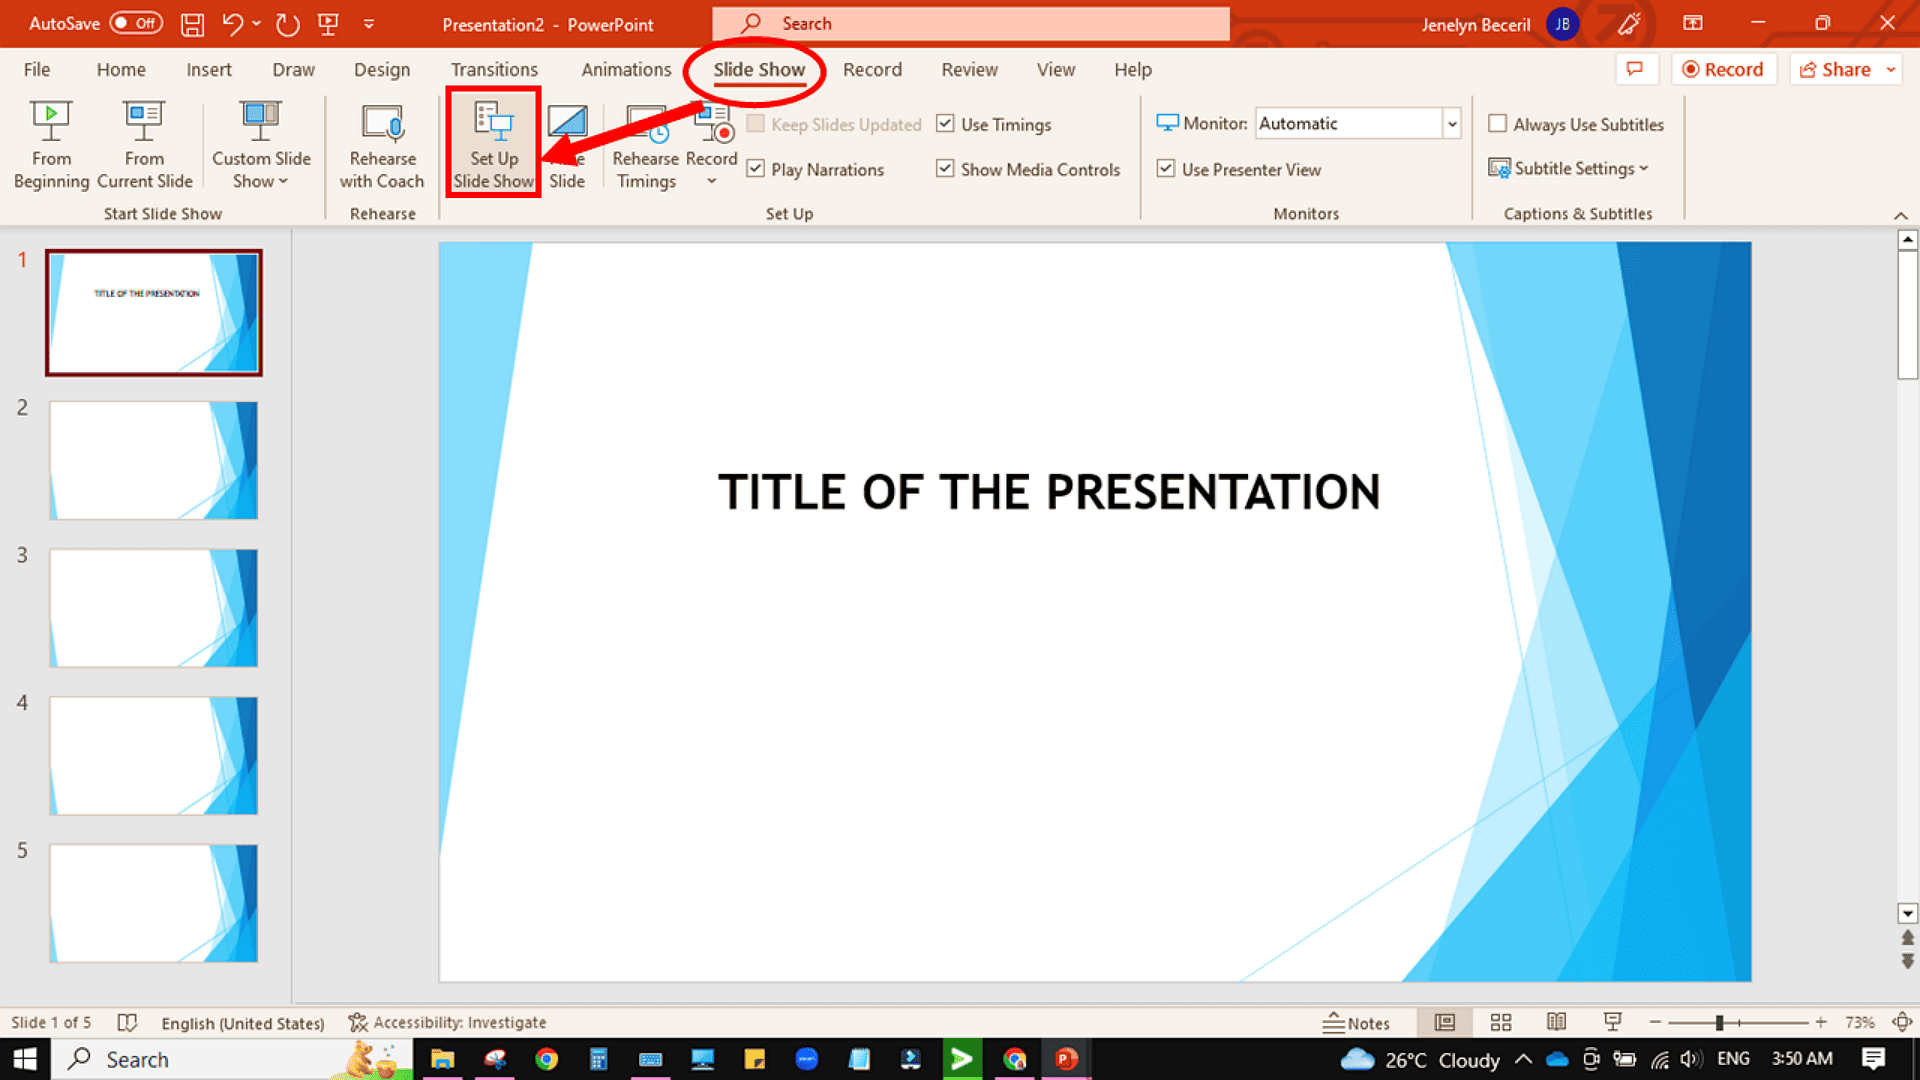
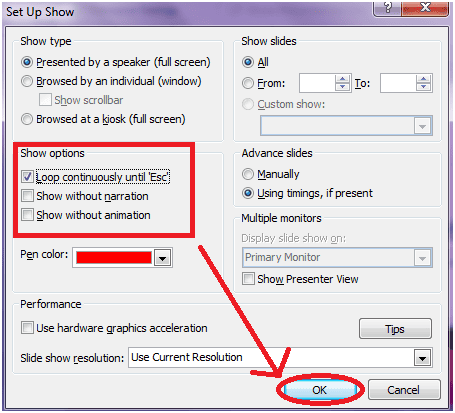
3. Locate the Show options section in the settings window. Then check the box labeled Loop continuously until Esc and click OK to confirm.
4. Click on the Transitions tab in the ribbon menu to adjust slide progression view.
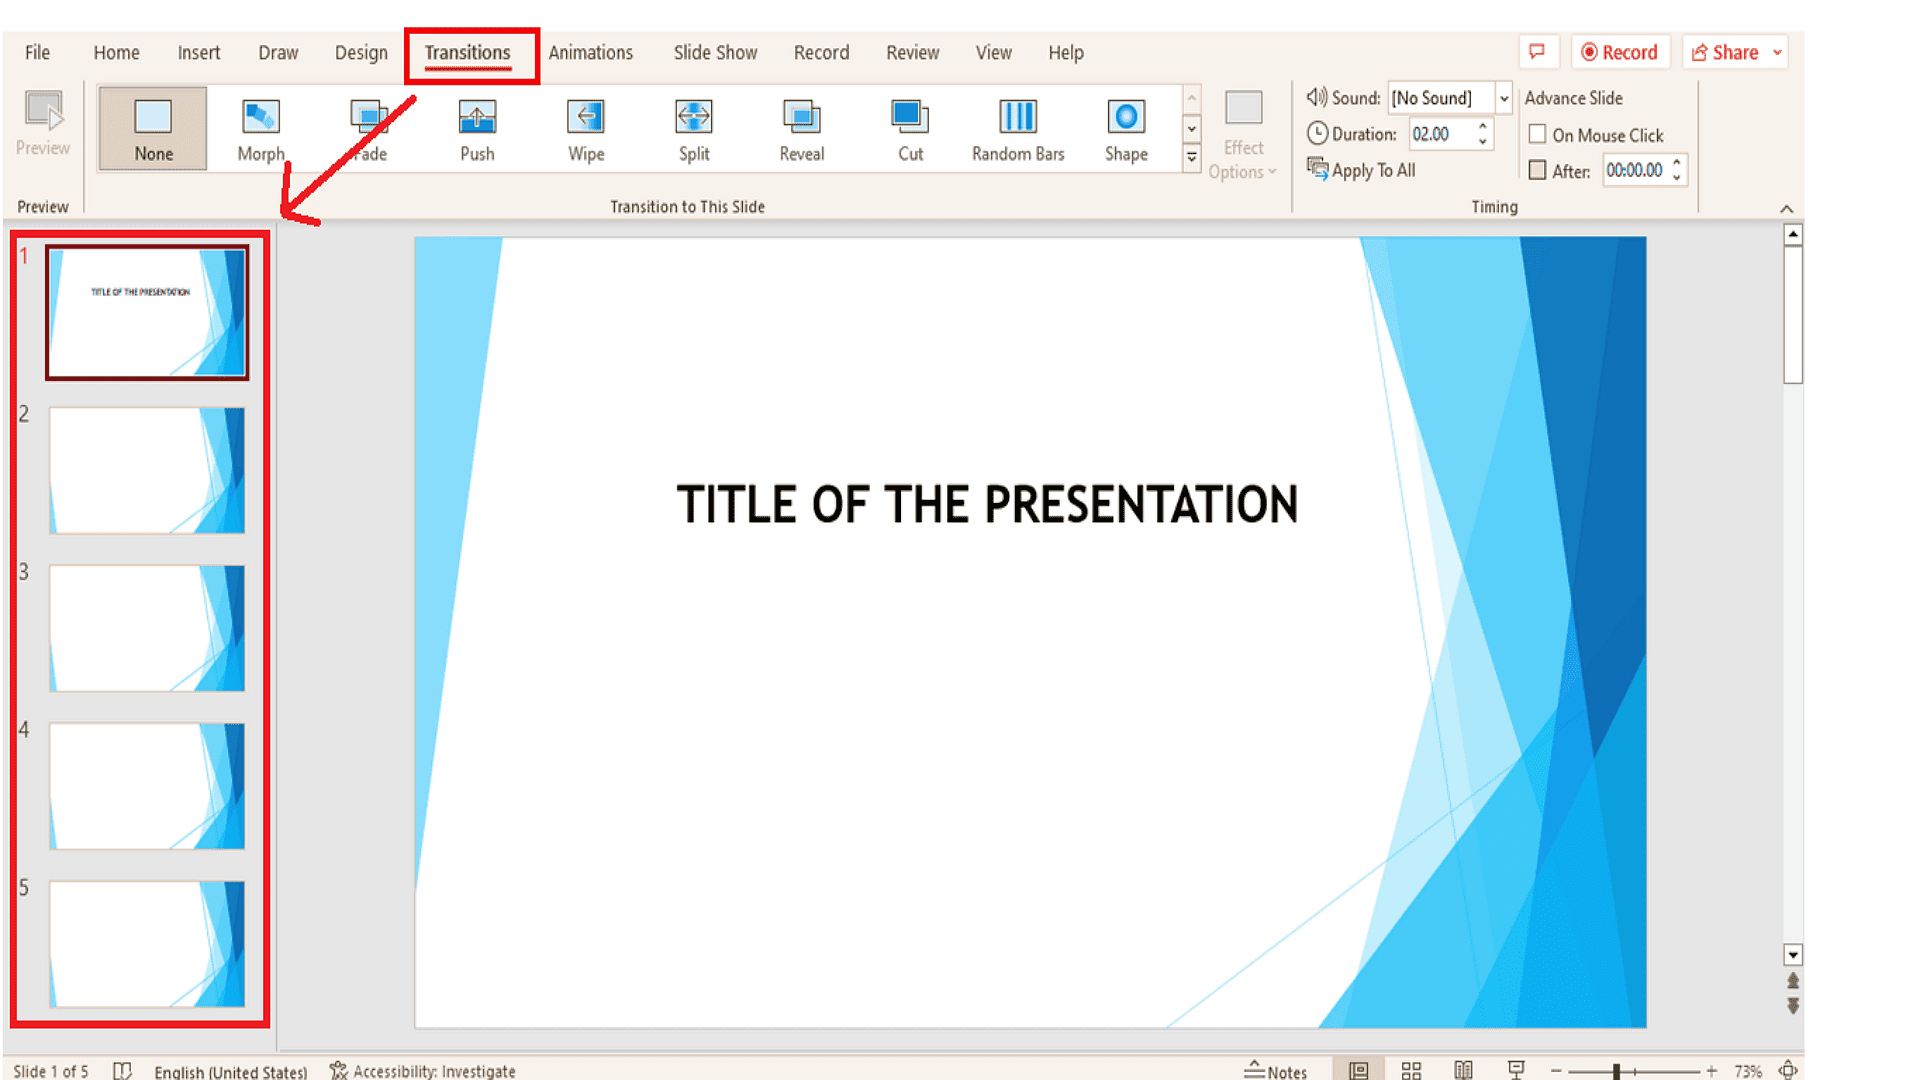
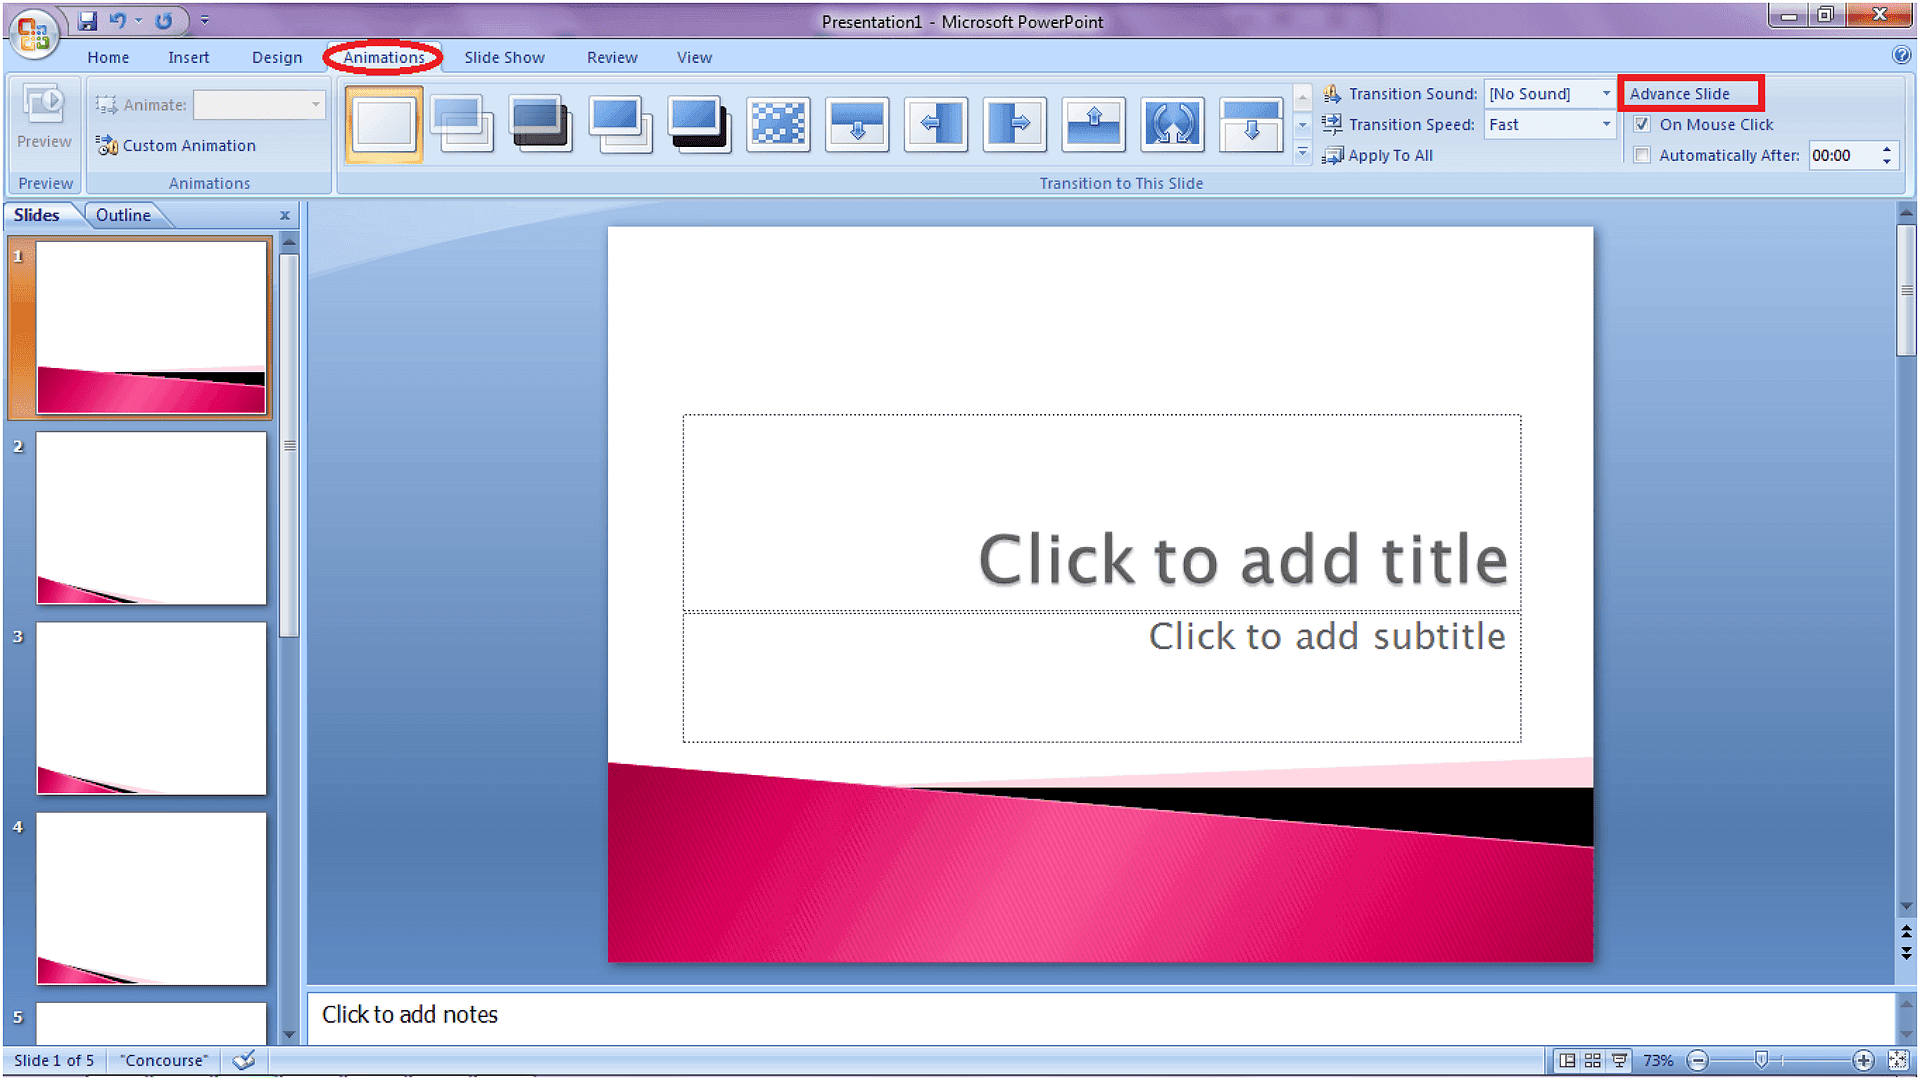
5. Under the Timing section, find the Advance Slides options. Disable On Mouse Click and enable After, then set your preferred slide duration.
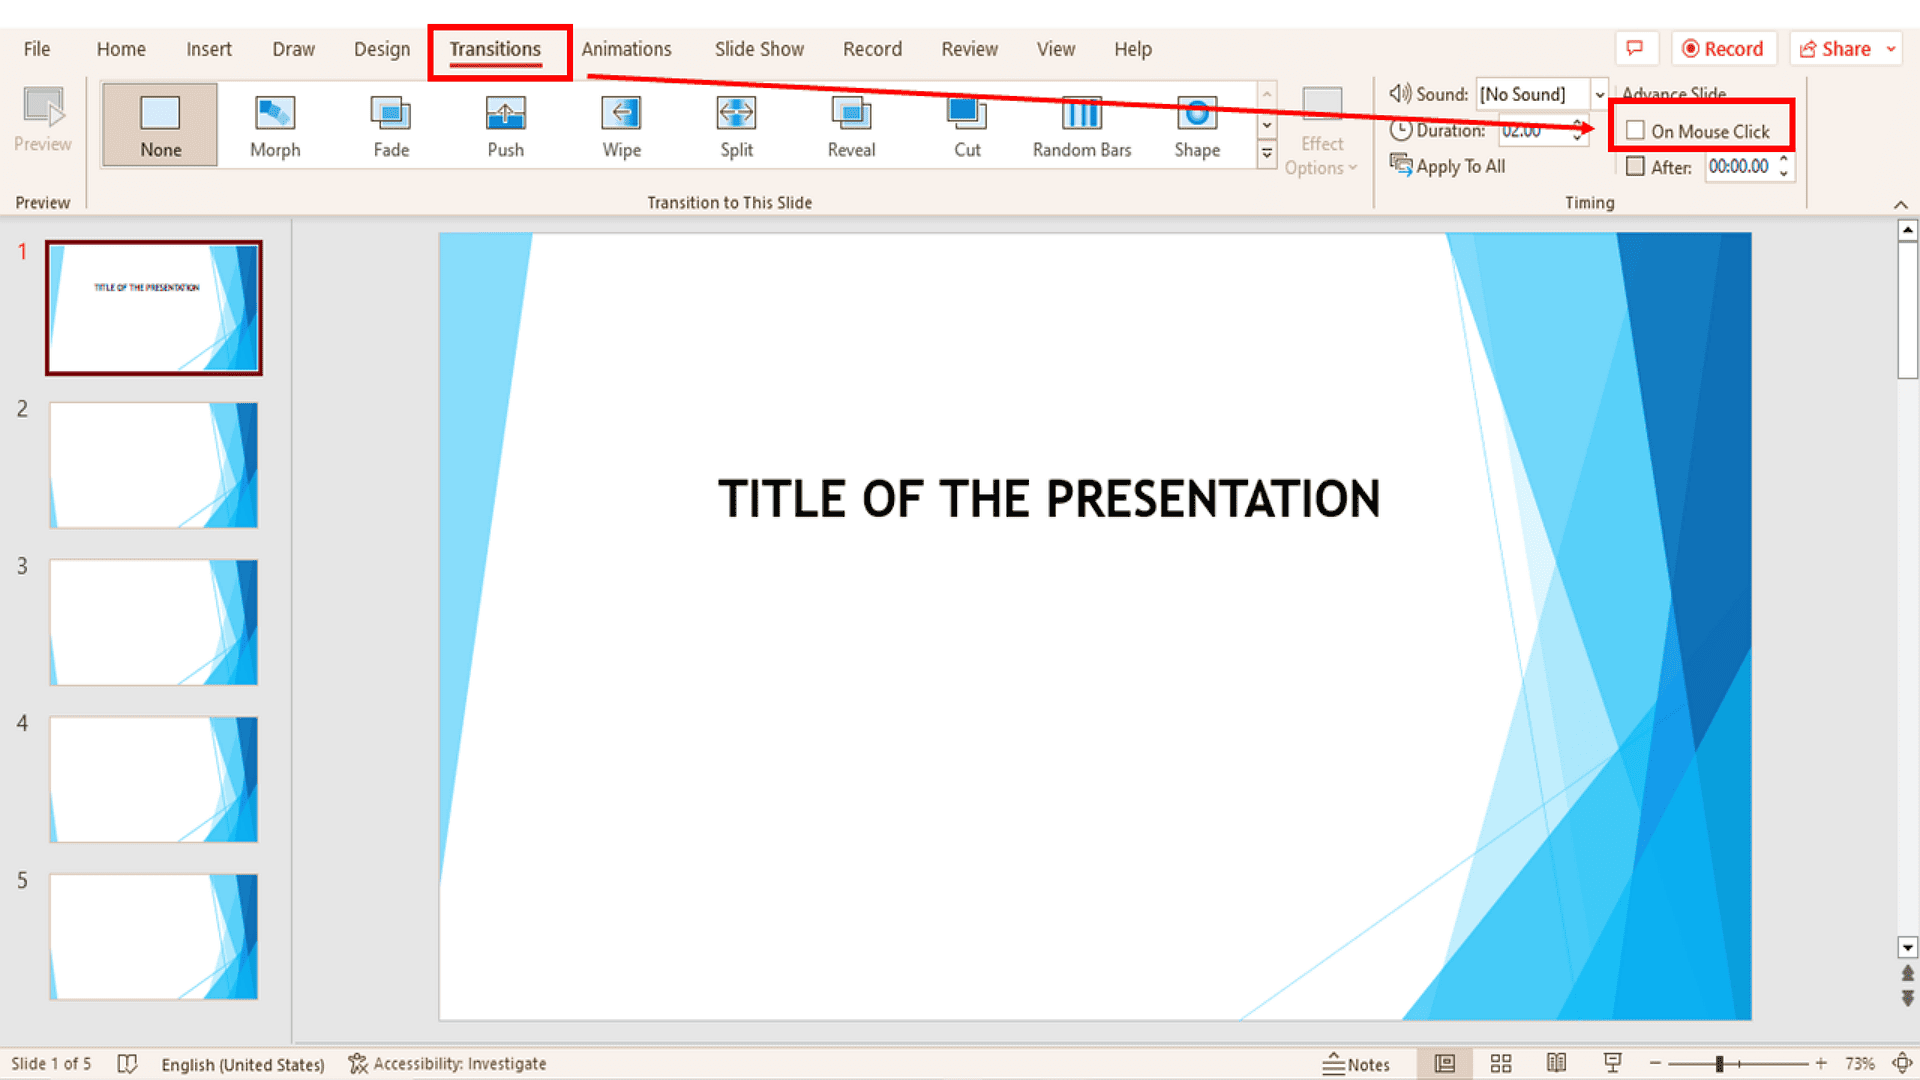
The duration you set using the up and down arrows next to After determines how long each slide remains visible. Once the presentation reaches the final slide, it will restart from the beginning automatically.
For customized timing on specific slides, select them individually or in bulk. Tap on the first slide in the left hand panel and hold Shift. Then click the last slide to highlight multiple slides together.
How to Create a Looping Slideshow in PowerPoint 2007
See how to make your presentation play continuously for PowerPoint 2007 users:
1. First, open your PowerPoint 2007 file on your computer.
2. Click on the Slide Show tab and then choose Set Up Slide Show bar.
3. Find Show options and check Loop continuously until Esc in the settings window.
4. Now click OK.
5. Navigate to the Animations tab and locate the Advance Slide settings.
6. Disable On Mouse Click, enable Automatically After, and set your preferred slide duration.
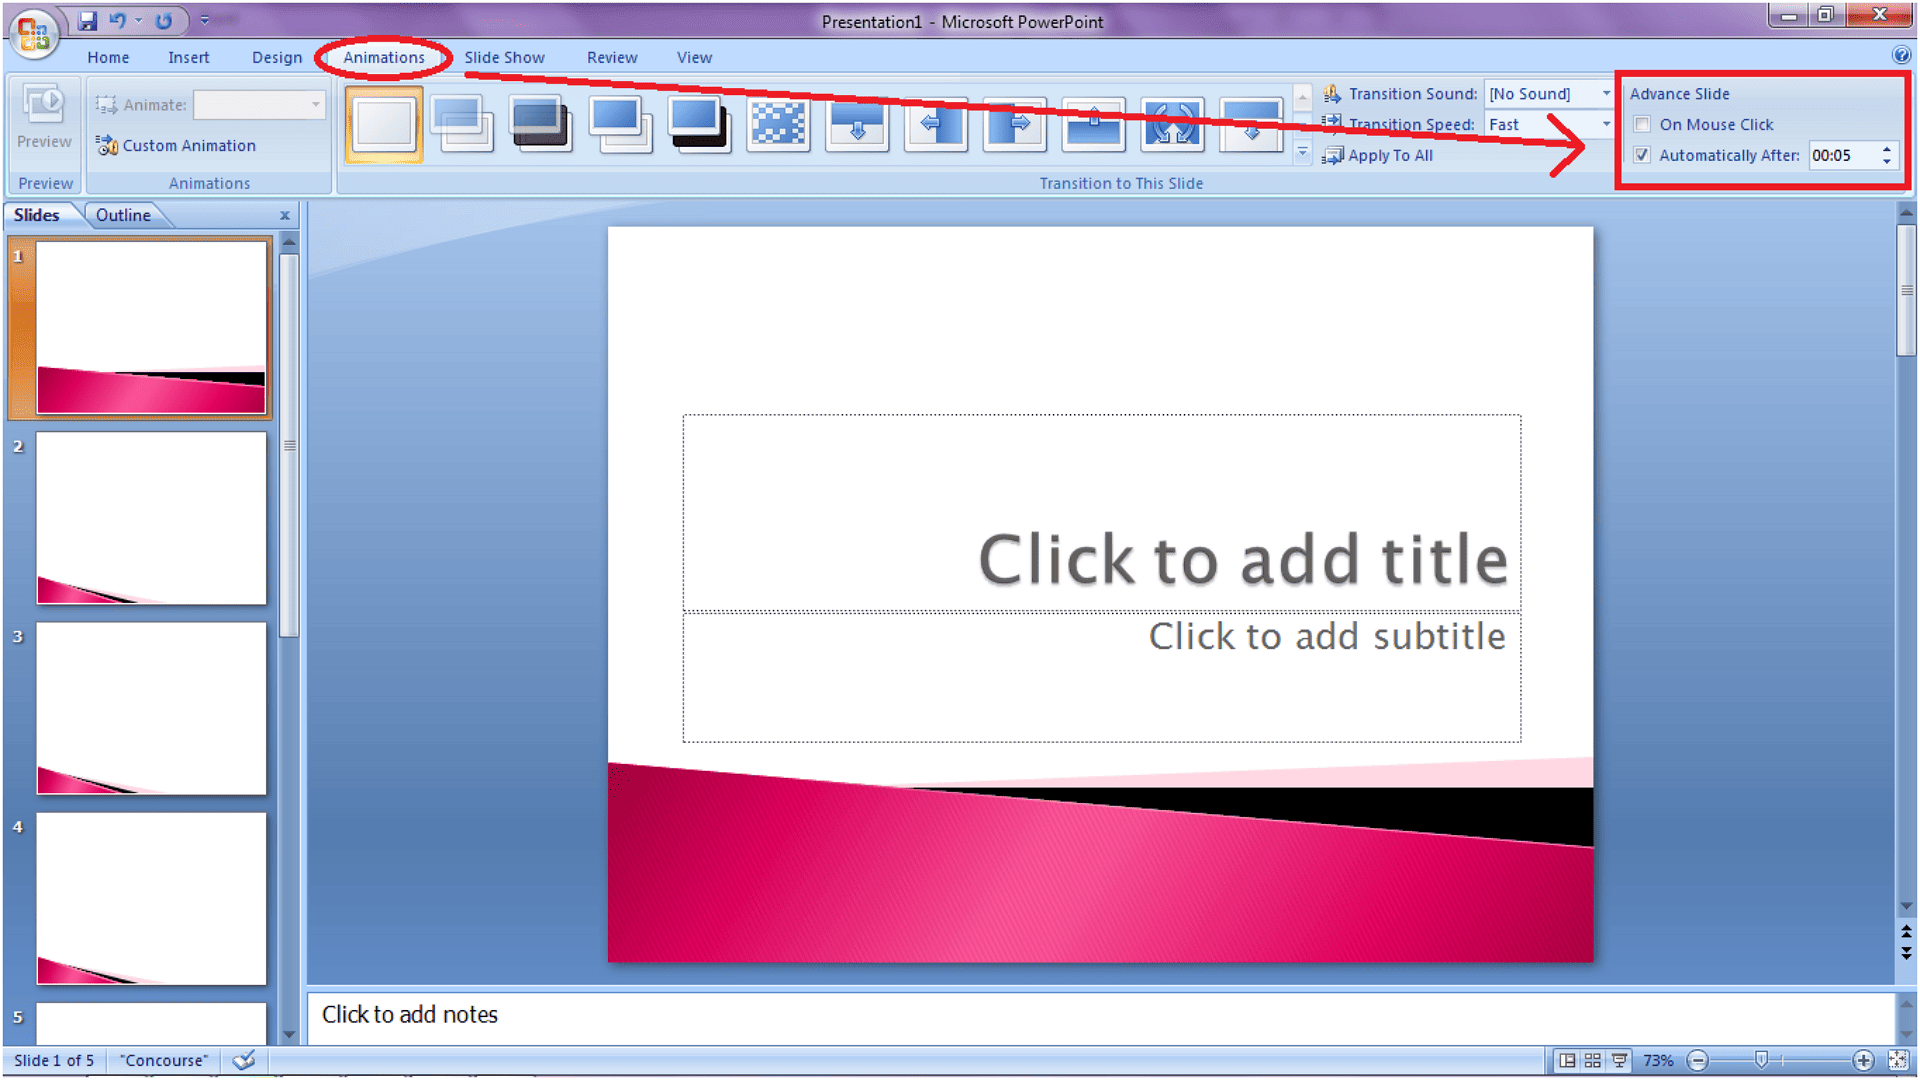
Once configured, your slides will advance automatically without manual clicks.
For additional control:
1. Go to the Slide Show tab and select Set Up Slide Show again.
2. Choose Browsed at a kiosk (full screen) and pick Using timing, if present under Advance slides.
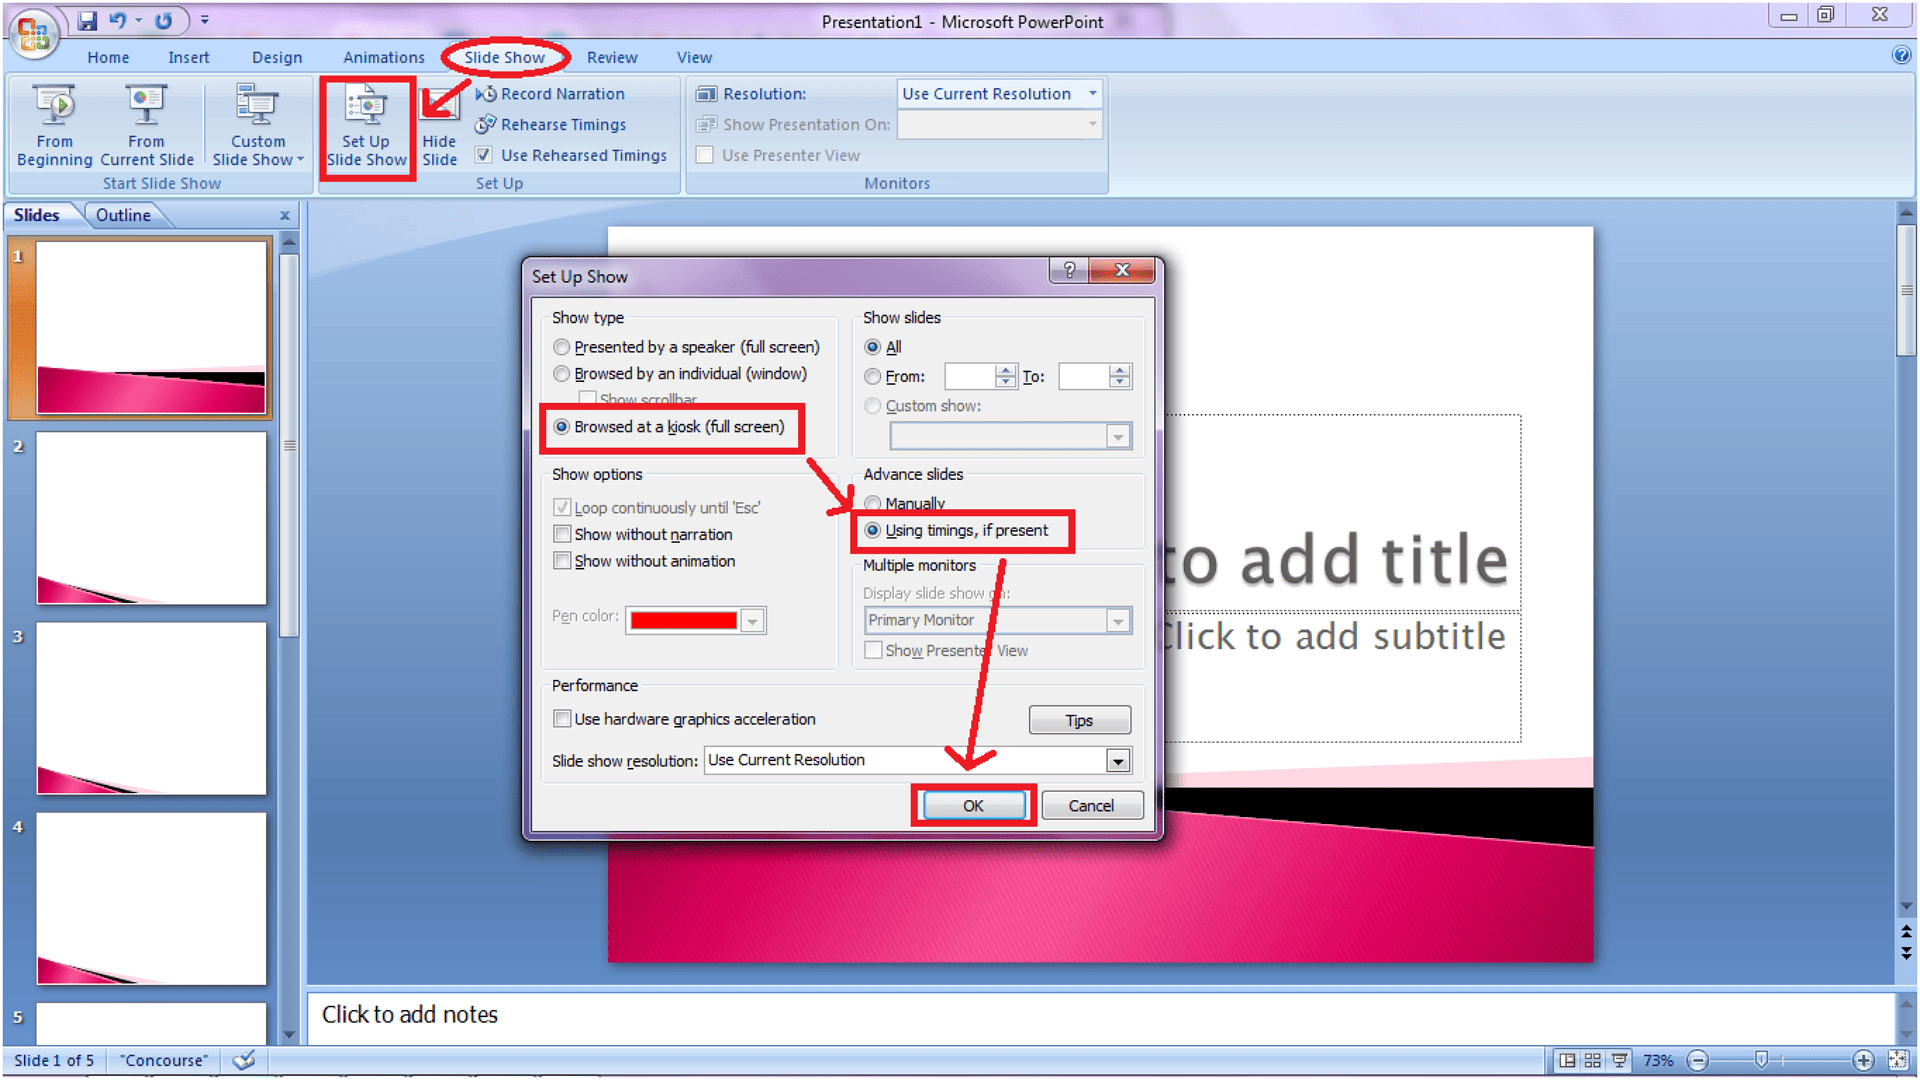
3. Click OK to confirm.
Remember: Effective presentations combine technical setup with strong design. Apply these settings along with good presentation principles for maximum impact. For best results, review PowerPoint design guidelines and explore additional tutorials.
How to Set Up Both Manual and Automatic PowerPoint Slide Loops
When creating presentations from break timers or countdown templates (available in both PowerPoint and Google Slides), you'll often need continuous playback for events. The process for setting slide duration and transition method can be found in the Transitions tab's timing controls.
Manual Looping Configuration:

For presentations requiring audience interaction:
1. Access Slide Show → Set Up Show
2. Activate continuous looping
3. Choose Manually under slide advancement
This enables control via click, keyboard arrows, or presentation devices
Automatic Looping Setup:
For unattended presentations:
1. In the same configuration panel
2. Opt for Use timings rather than manual control
3. Customize display durations in Transitions
Practical applications for automatic looping include:
- Digital signage displays
- Conference session transitions
- Lobby information screens
- Continuous event programming
Expert Recommendation
When preparing timer-based slideshows, pre-configure your slide durations to match scheduled intervals. The automated loop function provides hands-free operation - particularly valuable for situations requiring constant, uninterrupted playback.
Always conduct a full test run to verify timing accuracy and transition smoothness before your live presentation.
Troubleshooting and Their Solutions
Presentation Not Looping Properly
Check "Loop continuously until Esc" in Slide Show settings. Ensure "Use timings" is enabled for automatic advancement. Verify all slides have transition durations set. Test in full-screen mode (F5) to confirm proper looping behavior before final use.
Slides Not Advancing Automatically
Disable "On Mouse Click" in the Transitions tab. Set specific durations in the "After" field for each slide. Confirm all slides follow the same timing rules. Check for conflicting animation settings that might interrupt the automatic progression.
Presentation Stops Mid-Cycle
Review transition timings on all slides for consistency. Look for manual advance overrides on specific slides. Test presentation from different starting points to isolate where the interruption occurs. Ensure no slides have zero-second durations accidentally set.
Media Playback Issues
Set videos to "Play Automatically" in the Playback tab. Enable "Play Across Slides" for background audio. Check media file locations haven't changed. Verify all embedded content works in presentation mode before finalizing the looped slideshow.
Kiosk Mode Problems
Select "Browsed at kiosk" in Set Up Show. Adjust power settings to prevent sleep mode. Test presentation on target display device. Confirm all interactive elements work properly in kiosk mode before deployment.
Conclusion
Looping your PowerPoint slideshow isn’t just a technical trick—it’s your secret weapon for creating captivating, self-running displays that work while you focus on what matters most. Whether for trade shows, digital signage, or event backdrops, automatic looping ensures your message stays front and center without constant supervision.
Now that you’re a PowerPoint looping expert, why not test it out on your next project? Your audience (and your sanity) will thank you for the flawless, stress-free presentation experience. For more PowerPoint hacks, explore our PDF Agile's PowerPoint Tips section. to update your data-driven slides.