Welcome to our tutorial on "How to Enable Formatting Marks In Word"! If you're here, you're likely someone who values precision and clarity in your documents. Whether you're a student crafting a term paper, a professional drafting a report, or a creative writer penning your next masterpiece, understanding and utilizing formatting marks can significantly enhance your productivity and the quality of your work.
Formatting marks are the unsung heroes of document creation. They are the invisible guides that help you see the structure and layout of your text, ensuring that every space, paragraph, and tab is exactly where it should be. By making these marks visible, you gain a deeper understanding of your document's formatting, which can be crucial for troubleshooting layout issues, maintaining consistency, and achieving a polished final product.
In this tutorial, we'll dive into the world of formatting marks, exploring what they are, why they matter, and how to enable them in Microsoft Word. Whether you're using a Windows PC or a Mac, we've got you covered with step-by-step instructions and handy keyboard shortcuts. By the end of this guide, you'll be equipped with the knowledge and tools to master formatting marks and elevate your document creation skills to new heights.
Understanding Formatting Marks
Formatting marks are the unsung heroes of document creation. They are the invisible forces that shape your text, ensuring that every paragraph, space, and tab is precisely where it should be. Think of them as the backstage crew of your document—while the content takes center stage, formatting marks work behind the scenes to make everything run smoothly.
Definition and Purpose
Formatting marks are symbols that represent the formatting elements in your Word document. They include paragraph marks, spaces, tab characters, and more. These marks are usually hidden, but when enabled, they provide a visual representation of how your document is structured. This can be incredibly useful for editing, troubleshooting layout issues, and ensuring consistency in your formatting.
Types of Formatting Marks
- Paragraph Marks (¶)
- Description: The paragraph mark indicates the end of a paragraph. It's like the period at the end of a sentence but for paragraphs.
- Importance: Helps you see where one paragraph ends and another begins, making it easier to manage spacing and alignment.
- Spaces (·)
- Description: Spaces are represented by small dots. They show where you've added spaces between words or characters.
- Importance: Useful for identifying extra spaces that can disrupt the flow of your text.
- Tab Characters (→)
- Description: Tabs are shown as arrows pointing to the right. They indicate where you've used the tab key to align text.
- Importance: Essential for creating tables, aligning text, and ensuring consistent indentation.
- Hidden Text (+++)
- Description: Hidden text is marked with a dotted underline and the text itself is not visible unless formatting marks are shown.
- Importance: Great for adding notes or comments that you don't want to appear in the final document.
- Optional Hyphens (¬)
- Description: Optional hyphens are shown as a soft hyphen symbol. They indicate where a word can be split at the end of a line.
- Importance: Helps in managing text flow and avoiding awkward line breaks.
- Object Anchors (⎕)
- Description: Object anchors show where embedded objects (like images or charts) are anchored in the text.
- Importance: Useful for understanding how objects are positioned relative to the text.
Benefits of Using Formatting Marks
1. Enhanced Editing: Formatting marks make it easier to see and edit the structure of your document. You can quickly spot and fix issues like extra spaces, incorrect tabs, and misplaced paragraphs.
2. Consistency: Ensuring consistent formatting is crucial for professional documents. Formatting marks help you maintain a uniform look and feel throughout your document.
3. Troubleshooting: When something goes wrong with your document layout, formatting marks can be a lifesaver. They help you identify and correct formatting issues that might otherwise be invisible.
4. Learning Tool: For beginners, formatting marks are an excellent learning tool. They provide a visual guide to understanding how text and formatting work together in Word.
Enabling Formatting Marks in Word
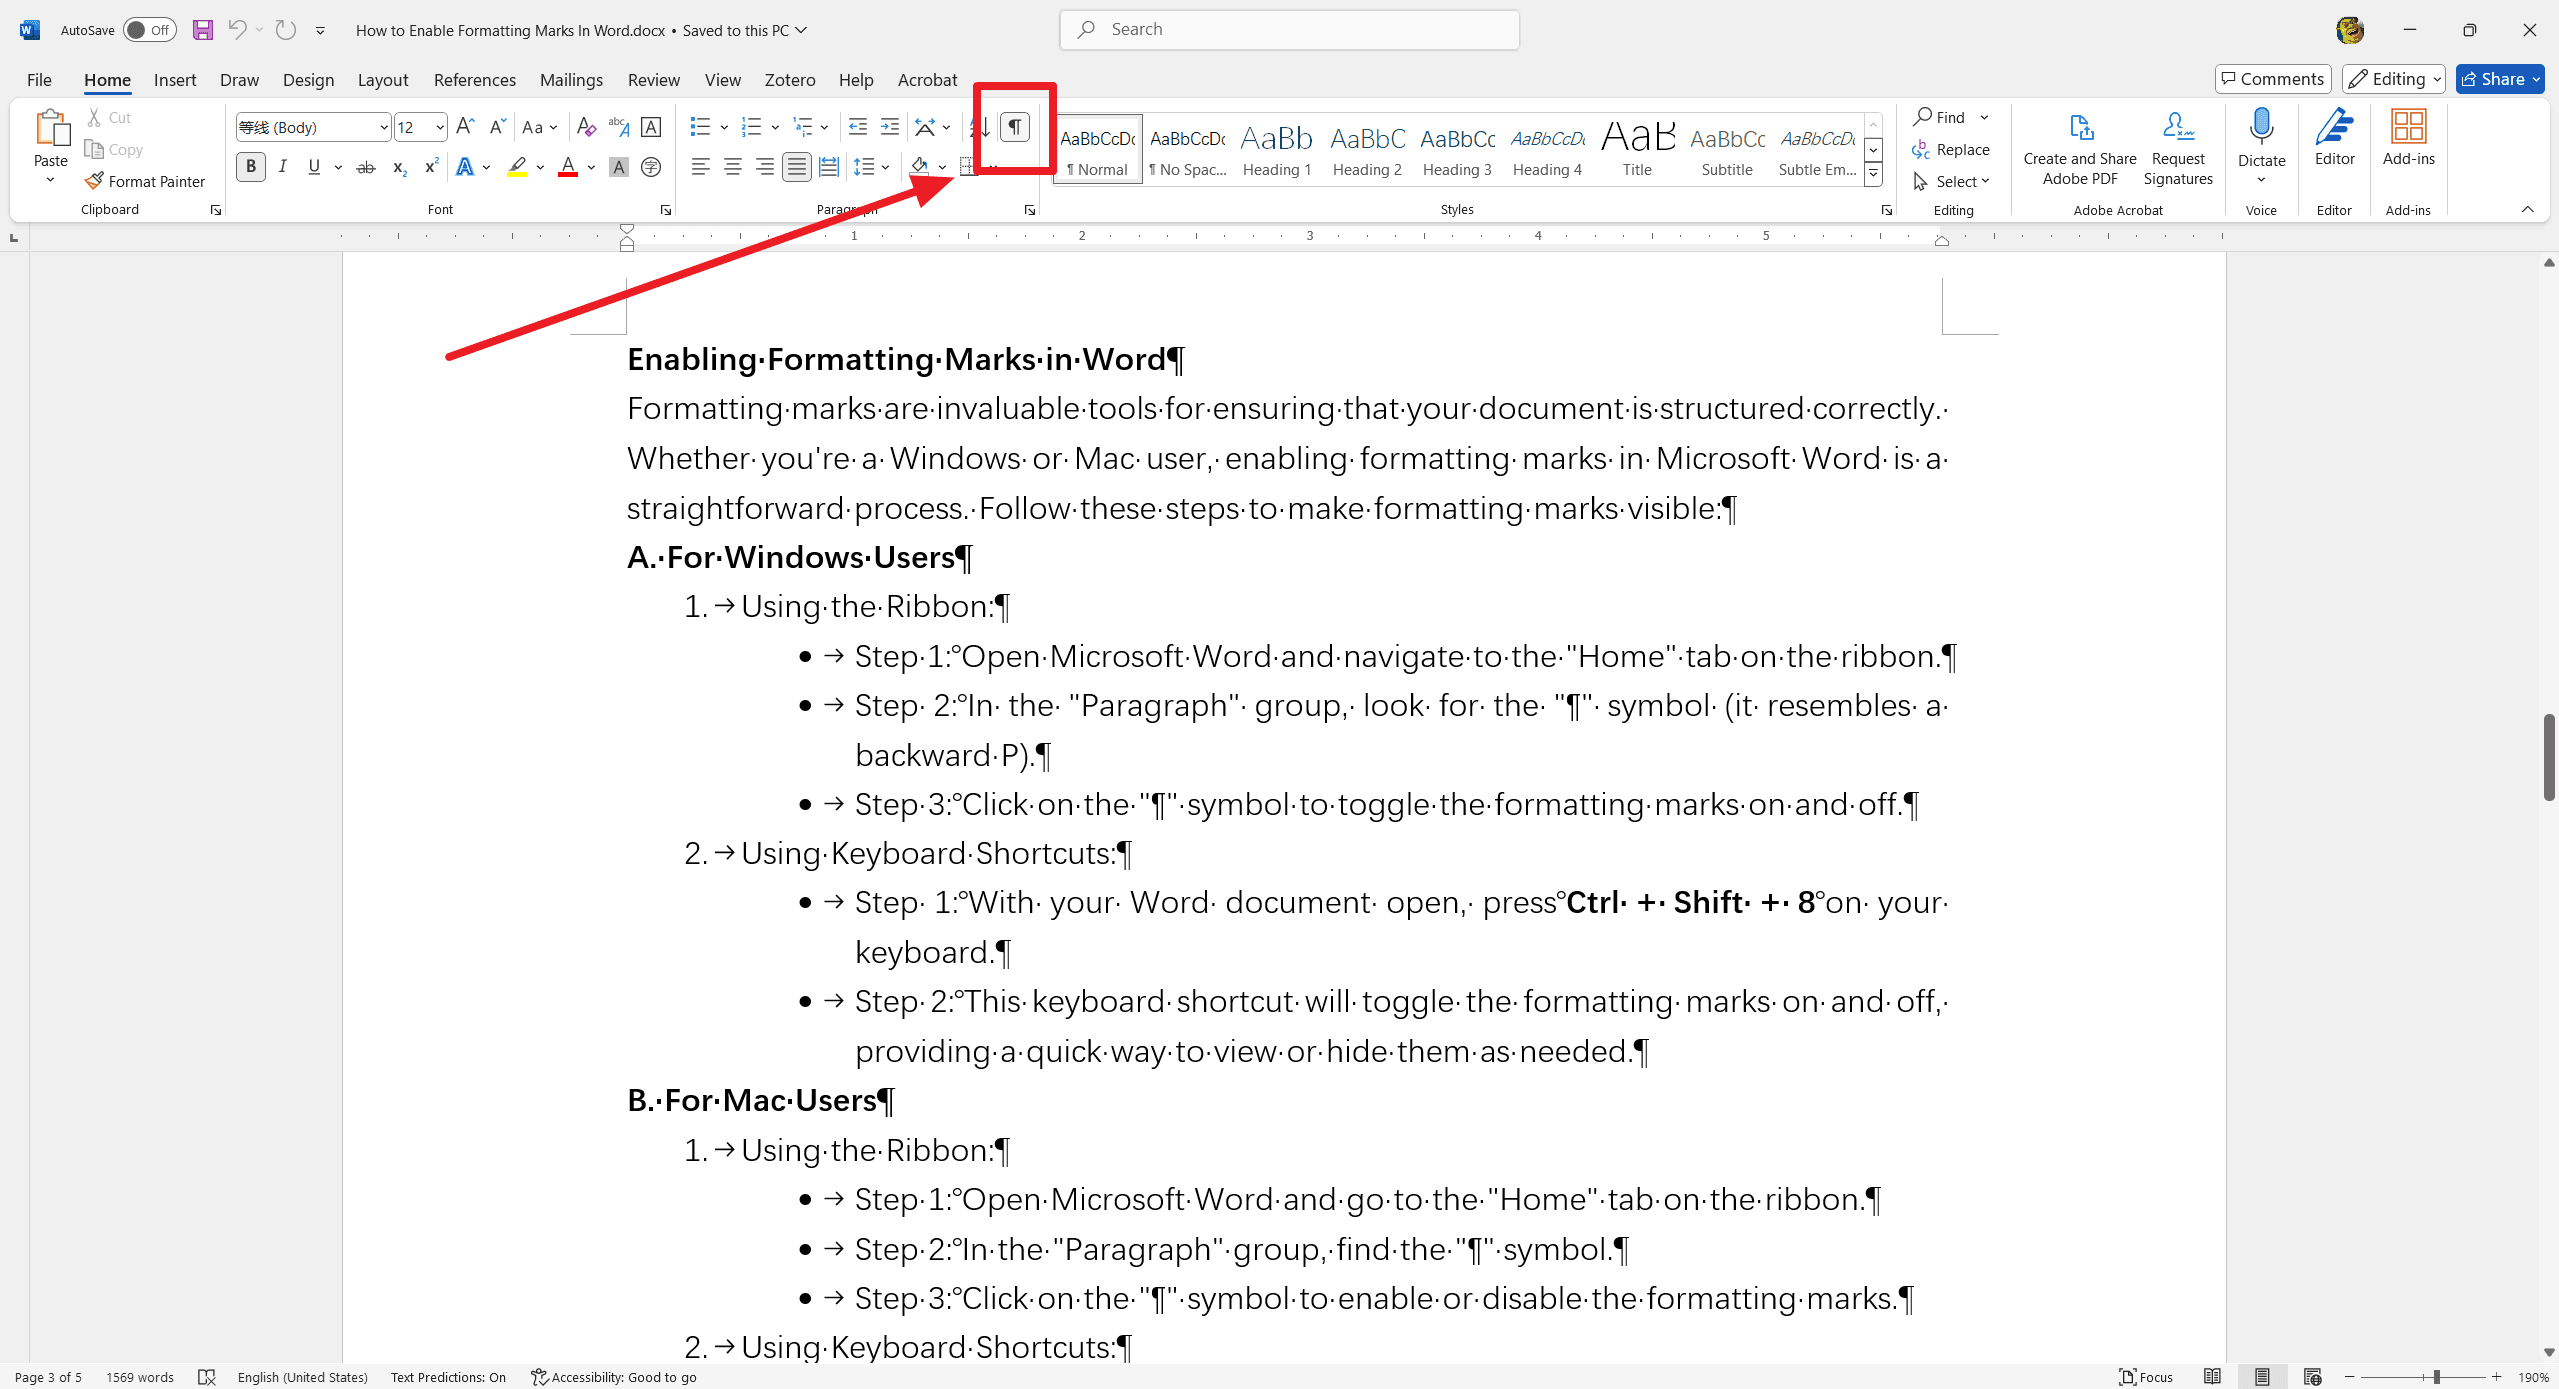
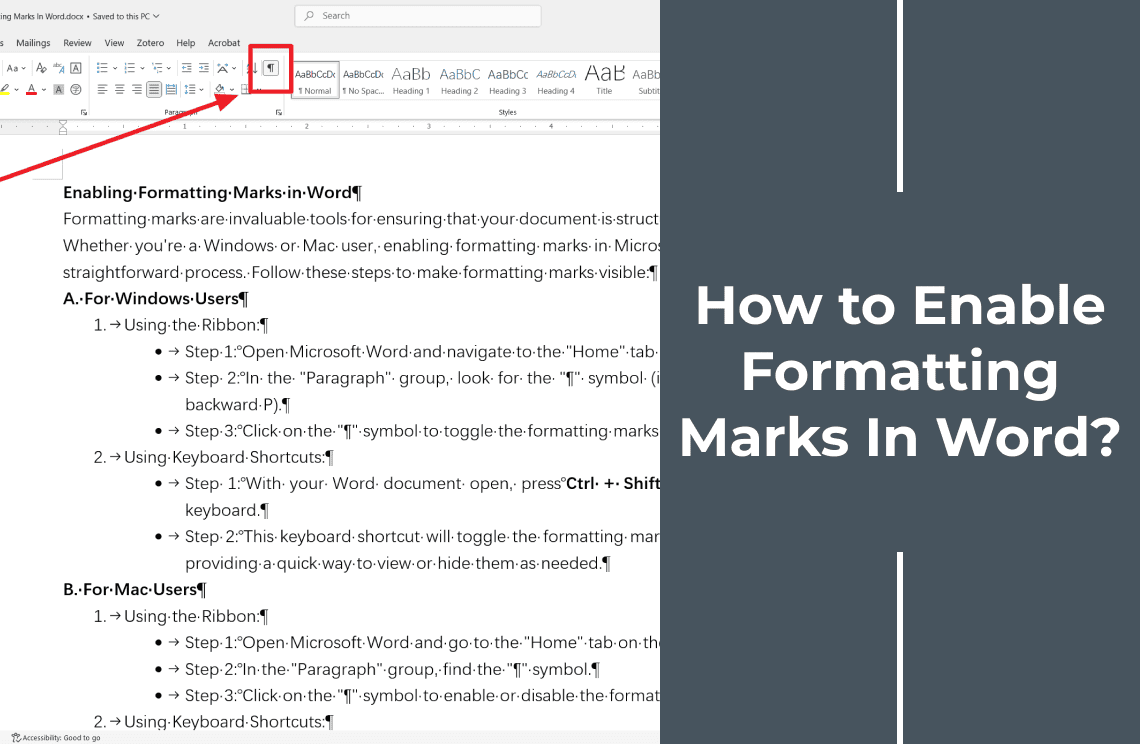
Formatting marks are invaluable tools for ensuring that your document is structured correctly. Whether you're a Windows or Mac user, enabling formatting marks in Microsoft Word is a straightforward process. Follow these steps to make formatting marks visible:
A. For Windows Users
- Using the Ribbon:
- Step 1: Open Microsoft Word and navigate to the "Home" tab on the ribbon.
- Step 2: In the "Paragraph" group, look for the "¶" symbol (it resembles a backward P).
- Step 3: Click on the "¶" symbol to toggle the formatting marks on and off.
- Using Keyboard Shortcuts:
- Step 1: With your Word document open, press Ctrl + Shift + 8 on your keyboard.
- Step 2: This keyboard shortcut will toggle the formatting marks on and off, providing a quick way to view or hide them as needed.
B. For Mac Users
- Using the Ribbon:
- Step 1: Open Microsoft Word and go to the "Home" tab on the ribbon.
- Step 2: In the "Paragraph" group, find the "¶" symbol.
- Step 3: Click on the "¶" symbol to enable or disable the formatting marks.
- Using Keyboard Shortcuts:
- Step 1: With your Word document open, press Command + 8 on your keyboard.
- Step 2: This shortcut will toggle the formatting marks on and off, allowing you to quickly switch between viewing modes.
Customizing Formatting Marks
While enabling formatting marks is straightforward, you might want to customize which marks are displayed to suit your specific needs. Customizing formatting marks can help you focus on the elements that are most relevant to your work. Here’s how you can do it:
A. Showing Specific Formatting Marks
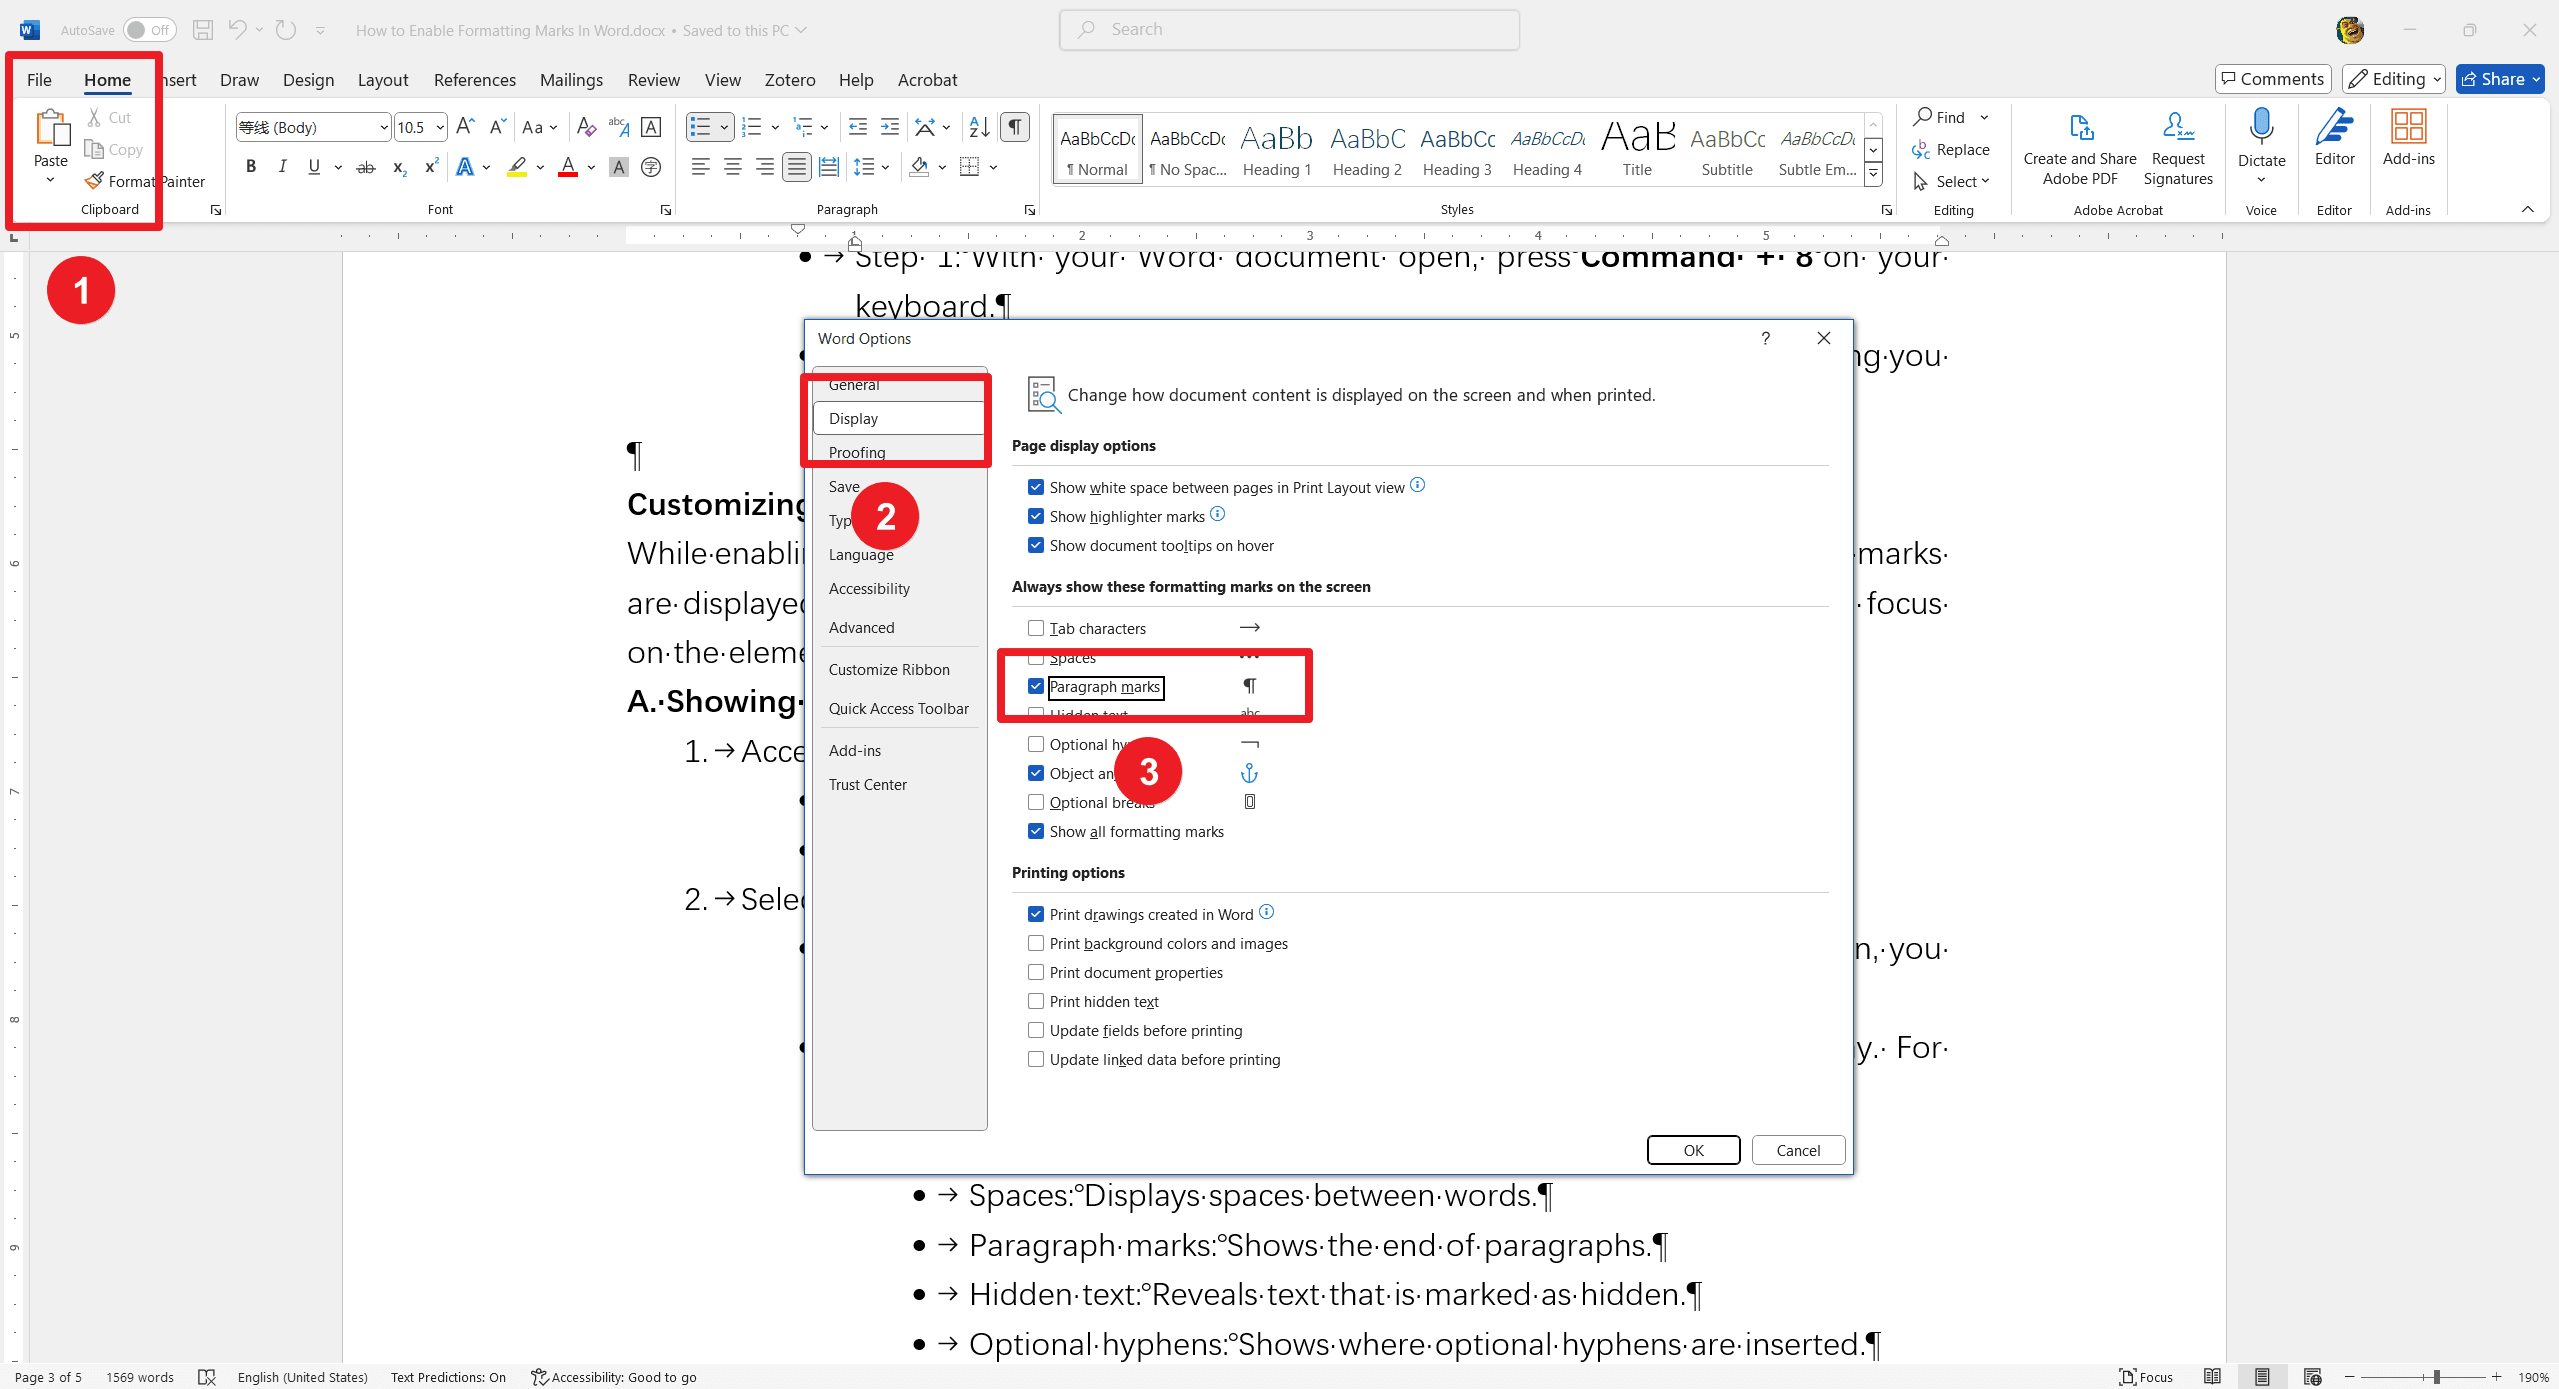
- Accessing the Options:
- Go to the "File" tab and select "Options" at the bottom of the menu.
- In the "Word Options" dialog box, select the "Display" tab.
- Selecting Formatting Marks:
- Under the "Always show these formatting marks on the screen" section, you will see a list of formatting marks.
- Check the boxes next to the formatting marks you want to display. For example:
- Tab characters: Shows where tab stops are applied.
- Spaces: Displays spaces between words.
- Paragraph marks: Shows the end of paragraphs.
- Hidden text: Reveals text that is marked as hidden.
- Optional hyphens: Shows where optional hyphens are inserted.
- Object anchors: Displays anchors for embedded objects.
- Applying the Changes:
- Click "OK" to apply your settings and close the dialog box.
B. Hiding Specific Formatting Marks
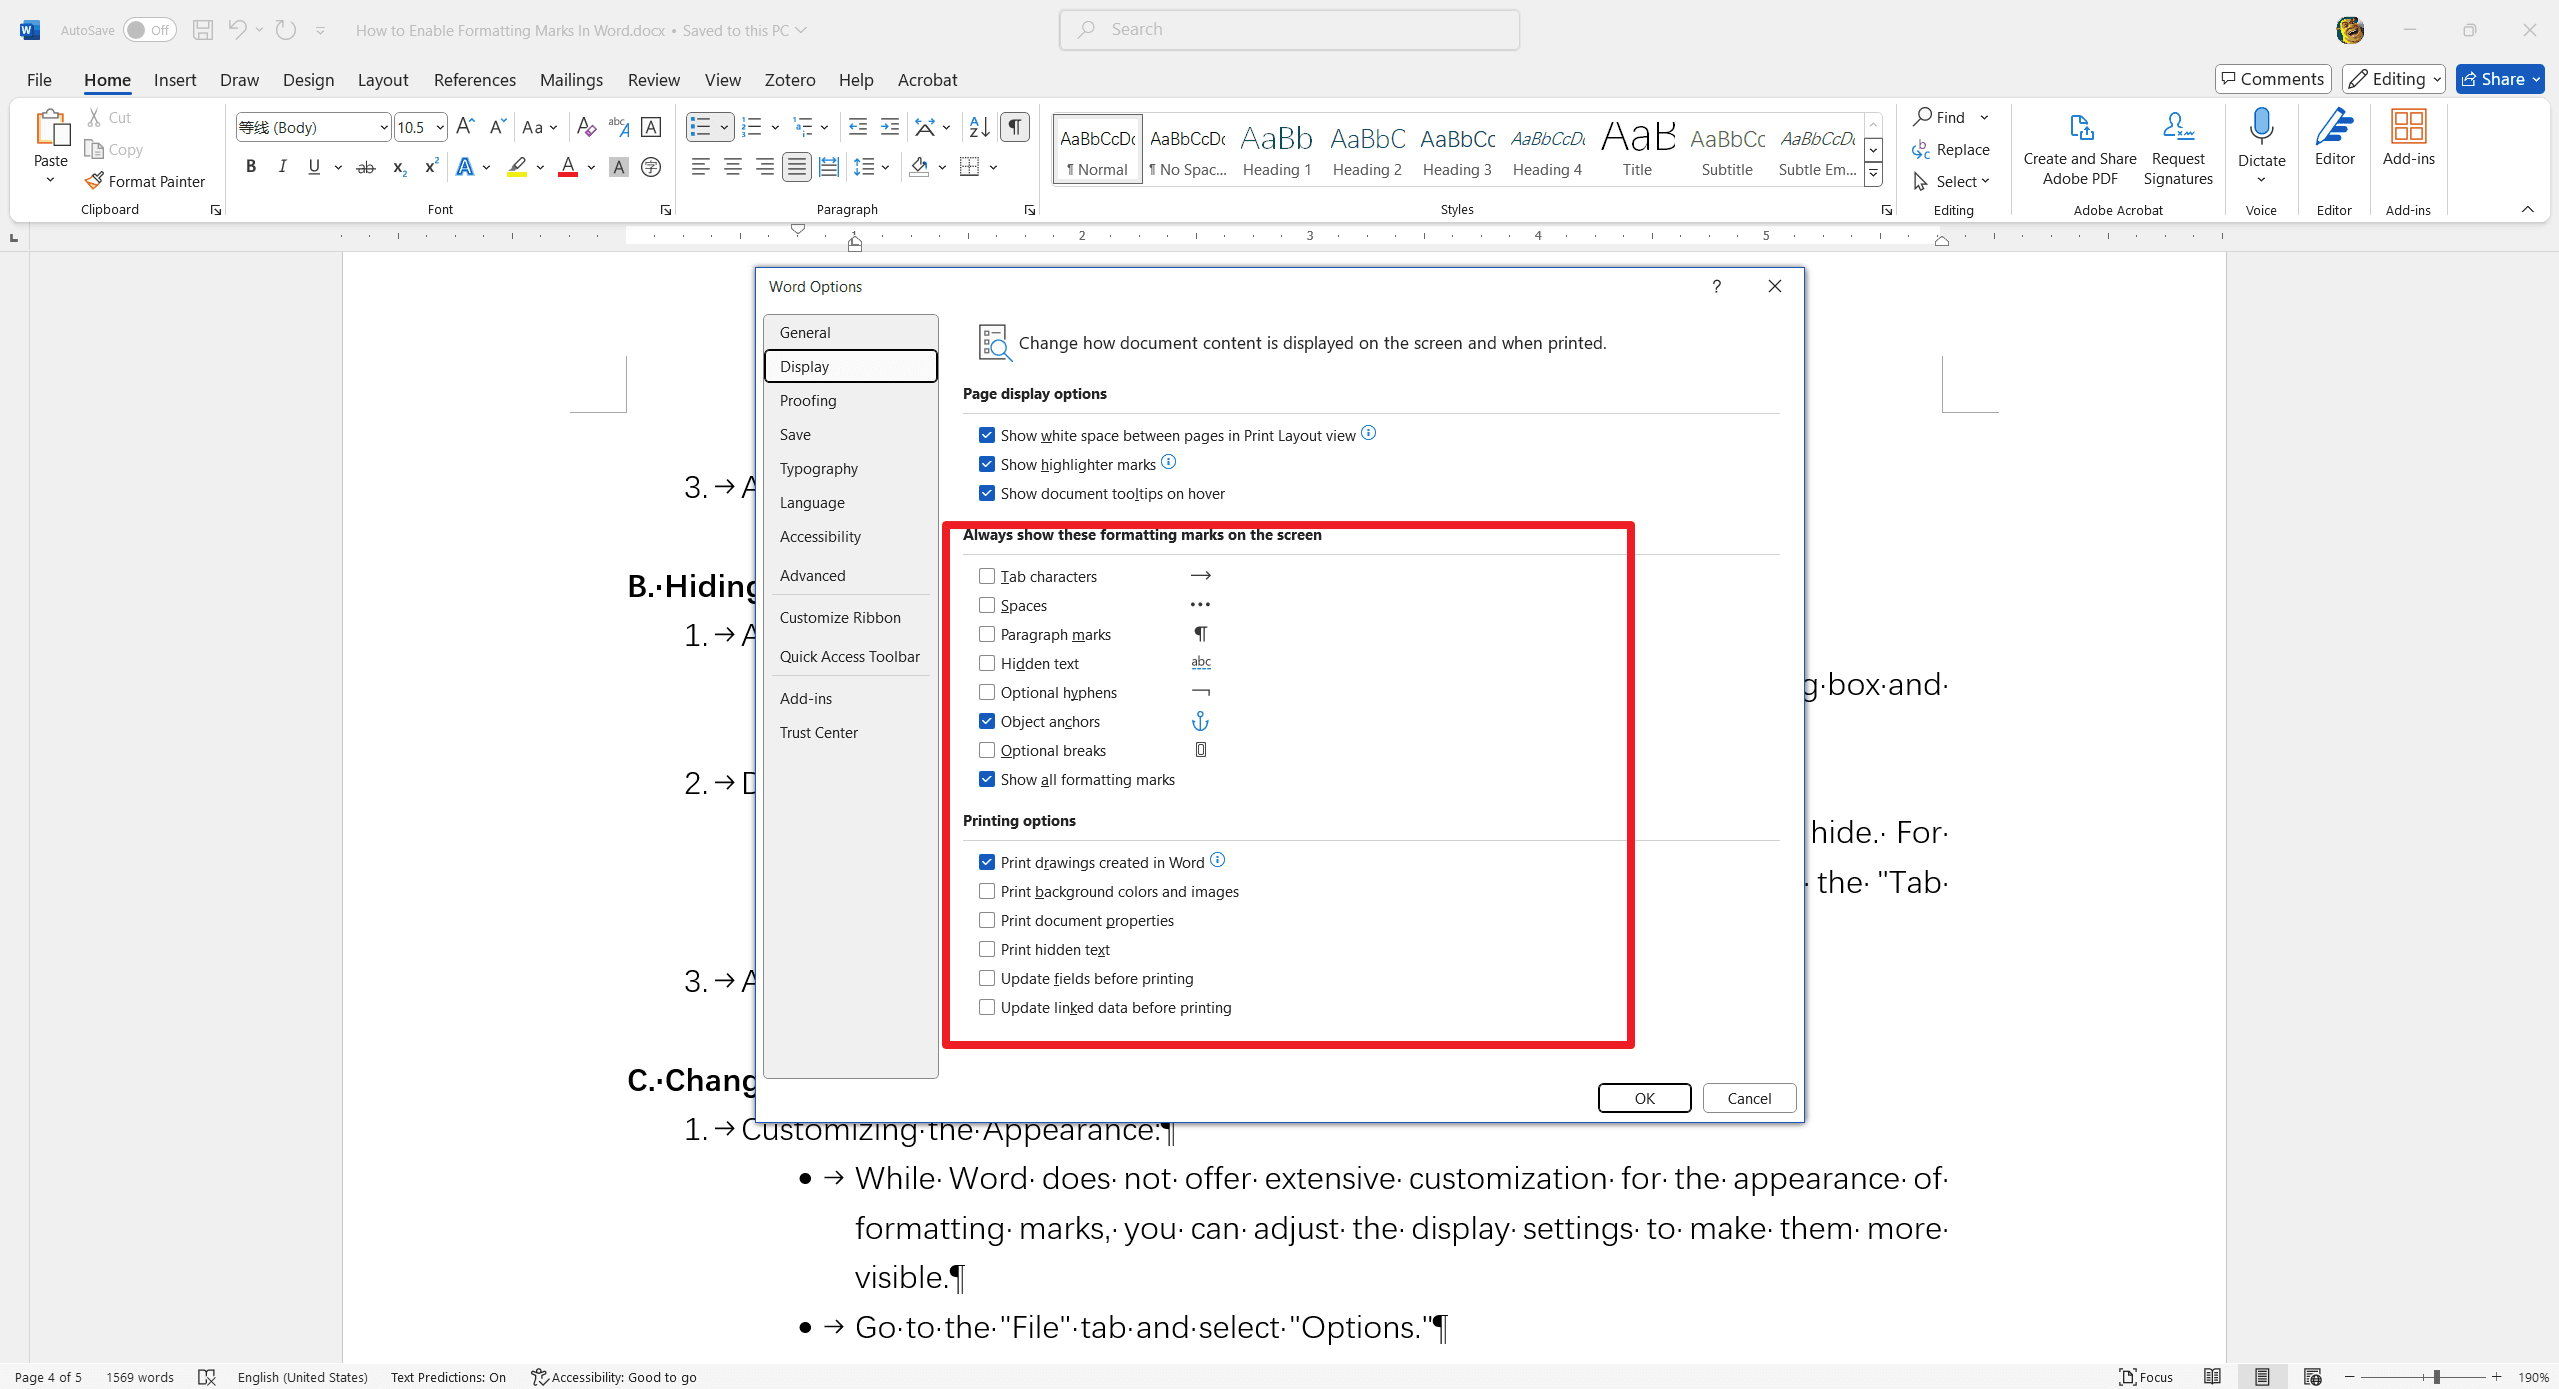
- Accessing the Options:
- Follow the same steps as above to access the "Word Options" dialog box and select the "Display" tab.
- Deselecting Formatting Marks:
- Uncheck the boxes next to the formatting marks you want to hide. For example, if you find tab characters distracting, you can uncheck the "Tab characters" box.
- Applying the Changes:
- Click "OK" to apply your settings and close the dialog box.
C. Changing the Display of Formatting Marks
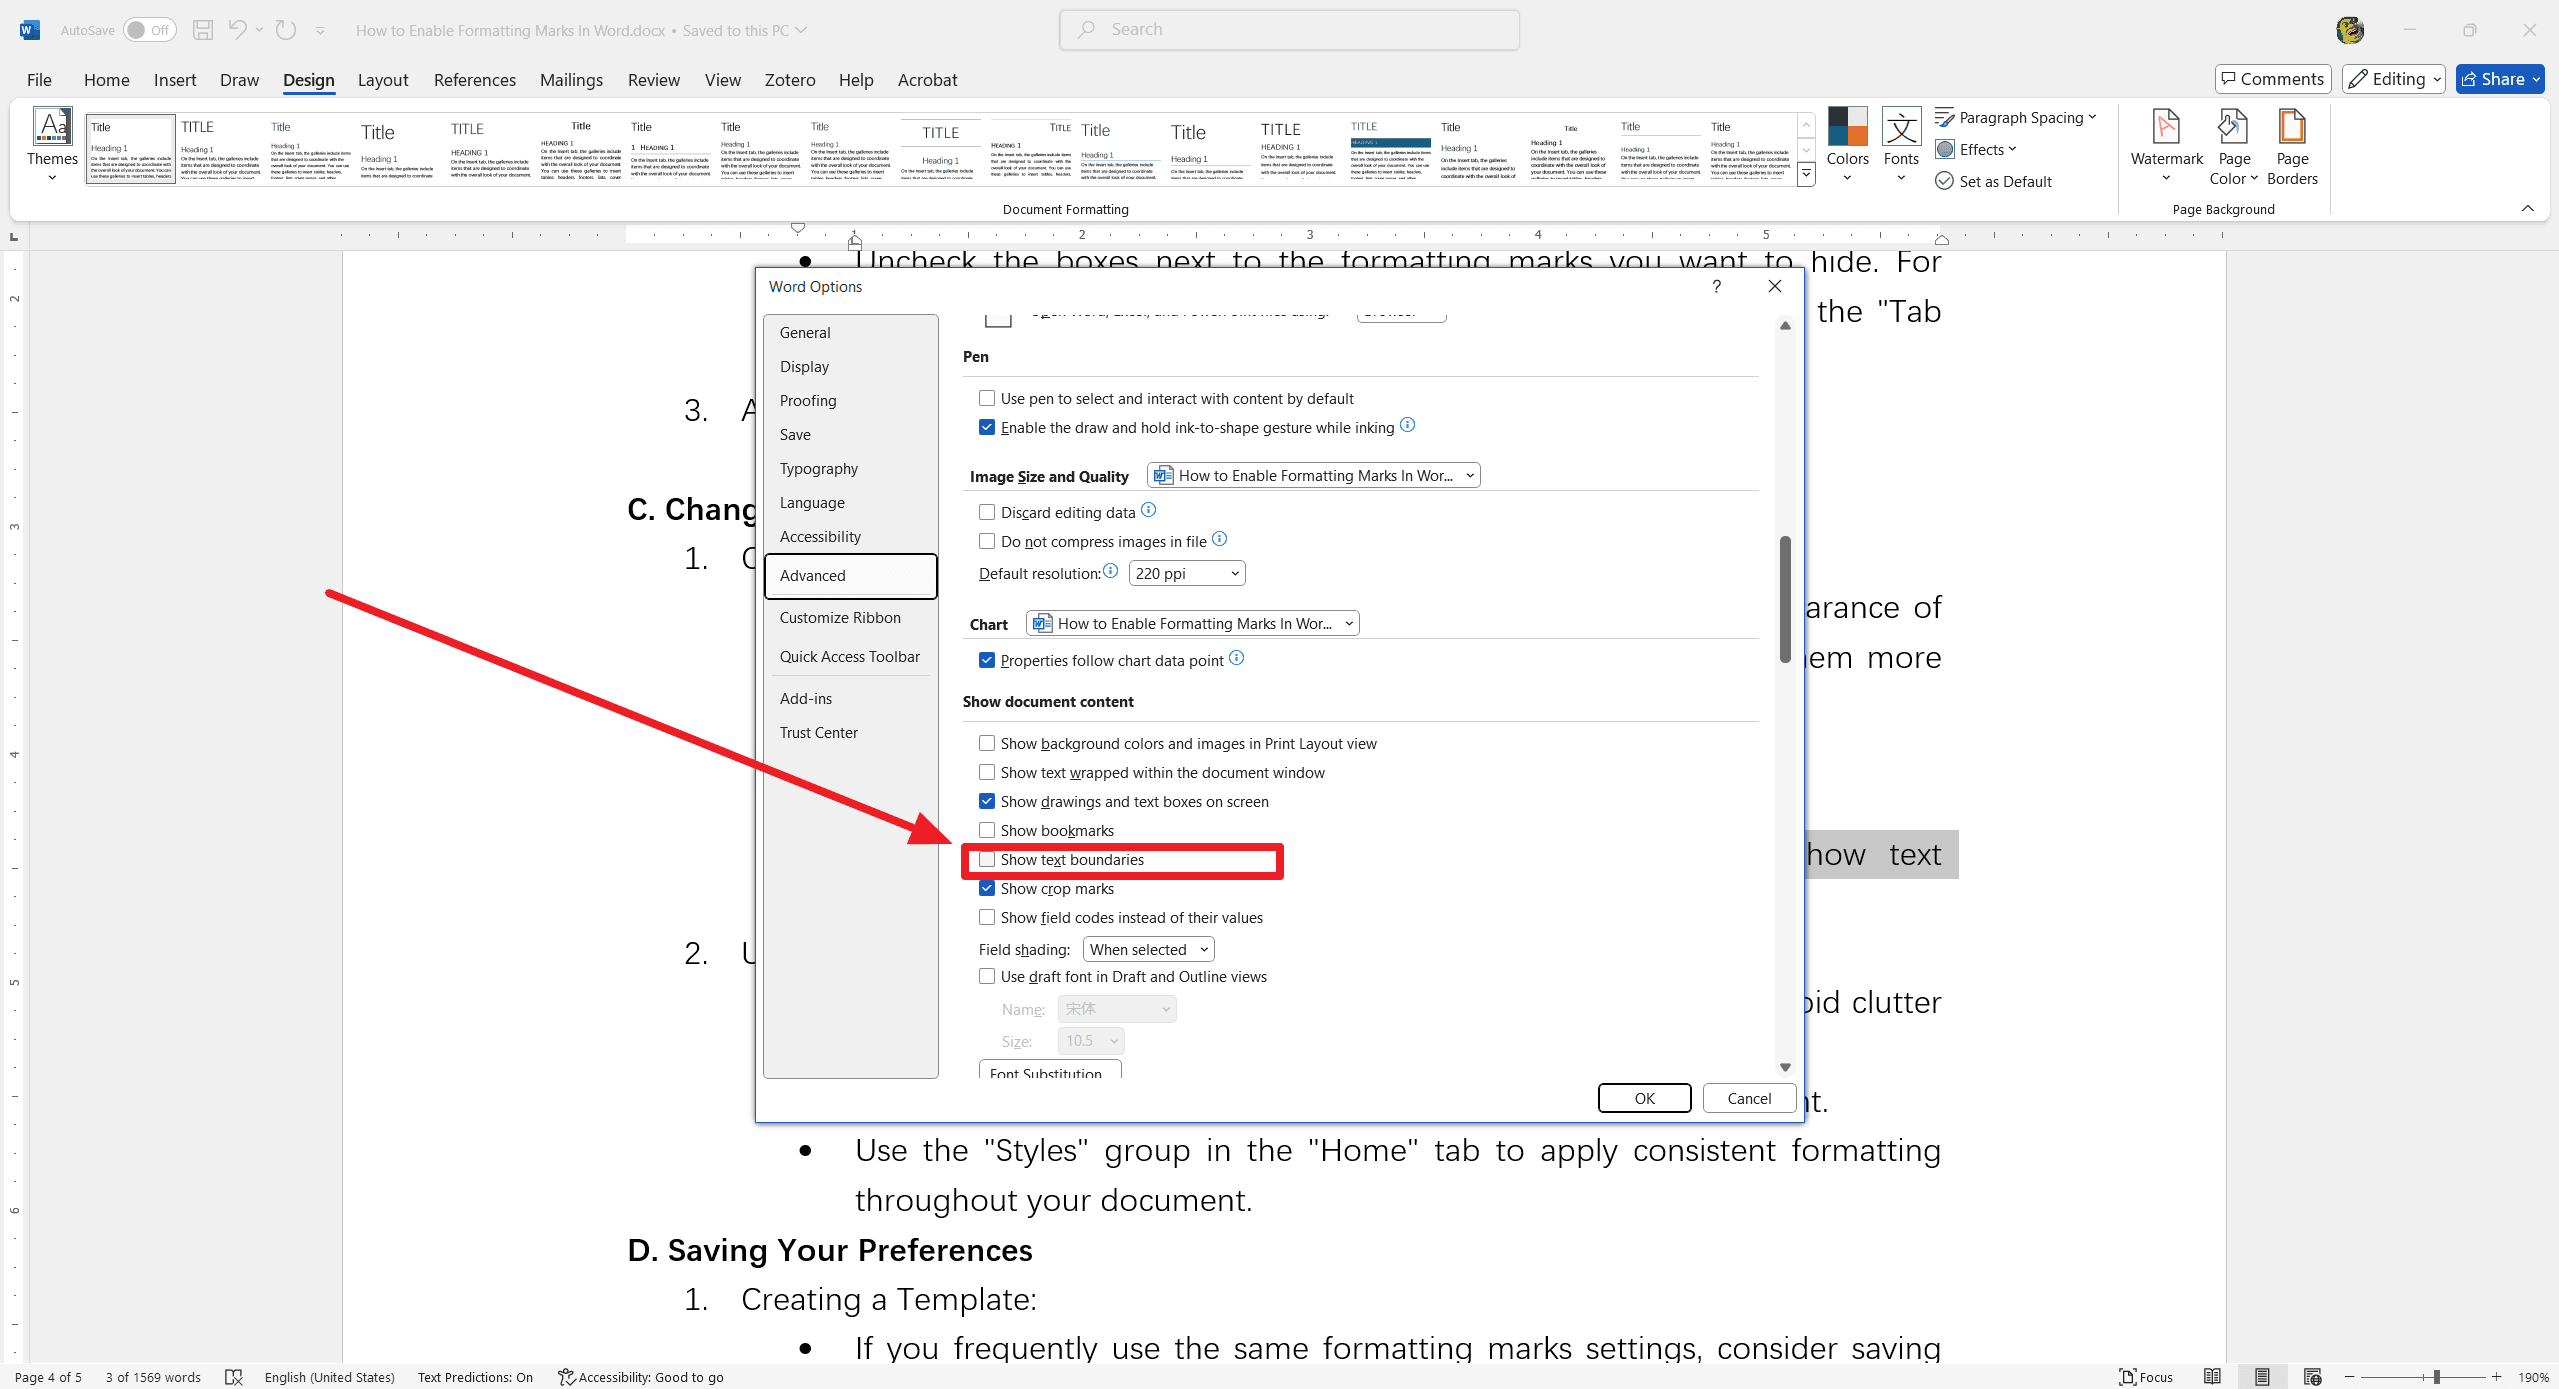
- Customizing the Appearance:
- While Word does not offer extensive customization for the appearance of formatting marks, you can adjust the display settings to make them more visible.
- Go to the "File" tab and select "Options."
- In the "Word Options" dialog box, select the "Advanced" tab.
- Under the "Display" section, you can adjust settings like "Show text boundaries" to make formatting marks more noticeable.
- Using Themes and Styles:
- Ensure that your document theme and styles are consistent to avoid clutter and make formatting marks easier to spot.
- Go to the "Design" tab and select a theme that suits your document.
- Use the "Styles" group in the "Home" tab to apply consistent formatting throughout your document.
FAQs
Q1: What are formatting marks in Word?
A: Formatting marks are symbols that represent hidden formatting elements in a Word document, such as paragraph marks, spaces, tab characters, and hidden text. They help you see the structure and layout of your document more clearly.
Q2: Why should I enable formatting marks?
A: Enabling formatting marks can help you:
- Identify and fix formatting issues.
- Ensure consistent formatting throughout your document.
- Understand the structure of your document better.
- Avoid common mistakes like extra spaces or incorrect tab usage.
Q3: How do I enable formatting marks in Word?
A: To enable formatting marks:
- For Windows: Go to the "Home" tab, and in the "Paragraph" group, click the "¶" symbol. Alternatively, press Ctrl + Shift + 8.
- For Mac: Go to the "Home" tab, and in the "Paragraph" group, click the "¶" symbol. Alternatively, press Command + 8.
Q4: Can I customize which formatting marks are displayed?
A: Yes, you can customize which formatting marks are displayed by going to the "File" tab, selecting "Options," and then navigating to the "Display" tab. Here, you can check or uncheck the boxes next to the formatting marks you want to show or hide.

